10 tips in 10 days coming up! I’ve basically been having a dough rising every day during the last years. Most often in a bowl or a box, and if not; in my thoughts. Sourdough loaves, pizza balls, burger buns, sweet cinnamon buns & breakfast rolls. Along with the coming week’s posts I will share 10 of the most valuable insights I’ve had that’s lead to more consistent result in baking high quality, beautiful goods from home (in no particular order). Would love it if you comment or DM with questions, I always do my best to answer!
So number 1, Sourdough country bread! Get your ideal dough by doing NOTHING. I’m talking about an extended 3-6+ hours flour and water only ‘autolyse’.
When baking a larger size (and heavier) piece of dough, such as a wheat based loaf of sourdough bread, the structure of the shaped dough needs to be able to hold a large portion if its own weight. This is in order to achieve a full bodied form when being baked.
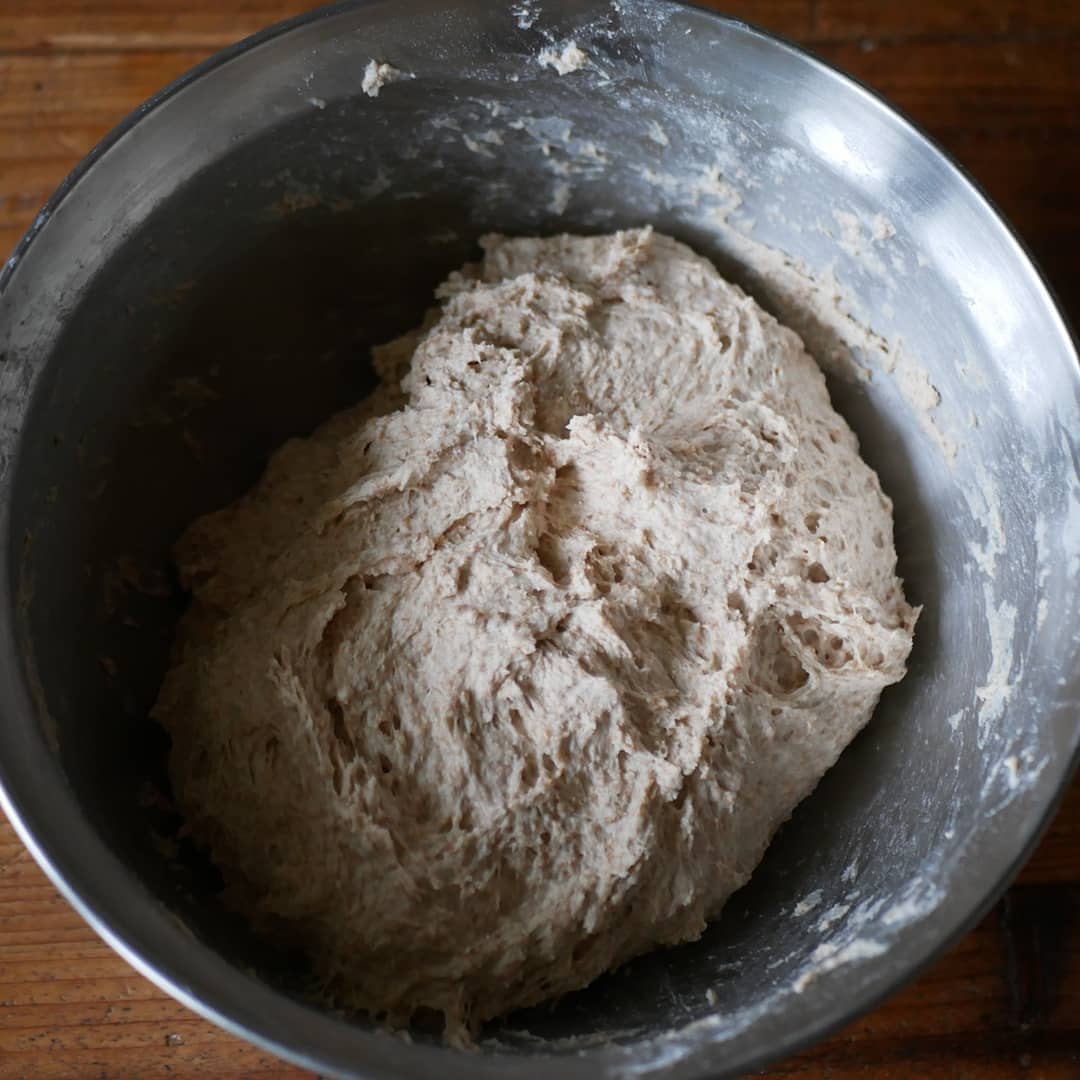
My best way to achieve this is to ensure a practically full ‘development’ of the dough in the time leading up to the final shaping. I’m achieving this consistently by letting time do its work on hand stirred flour and water, rather than relying to kneading/machines during the mixing only.
A freshly mixed dough with water and flour only.
Mixing is all about hydrating the flour. Even though you can’t see dry flour any more, it doesn’t mean the flour is hydrated to the point where the chemical processes starts going.
Relying on time first handedly has given me doughs that feels more supple, smoother and easier to handle during the folding and final shaping.
This is true to all types of wheat dough really, not just sourdough bread.
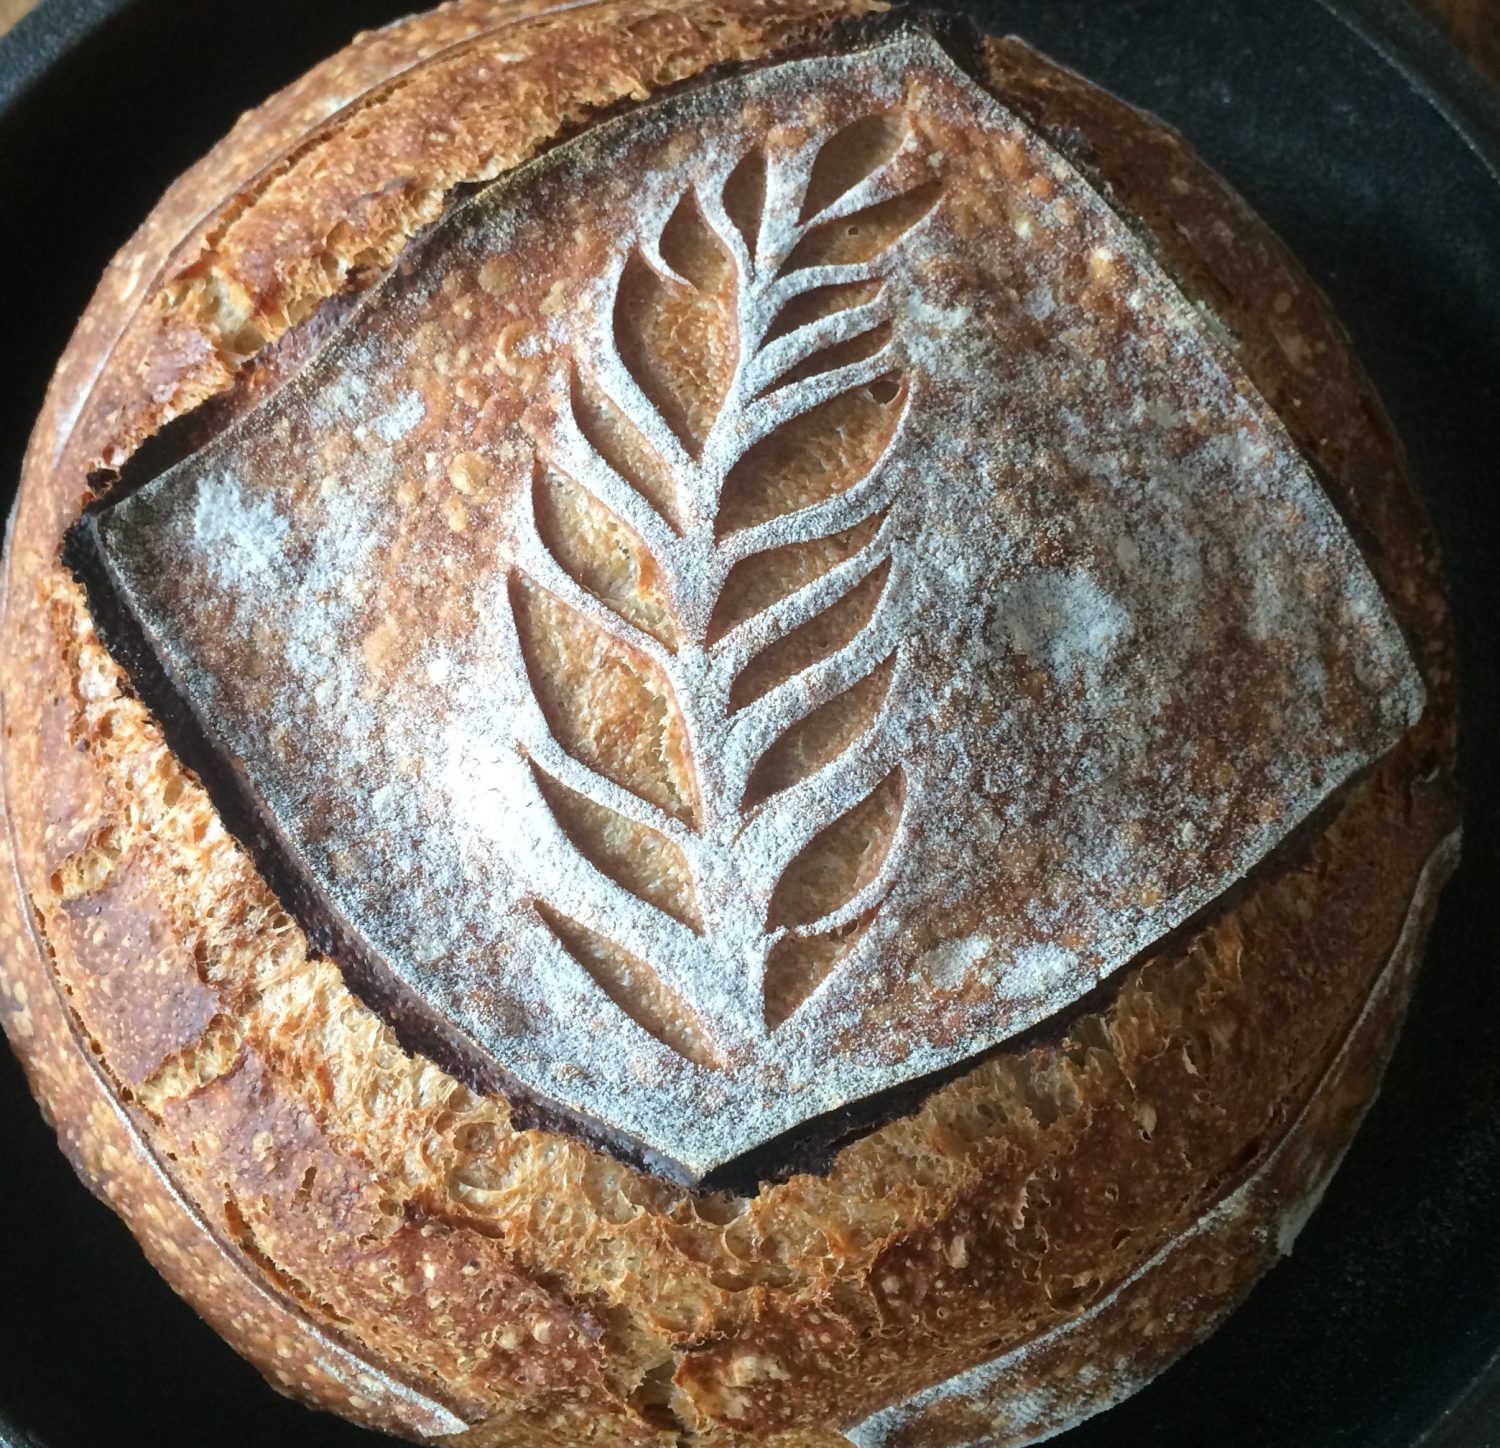
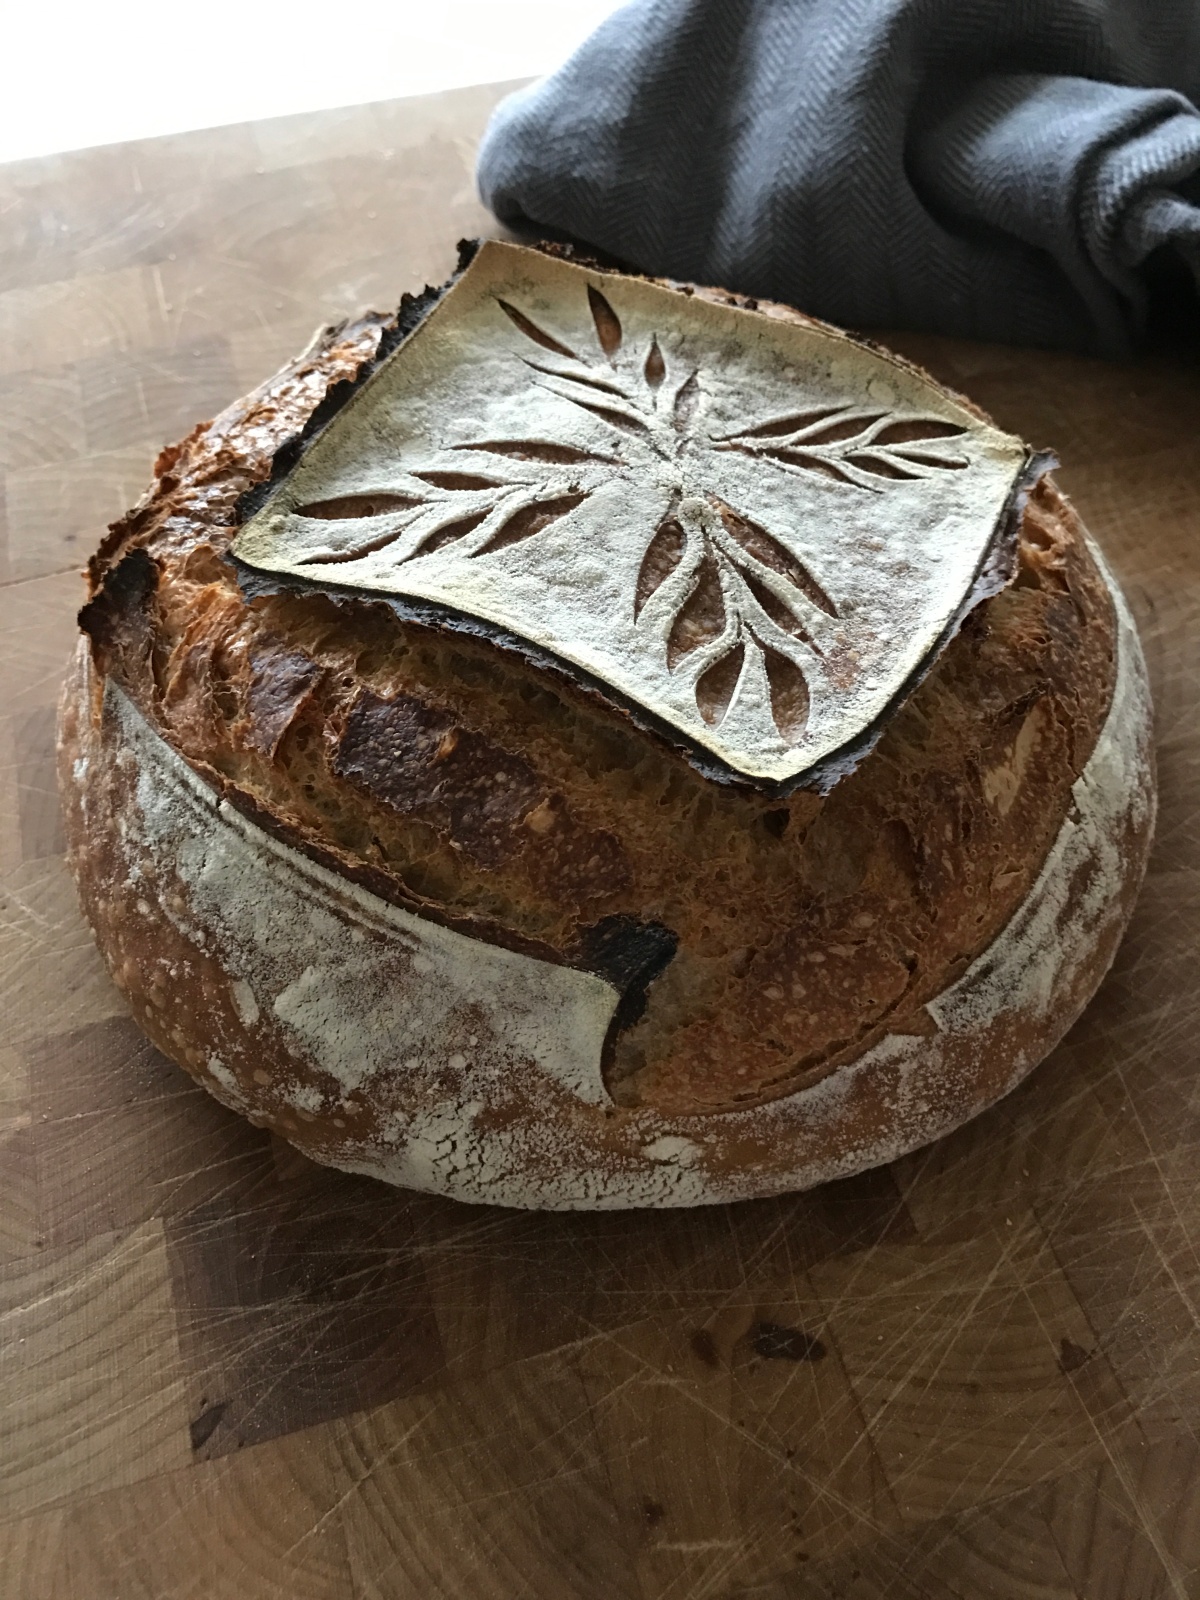
Featured in this post is today’s first test bake with regionally grown and milled organic bread flour from Limabacka Kvarn and a quarter fresh milled whole ölands wheat. Stunning result!
In this part of this guide I will get into the last variables and insights of the baking process that directly affects the visual outcome on your country style sourdough loaf. In the first part I focused on the why and the preparations leading up to THE moment. These preparations are what will affect 90% of the outcome so check it out if you haven’t. Let’s get started on the finishing touches of a process that potentially have stretched of several days.
Now before we break this down further you need to know what happens when you put well-balanced dough on a really hot surface, inside a really hot oven. During the fermentation gas pockets have formed inside the dough. These pockets have a different amount of gas depending on the flours capacity, the sourdoughs effect and how you’ve handled it during the process. When heat is applied the gas expands upwards, looking to exit the bread. The water in the dough also begins to expand and vaporize (becoming gas, pushing upwards). The gas will look for the path of least resistance. If you don’t score at all it will create cracks where the dough is at its weakest. If you do less cuts the gas will expand towards less surface and the uprising effect on the settling crust will be grater. More cuts spreads the effect.
The last variables
The determination and confidence in THE moment
The friction (swiftness)
The force, depth and angle
The added flour for contrasts
The heat, steam and timings during the bake
The determination and confidence in THE moment
Yes, it’s THE moment. That half nervous half excited trembling moment where a perfectly shaped, naked piece of dough lies before you. You need a plan to get you focused on the task. Before your loaf left the basket and before the blade touches its skin you need to have a well thought out plan, which you are determined to stick with. By the time my son started to explore crayons a year ago I started to explore scoring patterns. I often spent a good time stenciling out a loaf and practice the lines while my boy spent his time by destroying it.
Try out how the esthetics feels to you by drawing the pattern on a piece of paper and think through in what directions you plan to strike the cuts. How to flour the surface. Believe me, it makes a big difference in the end. Also, take the variables presented in the last article in mind when planning your move (under, over, strong and weak dough).
Enter THE moment with confidence and a plan to take joy from it.
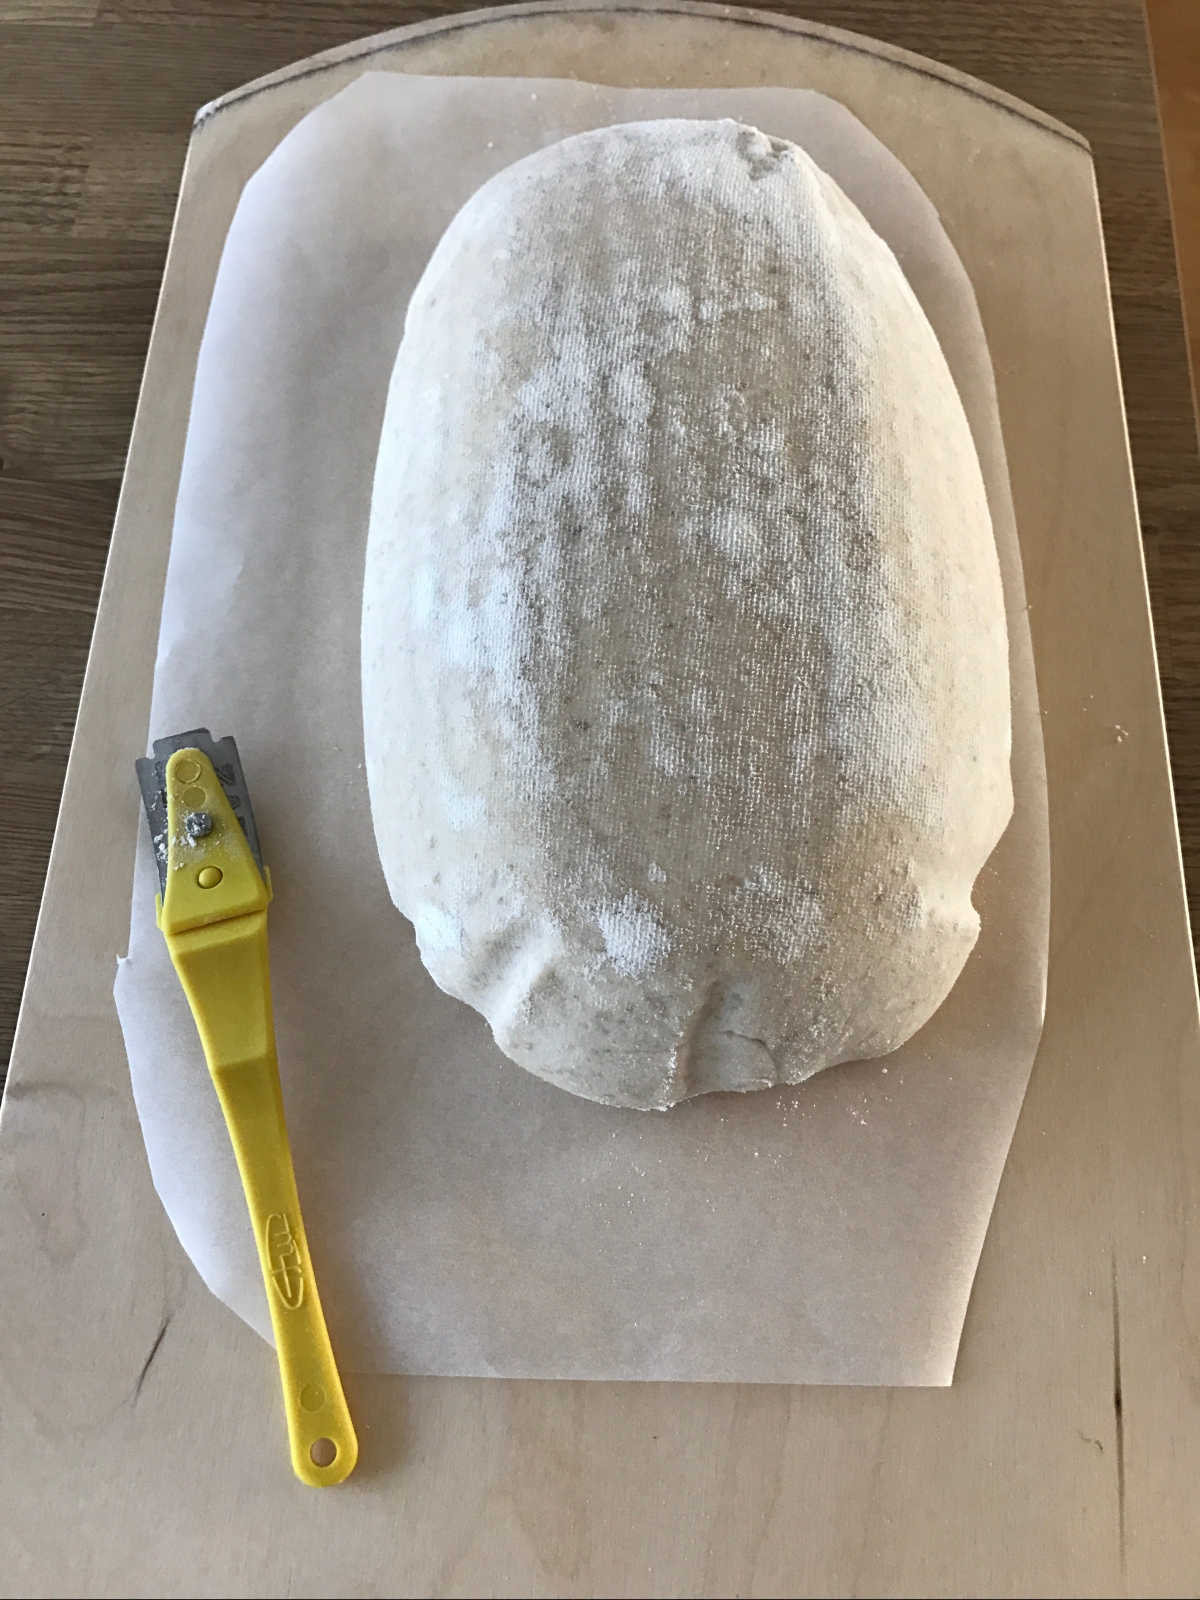
THE moment, time to put your plan into work. As you can see this dough has some flour left on it from its cold rest in a basket.
The friction (swiftness)
You want those really clean cuts right? No jagged dragged edges. The dough should not want to follow your blades direction. It should stay put and open up with clean edges.
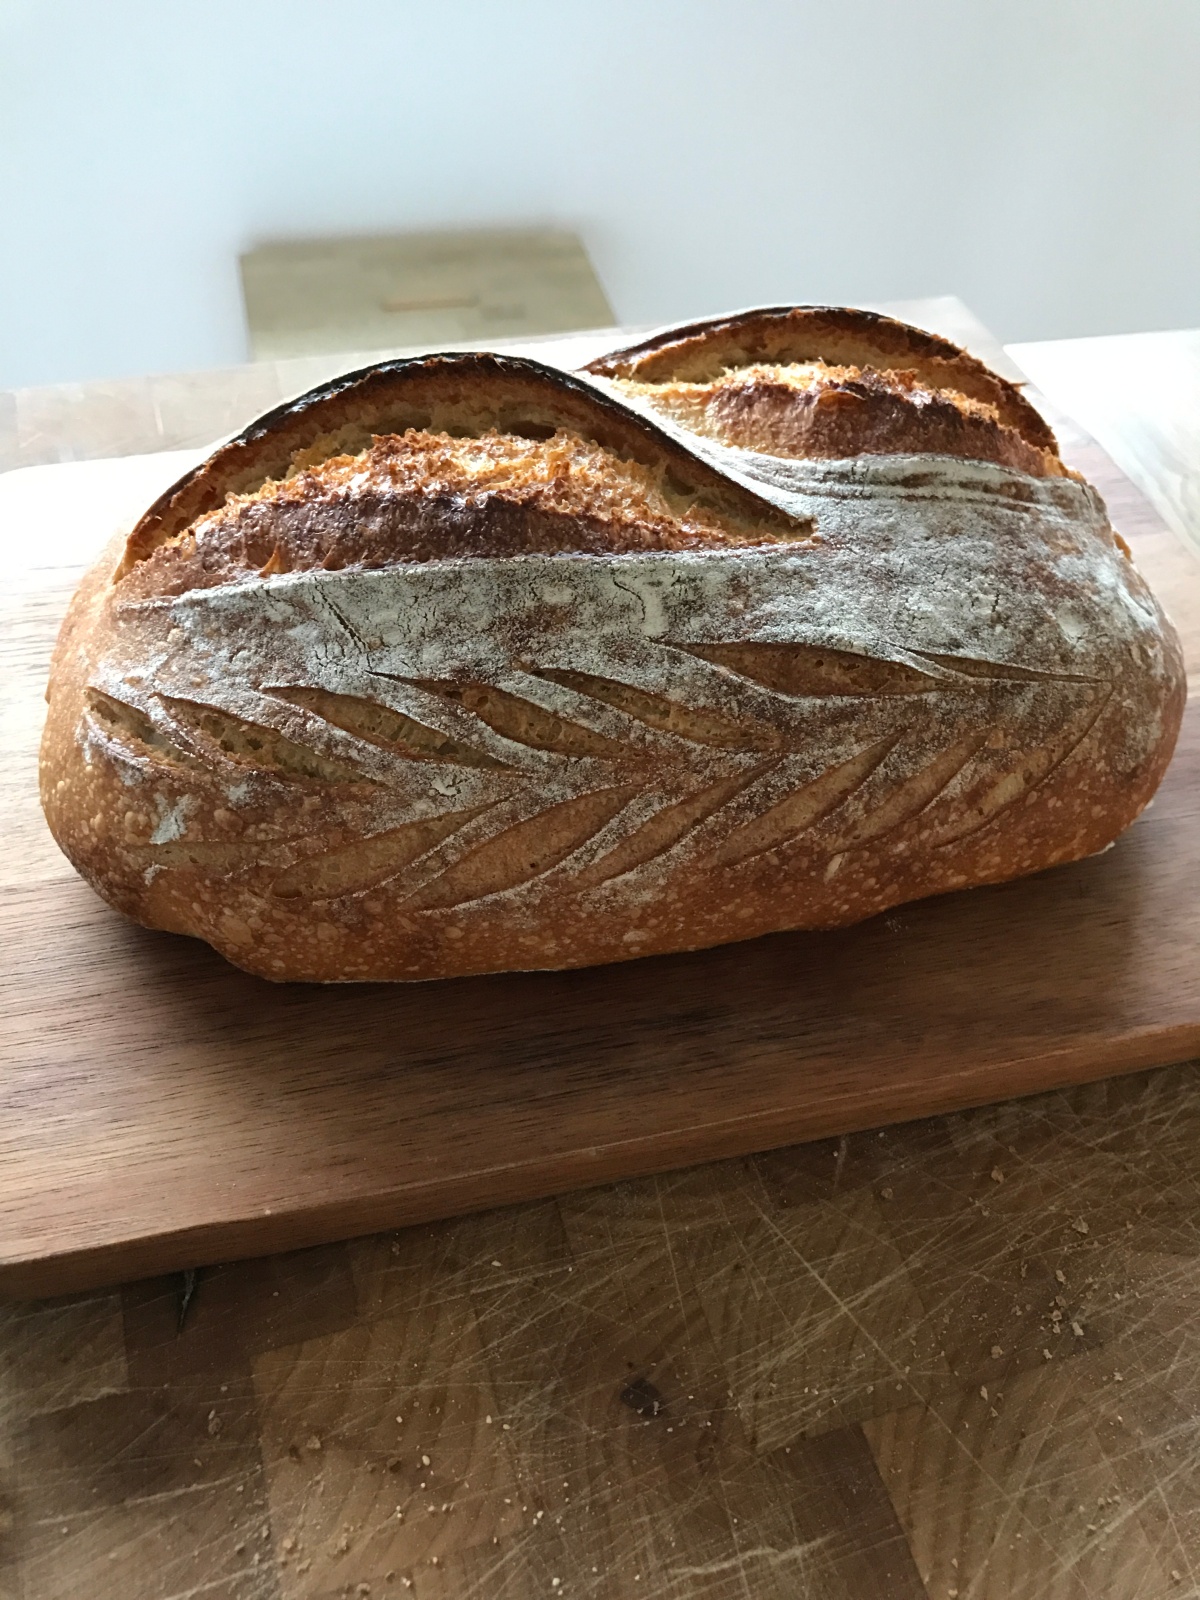
A softer surface will more easily drag with the blade (room temp proofed dough, higher hydrated dough, closed environment damp surface proofed dough). A drier, harder surface will give you less friction and cleaner cuts. Read more in the previous part about how the state of the dough affects the friction.
Keep in mind also that the longer a stickier material is in contact with another material the more likely it’ll get stuck. Swiftness is a variable because of this. Now you don’t have to draw quicker than your own shadow to create clean cuts so take it easy still. Controlled trumps quick, find the balance here.
You also want to avoid the potential touching of the blade holder (on the lame if you have one) as well. It can cause the dragging too or create patterns in the flour on the surface that you don’t want.
By dipping the blade in fine flour or rinsing it with water (you could also spray it lightly with oil) you reduce the friction from the blade as well. I usually do the first right before making the first cuts. Make sure also to treat your blades well and by well I mean rinsing only under running water, never touch the blade and let the blade touch anything other than dough.
Result of above video. A rather weak dough with a higher hydration and softer surface.
The force, depth and angle
When THE moment reaches its climax you’ve made that first cut. The force, depth and angle will affect how the gasses in the dough will expand when exposed to heat, pushing the stabilizing crust up and outwards. In the first part I gave some insight in how you can adjust the cuts to the state of the dough fermentation. In this section I’m going to assume we have a good balance in proofing and strength.
I generally prefer a clean shallow cut over a deeper. If you go too deep the tension of the dough will be undermined and the risk of unnecessary spreading increases. I’d say 2-5 millimeters are enough.
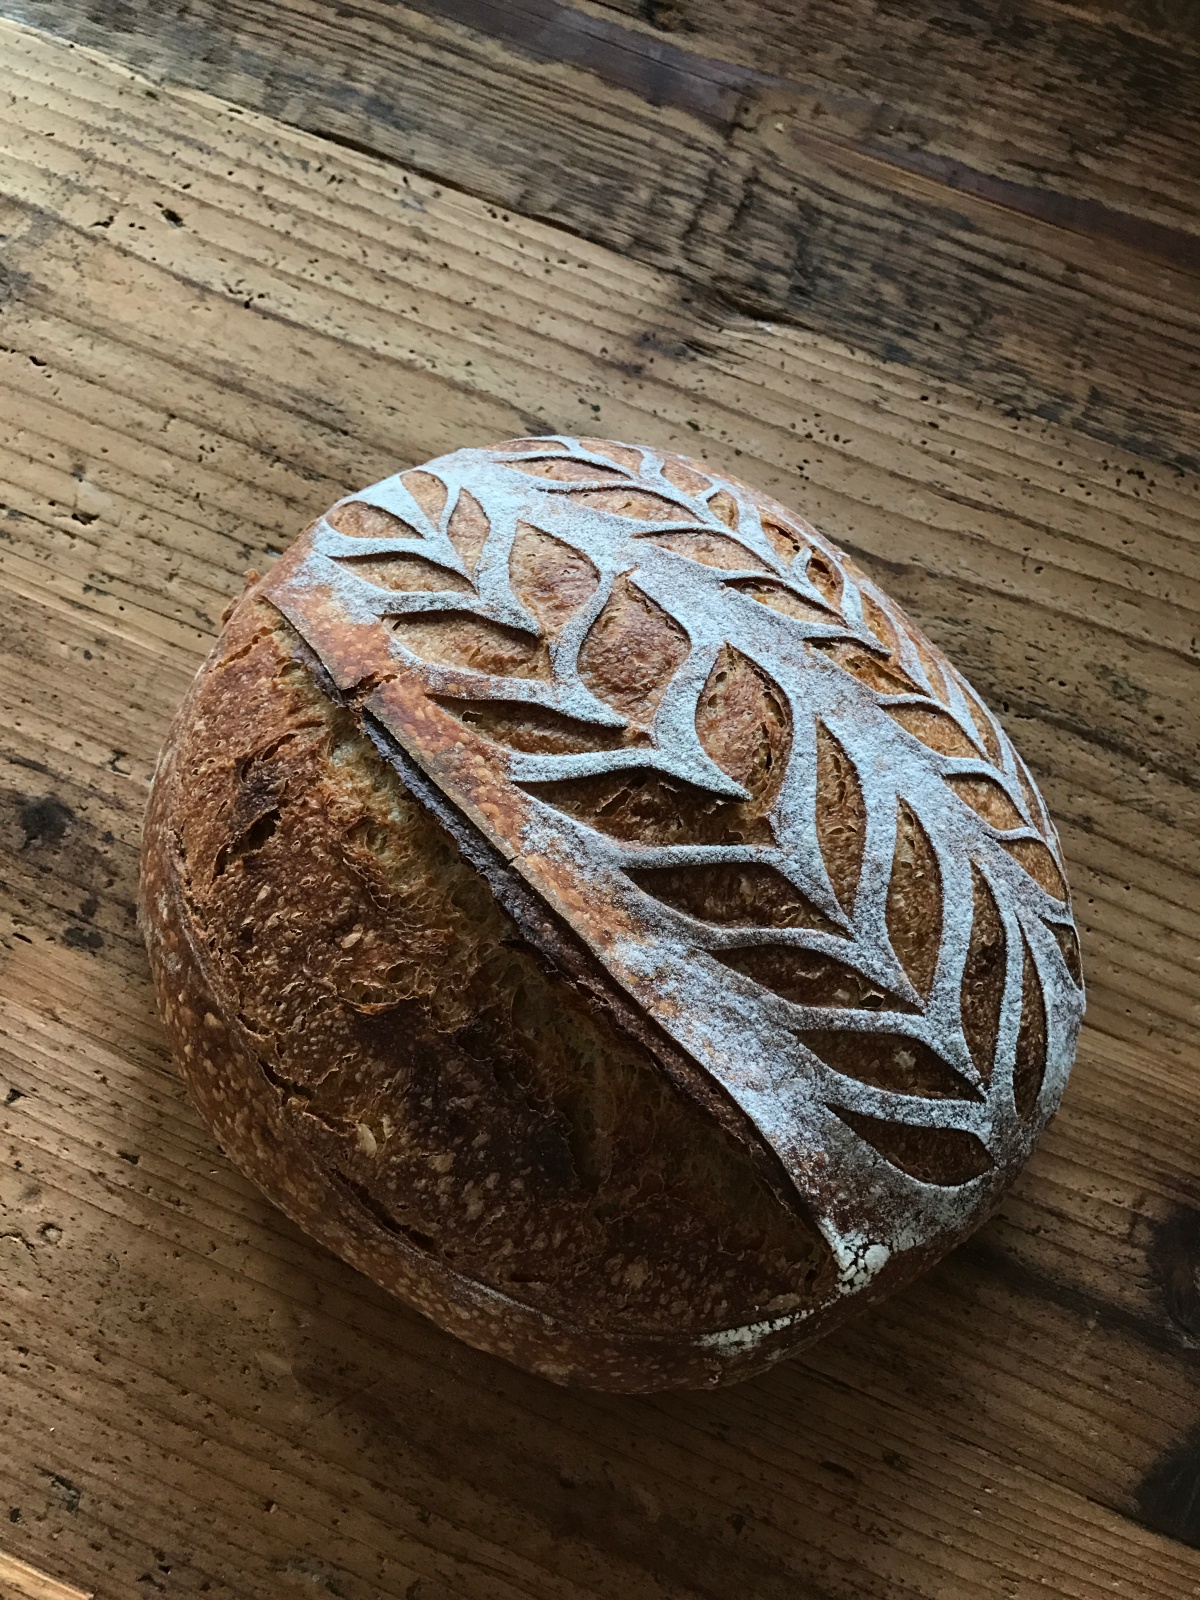
If you want one side of the longer cut to rise upwards, creating ridges in the crust (or “Ears” as they are commonly called) you need to angle the cut, creating a sort of lip under the skin. A 45 degree angle is good. A curved blade helps you achieve this lip under the skin of the dough as well. If you want ears on both sides of a longer cut you don’t angle the cut at all. The expanding surface of the dough will push the lip you’ve created upwards when baked. The cleaner and more even cut you’ve made, the cleaner “ear” you’ll get (this is also very dependent on the steaming and more, I’ll come to this later). Tension in the dough surface seems to have an effect on how the ear will rise as well. Be sure to place the dough with the seam centered upwards when put in a basket and try to created an even tension without breaking the skin during the shaping phase.
Giving the blade a 45 degree angle while maintaining control, getting even depth and force is a lot harder than it looks. I’ve been absolutely certain I’ve given it an angle but in video review it shows I angle it back just as the cut is performed. The trick here is to angle the wrist and lock it, using the elbow as direction. Do not rely on your fingers angling. Your muscle memory will force you into a straighter line, such as you’ve been doing all your life when slicing something or drawing something. Lock in, hold on, trust your elbow, go for it and keep the other hand away.
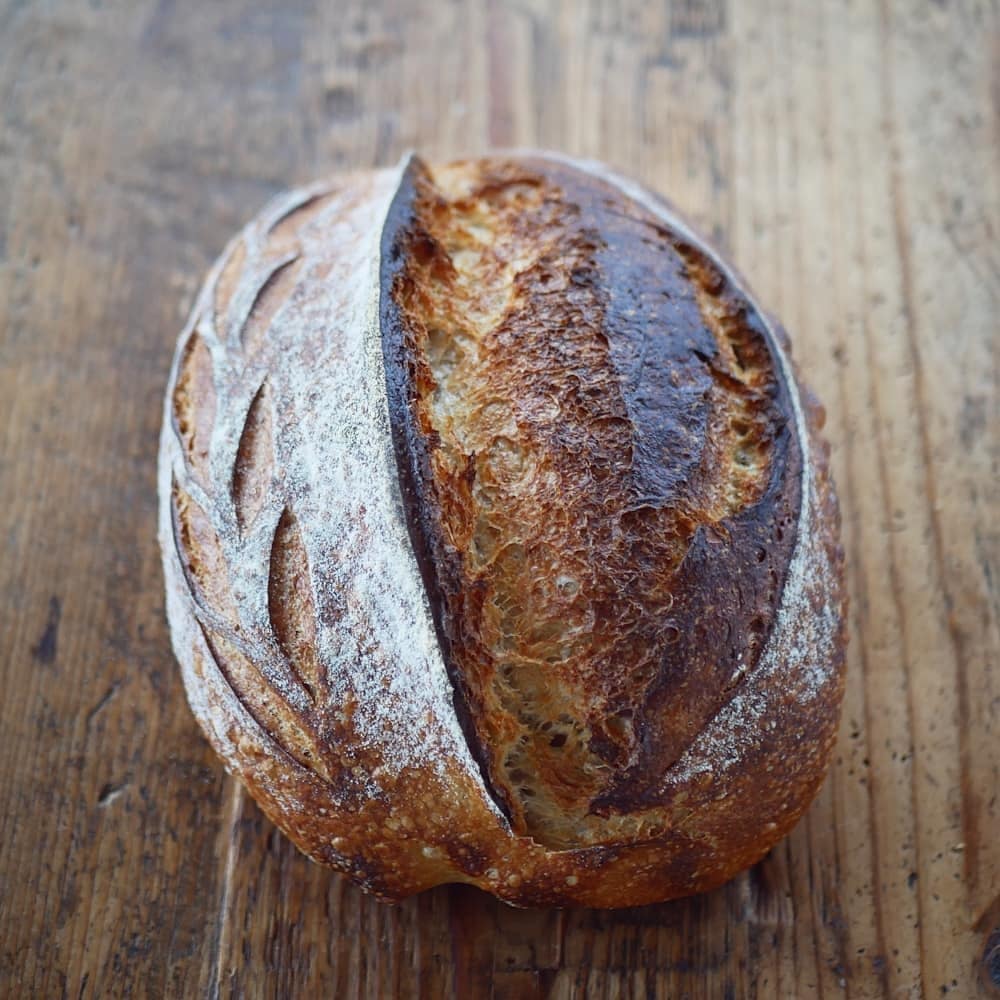
The Double Ear cut. This was a medium hydrated dough that was relatively strong. You can see in the video that my wrist was angled when the vertical cuts were laid.
The added flour for contrasts
There are some choices to be made regarding contrasts before using the blade. How much flour to use if any, what type of flour and where to apply it on the loaf. Each choice will result in a different result.
I tend to use relatively little flour before putting the shaped dough in the basket for the final proofing. I never dust the cloth in the basket, only the loaf itself. Most of the flour will be absorbed in the dough and the cloth during the long retard leaving me with more choices before the bake.
I most often go with rice flour when choosing to flour the surface. It has a higher tolerance for heat and takes longer time to get burnt. I could also use regular sifted wheat if I’m looking for that rustic burnt look.
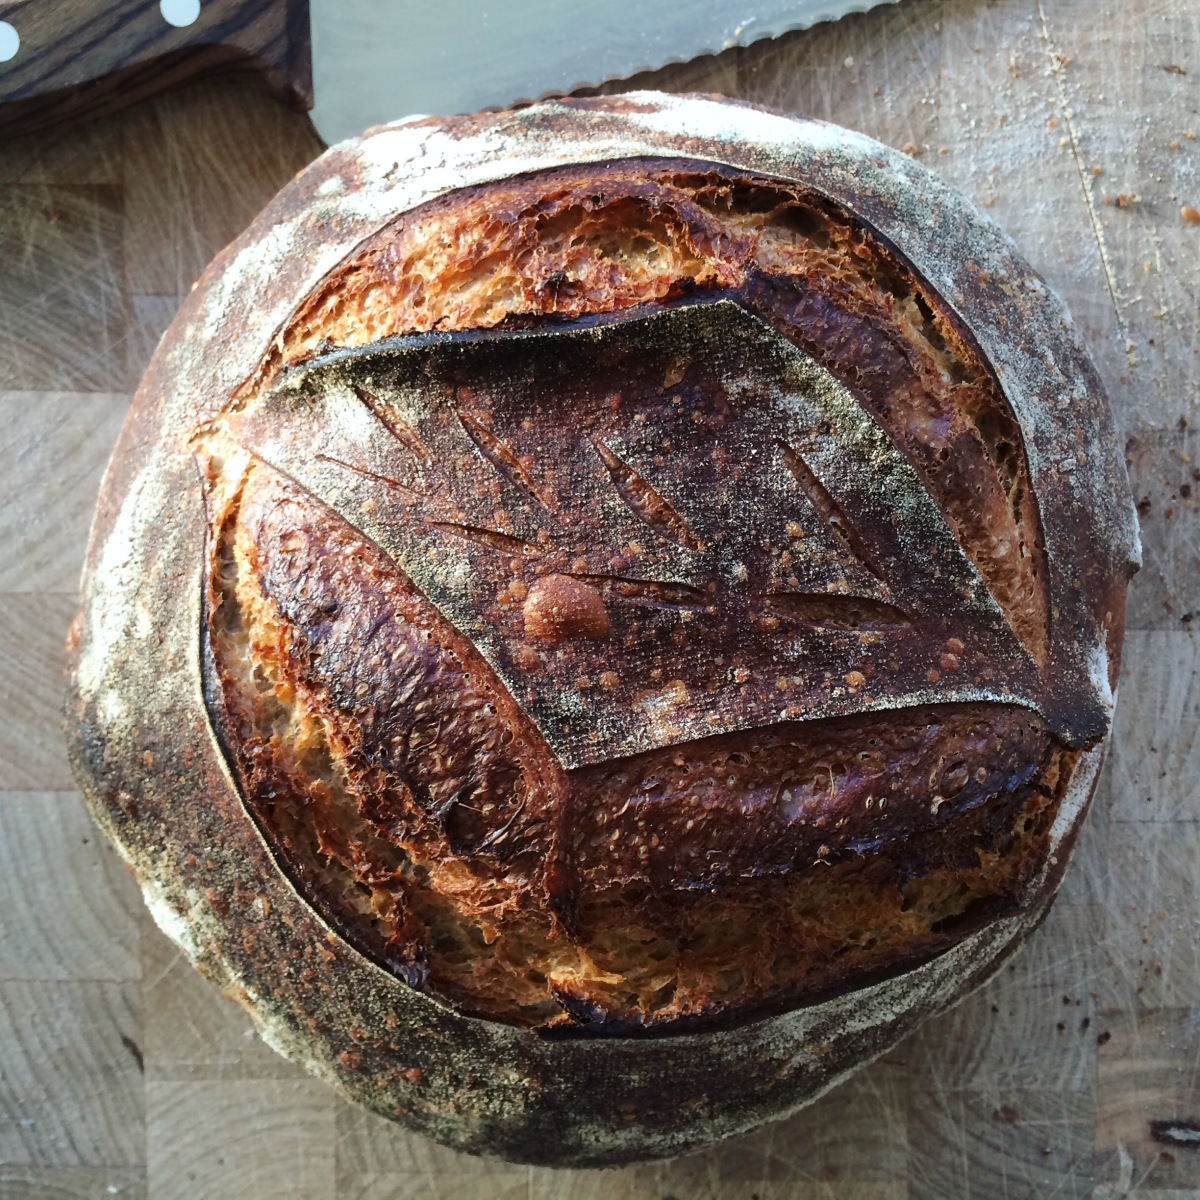
If I’m going for a straight or double cut with ears I tend to not flour at all. I think the shifting colors in the crust is a thing of beauty itself, with the blistering from the dampness in the dough reacting with the extreme heat.
If I want to add a more artistic touch to the end result I apply flour to the areas where I want a distinct effect, creating contrasts between the cuts that have opened up and the white flour. I normally use a tea dispenser filled with flour and shake it to create an even layer. If I suspect it’s unevenly spread I could also rub the surface with my hand to adjust. The video below will show you the general method.
Result of above video. The contrasts in on this crust is magic! Without the flour the lines wouldn’t appear as distinct.
The heat, steam and timings during the bake
In a home environment you have some options when it comes to transfer heat effectively to the dough, making it rise to its max potential before the dough settles which happens when it reaches a certain degree. This is why it’s important to shock the dough with a higher heat, making the gases expand rapidly. You want to keep the skin of the dough flexible and damp so it wont tear during the rise or hinder the rising by settling too quick.
I’ve realized exposure to steam is vital to the development of the colors in the crust too. The longer I expose it to steam the better variations of colors in the crust I seem to get. You see, the remaining sugars in the dough will caramelize through the same Maillard reaction that happens when frying or grilling meat for example.That’s why the crust with a character is so tasty. A crust on an over proofed loaf (where less sugar is present since the yeasts have eaten most of it) will have less variations of color and won’t taste as good.
I use two different mediums to transfer heat and just as many to make hot steam take care of the skin. Either the so-called Dutch Oven or the baking stone with added steam.
The Dutch oven is a pre heated (1 hour) pot in which you’ve put the dough. By putting the lid on you will trap the steam that the dough generates when temperatures rise. The dough will take a steam bath in its own steam! It can prove difficult to transfer and score a dough in a deep pot so I’ve started using a Lodge cast iron Combo Cooker. It has a skillet that serves as a bottom and a deeper pot that serves as a lid, trapping the steam. An easy way to bake with consistent steaming results! I only use it for round loafs (Boules) since its diameter is around 24cm, limiting what oval loafs/batards I can use it for. I bake
The baking stone can be either ceramic or granite. I usually pre heat my ceramic stone (placed in the middle of the oven) for at least 2 hours at maximum temperature, otherwise the heat transfer will be too slow. I nowadays bake all my oval loafs/batards on the stone and add steam manually. I do this the following way (mostly inspired by Maurizio Leo, check out his guide for steaming here, also check his other great material):
10-15 minutes prior to the bake I take make two tight rolls out of kitchen cotton towels and put them in a standard size baking tin. I also insert a standard full size oven tray and the very bottom of my oven. The stone has now been pre heating for at least 1 hour and 45 minutes.
I boil water and pour it over the tightly rolled towels slowly, making them absorb it fully. I keep pouring until the water stands about 2-3 cm from the bottom of the tin. I now insert the tin on the oven tray at the bottom of the oven. I place the tin at the center of the tray.
DISCLAIMER – THIS STEP IS NOT VITAL AND USED AT OWN RISK: While making preparations for the scoring I plug the exhaust at the front of my oven, right above the oven door, with wet paper cloths. This will trap the steam produced in the oven better. Be advised that this will probably damage the oven in the long run. The time display of my induction stove top gets all misty (sound has stopped working too) and the doors to the cupboards around the oven takes some serious dampness during the bakes.
I boil some more water now and prepare a long metallic ladle which I’ve bent to an almost straight angle. Right after the bread is scored I open the door (and beware of the attacking steam) and place the bread on the stone. I usually use a pizza peel with baking parchment to slide it on the stone. Now I fill the ladle with about 200ml of water and splash it on the oven tray at the bottom, creating a cloud of steam, which I try to entrap by quickly closing the door.
I set the timer to 25 minutes and let the steaming tin sit there for the whole period. During this time I wont open the door. I bake at 250C (480F) during the first 15 minutes, lowering to 230C (445F) for the rest of the bake. Sometimes I just go with 250 all the way.
When 25 minutes have passed I open the door, remove the tin (and the paper clogging the exhaust if used) and let the door sit open just a little while to let the dry air enter the oven. I also remove the parchment paper and spin the loaf 180 degrees, moving it to a warmer place on the stone. I bake for at least 10 more minutes, often 5-10 more depending on the color I want.
I take the loaf out when I’m pleased with the colors and place it on a cooling rack. You should wait at least 1 hour (or actually until the inner temp is around 40C) for the crumb to settle before cutting into it.
The type of flour you use will react different during the bake. A stone ground wheat flour with high extraction (more of the original grain left) will probably give you a darker, deeper color then a roller milled wheat flour with low extraction. Different brands and breeds will have different characteristics as well, giving unique results from each harvest depending on exposure to sun and nutrition. Not to mention all the other cool stuff you can add to the flour (like purple corn and other vulgar food). It’s a never-ending palette of opportunities to your visual outcome.
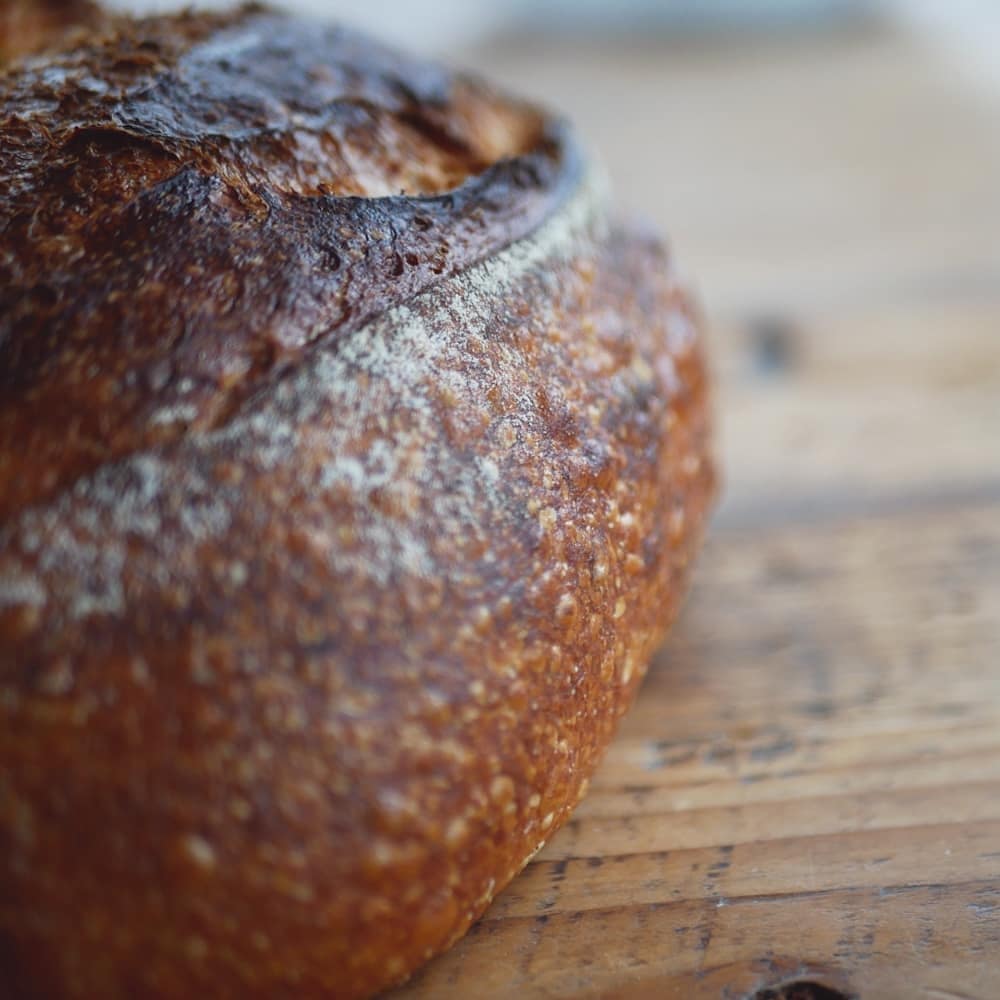
A boule made from all stone ground flour.
End note
Bake it hard if you like the darker colors. Bake it lightly if you like it lighter. Add a lot of flour if you like contrasts or add just a little or none if you want the colors of the crust to shine! Go nuts with the blade if you prefer the patterns to be the center of attention, or let the loaf reach its maximum ear height by that single and precise slash.
Give your loaf the soul you think it deserves.
In the following 5-10 minutes of your time I will do my best to describe the nature of a baked country-style bread that’s considered beautiful and how I go about to make it so.
So what’s considered beauty in a loaf of bread? I guess it’s always on the beholder to decide and I do believe there’s more to it than current norms and preferences. Your instinct will tell your judgment if it’s edible and good for your body and soul. It’s that millisecond during which you decide it’s nice or not. The sugar still left in the dough’s skin will caramelize in gradients when exposed to intense heat. The blooming will reveal to you if the fermentation is at level and how the gentle hands of steam has delivered an even spring with smooth distinct lines. All the excellent craftsmanship of good people involved in cultivating and refining the grains in a sustainable way really shines through in the baked goods.
You eat with your eyes as well so the absolute final touch before the bake is very important to me. This is where the soul is infused and defined. The story of this bread is now complete and the last chapter is written with a razor blade. It’s my duty to these fine raw materials to make the very best of it.
This text is the first part about the variables of scoring and baking and hopefully you’ll get some insight in what affects the outcome (check out part two here). Like with all sourdough bread baking it’s pure madness to think you can control the outcome fully every time. Getting more consistent results is always my goal and the goal of this article is to give you perspective on it.
Bread scoring – The Why
To “score” (cut/slice the surface of the dough) a loaf of bread before its baked has a clear purpose aside the decorative. It helps your bread reach its full potential if executed correctly. The gases that’s been built up inside your loaf will expand when exposed to intense heat and will rise upwards to try to exit at the point/points of least resistance.
This is what makes the bread increase in volume when baked. You need a damp environment (but not too damp) to keep the gases from bursting the surface and you need to adjust the depth of and number of cuts accordingly to the state of the dough. I’ll get in to the details of this further in the article.
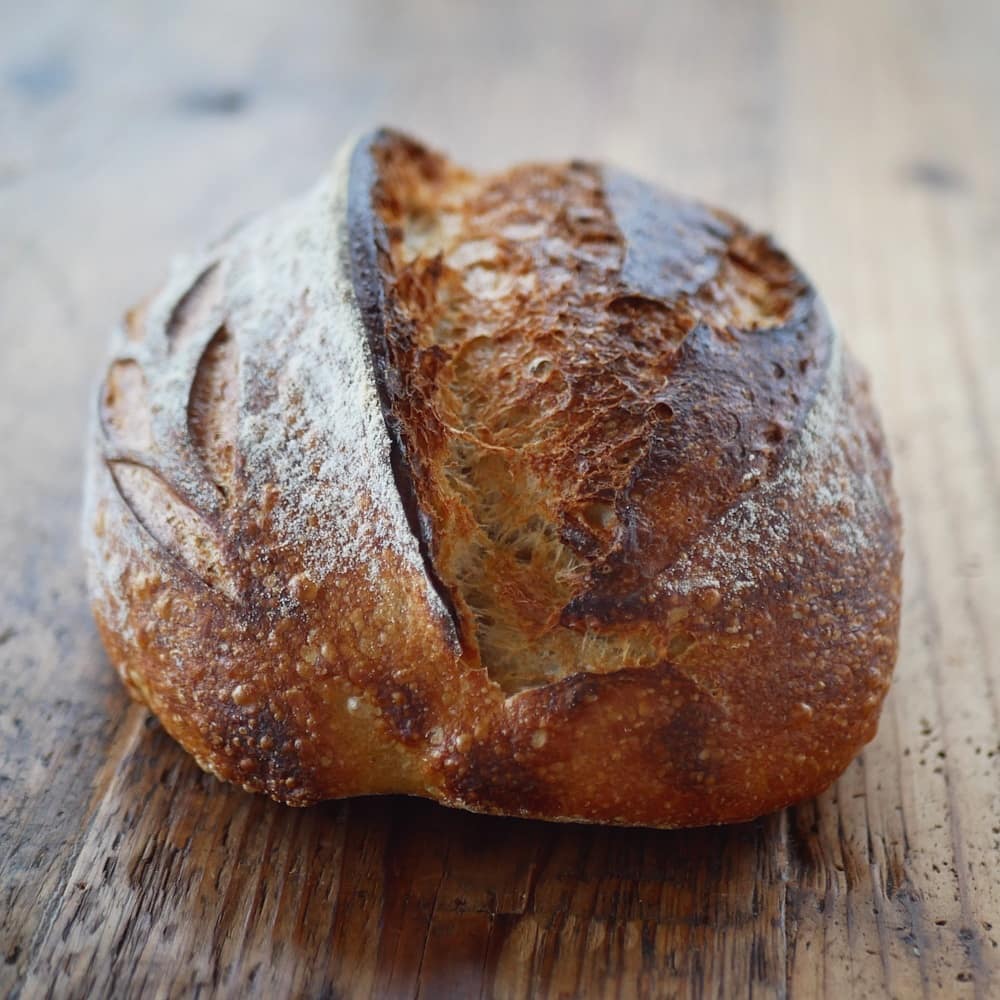
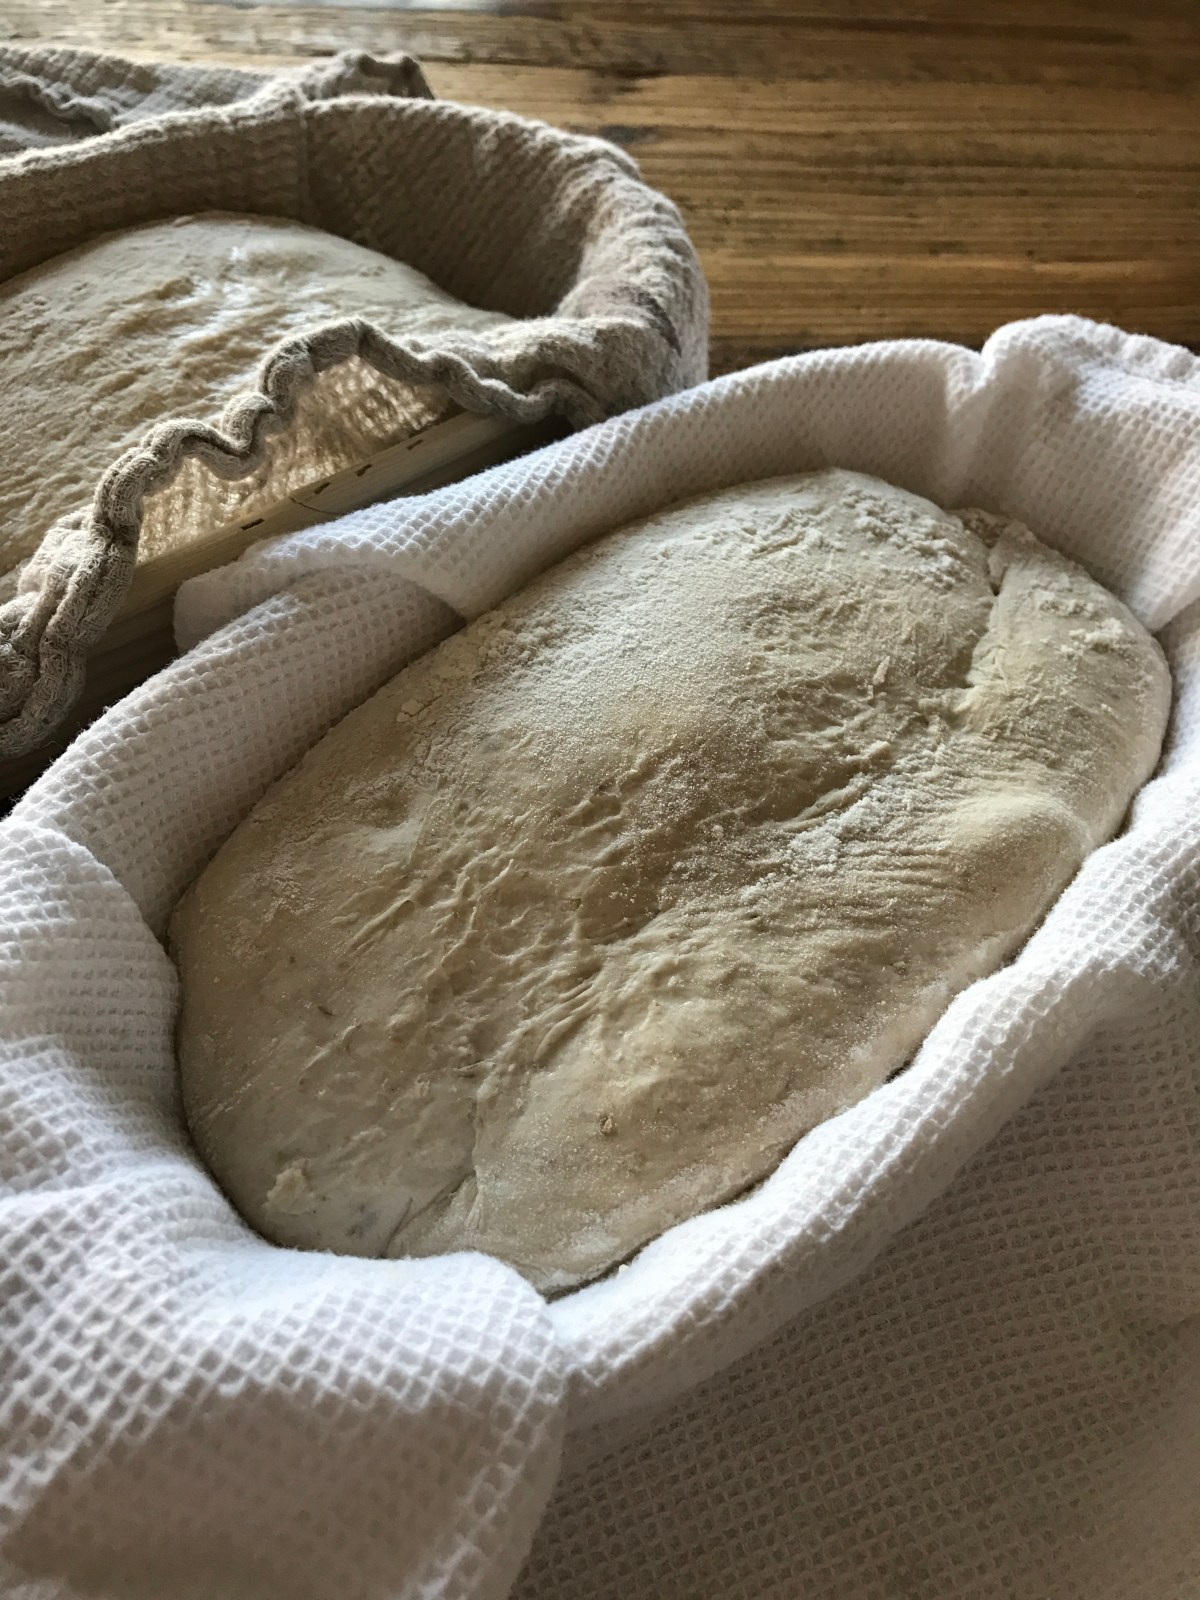
Two scored loaves the moments before the bake
The tools
I use thin and pretty much standard double-edged razor blades to score the dough. Most often mounted on a bread lame (yeah “Lame” from the French). I think it’s a relatively cheap investment that will hold a lifetime probably. If you take good care of your blades they’ll last longer. Rinse them with water only after use (no touching), rotate the blade so all four edges are used (if you can keep track of it) and you probably could do a total of eight baking sessions on one blade.
I don’t think the brand of the blades will yield different results. As long as they are thin and sharp its fine and I want to believe all razor blades qualifies. A pair of sharp scissors will do just fine as well, or small serrated blades made for this purpose. I just simply prefer the razor blades.
That goes for the Lame as well. Pick one that feels good to you! The weight, balance, ability to apply force and at the same time control. The possibility of bending the blade is also vital for me (helps the cuts to open up nicely since you automatically get some angle to it).
Of course there are more tools then the Lame and blade to simplify the scoring and baking process. I’ll get to them later in this guide (mainly part 2) as they fit into the purpose.
This is a Mallard Ferriere Lame Super Grignette with a curved edge razor blade (I’ve switched to a normal razor by the brand “Zaza”)
The variables
So here’s the part where I’ll give you the answers you’re probably looking for; What affects the baked outcome? How can I score my bread to make its soul shine? Here we go!
To an extent of 90% I’d say it’s the state of the dough that will determine of it’ll turn out looking close to what you imagine. The remaining 10% is the blade, your skill with this blade and the temperatures, exposure to steam during the bake. The short version is this: Perfect all the parts before the bake and you’re 90% there. The last 10% is easy once you’ve got the process down.
As you’ve probably guessed I don’t like short versions so during this part (and the following part) I’ll break the variables down for you:
The 90%:
The fermentation of the dough
The strength of the dough
The shaping of the loaf
The hydration of the dough
The final proofing/retarding and exposure to dry and damp air
In describing these variables I will be using terms that might require some experience and knowledge of the process. In the future I will give you in-depth articles about these parts as well. I’ll try to keep it close to the core of scoring in this piece.
(1) The fermentation of the dough:
A heavily under proofed dough will burst wildly when baked. If you try to go for a pattern it will just be destroyed by the forces packed in the dough. A heavily over proofed dough will collapse into it self when baked, leaving your cuts intact but not blooming.
You need to work on finding your timings for the fermentation and know when to bake at first hand. If you know (or suspect) the dough to be slightly under proofed, make sure there are enough surface that has been scored for the gas to erupt upon. Use longer cuts and more of them to make room for the expanding surface.
If you know (or suspect) the dough to be slightly over proofed, make sure there are less surface scored, and use more shallow cuts.
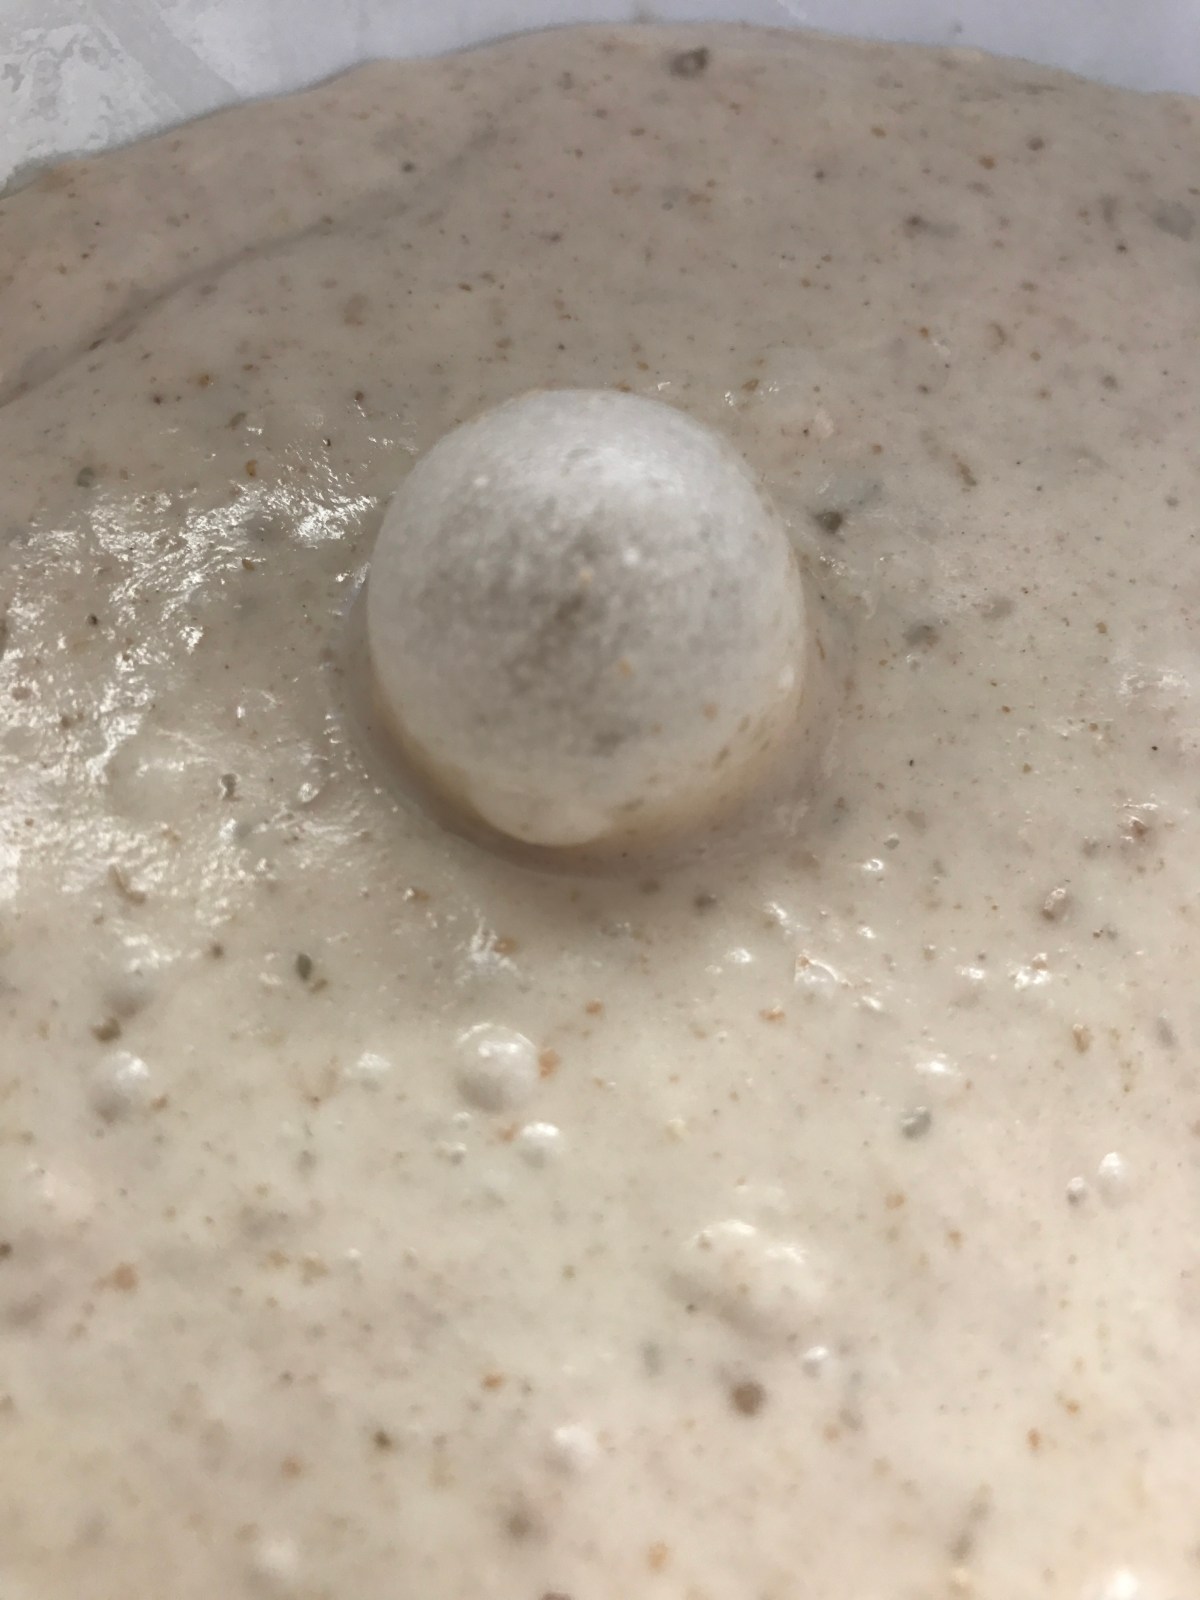
Activity during bulk fermentation
(2) The strength of the dough:
A “strong” dough will hold its shape well and give a good bloom/oven spring. Some ways to make a dough strong is 1. Mix it hard/stretch and fold often (if it’s a flour that can take it). 2. Make a stiffer dough with less hydration. It will most often give a tighter crumb. 3. More salt adds strength but not recommended if you eat a lot of bread. 4. Use very strong flour protein wise.
A “weak” or “slack” dough is more extensible and will more often yield a more open crumb if matured correctly. Using more water and less salt (shouldn’t use below 2% tho) will give you a more extensible dough with potential of a different crumb structure. A weak/slack dough won’t be able to hold its own weight, thus spreading when not supported by a banneton. This can also be true for a stronger dough that has been matured for too long and acids start to break down the structure. Same thing goes if your leaven/starter is too acid.
Going for a longer autolyse (no leaven or salt) can give you a more extensible dough. The maturing process itself adds strength to the dough so shaping and proofing cold too early can also result in spreading.
I always strive to find the balance between strength and weakness at every bake. Giving it just enough strength to be able to hold its own weight. At the same time leaving it with a complex inner structure. Strength and weakness – baking imitating life.
(3) The shaping of the loaf:
By shaping correctly you create bindings in the loaf that makes it stronger and more prone to hold its shape and weight. You will get a bigger and better bloom when baking a tightly shaped loaf (but it might cost you that open crumb).
Also, damaging the outermost surface when shaping will affect the esthetics of the baked loaf of course. Shaping dough is a craft that will take so many years of home baking to master. Just try to do better every bake and let that be enough (or go to your local bakery and ask if you can shapes their loaves for a week).
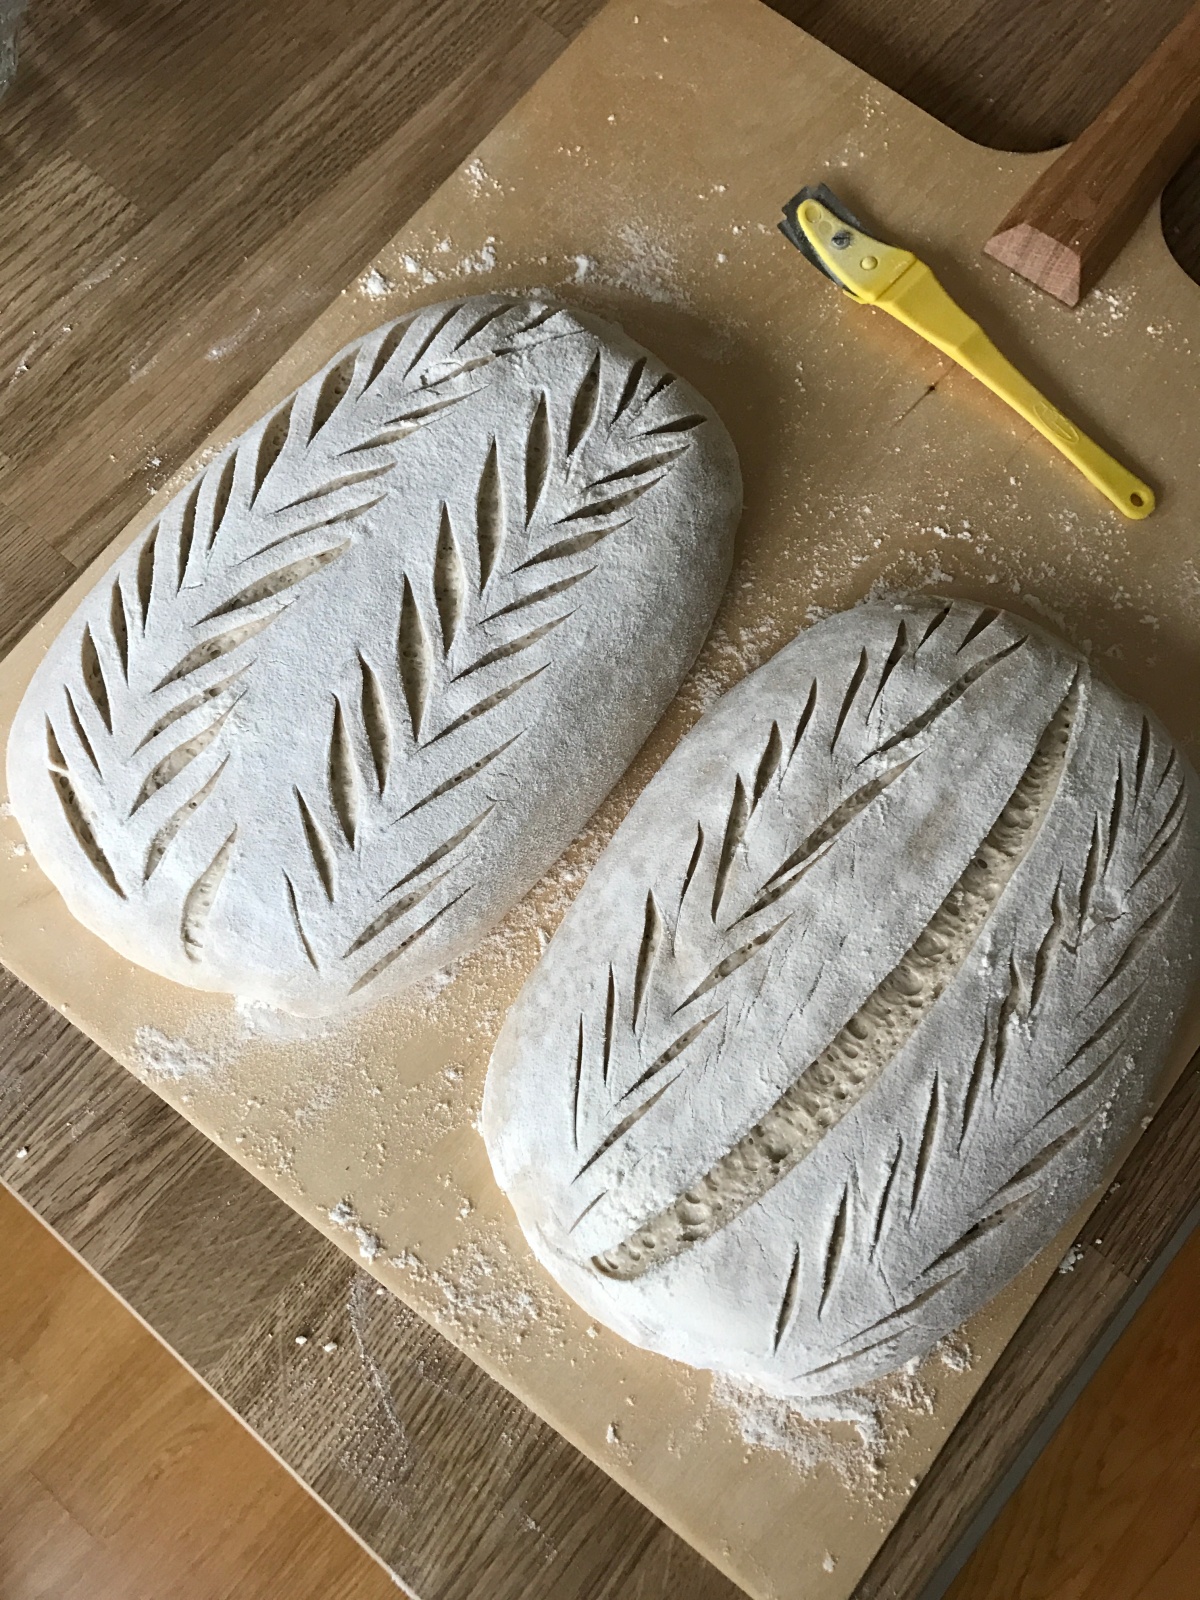
Two pre shaped loaves at a medium hydration (75%)
(4) The hydration of the dough:
A dough that on the wet side of the balance will be harder to score. I think bread scoring is really enjoyable so I prefer to work with a bit stiffer dough. If you’re going for a style of bread with very high hydration I recommend you to use very simple patterns. Like a single or double cut on an oval loaf, square/triangle cut on a round loaf.
When I make dough with higher hydration I want the most outer surface to dry out just a little bit. Enough to form a sort of “skin” that responds better to scoring. A very soft and damp tends to make the blade drag the cuts, leaving the dough jagged. Friction will be less with a drier surface. See the last variable below for more info on how to get that skin going!
(5) The final proofing/retarding and exposure to dry and damp air:
After I shape the loaves I put them in cloth lined bannetons. Then I put the bannetons inside plastic bags. This is to create a damper environment for the dough so It can rise proper. Depending now on the levels of hydration in the dough I let them sit in the bags, tightly shut, or just expose them by opening the bags.
To create that “skin” on higher hydration dough I just simply don’t use the bags. If you’re very bold you can just skip covering the bannetons at all! This will make water leave the outer layers of dough in search of balancing the amount of water between one medium to another (osmosis), leaving a dryer layer.
This is true no matter the levels of hydration in the dough, feel free to experiment with it.
Shaped loaves resting in room temperature before entering a long cold retard in the fridge
(6) The temperature of the dough
It seems as if its easier to score a dough that’s colder. I most often bake straight from the fridge. I’ve tried doing a same day bake room temp proof and also find it harder to do any patterns with a flair in this state.
However I do believe it has mainly to do with the fact that it has been exposed to air for a longer time. If I were to put the dough in the freezer and take it out just as it drops to 5 degrees Celsius (41F), I don’t believe its easier to score then as if it had been proofed in room temp. I think its the long wait (and if the long wait is in a colder temp then its slightly better) and the level of dampness in the outmost layer of the dough that gives you that sweet spot density for your razor.
I cant deny it has an effect. When you strike a cut with that blade the tensions of the outmost layer starts to release. A colder medium moves slower then a warmer so it should keep the dough from spreading too fast. That gives you more time to work with your artistry then if the dough was warmer.
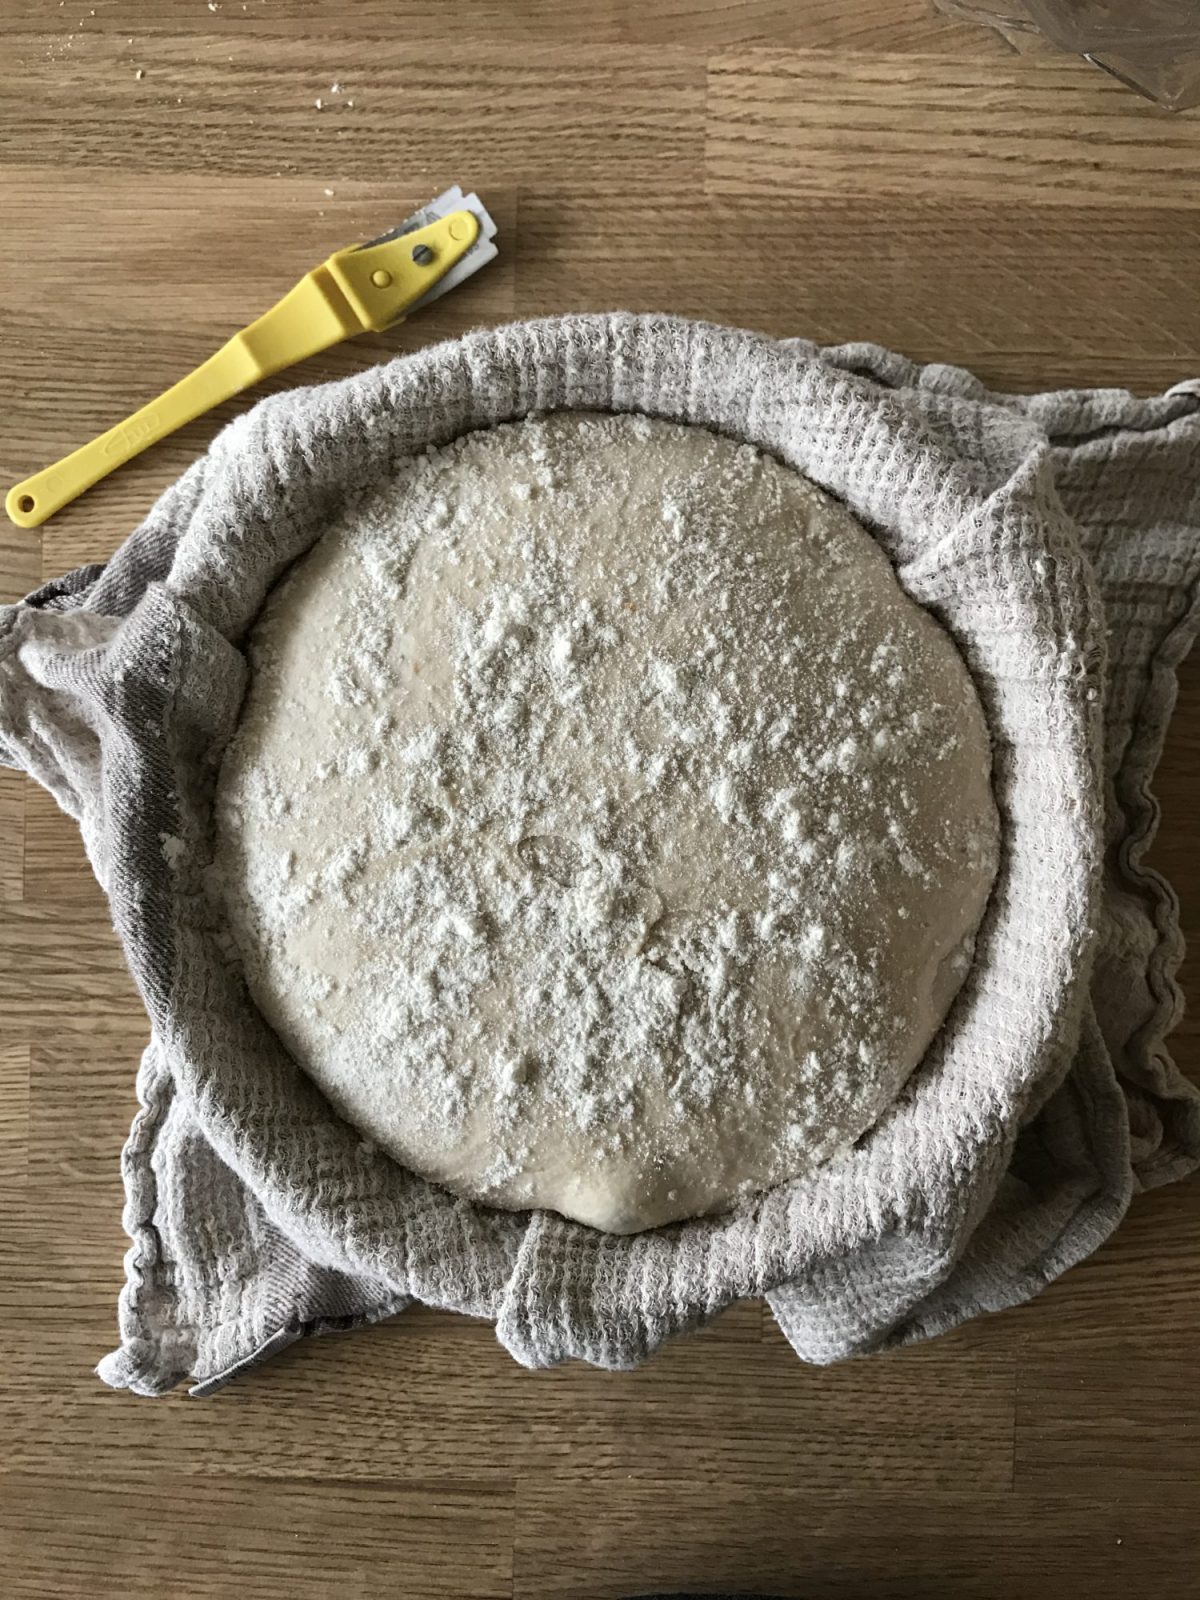
A rather stiff dough sprinkled with flour and ready to score!
End of part 1
Alright! That concludes the first part of this article about the final part of the process of baking bread at home. Click here to enter the concluding part where I’ll break down the last parts of the variables of baking soulful bread.