
Country Style Sourdough Bread 1.0
Introduction
I do not use recipes from books to decide the amount of ingredients used in a dough. I use my own formulas which I’ve created from trials with my unique batch of flour, starter and environment. A key to reach consistently good results, and understand why you’re not getting them, is getting to know the flour, water, wild yeast and salt YOU put in your dough today. Add knowledge of seasons, temperatures, timings, techniques and YOUR handling of this dough and you will reach the goals you’ve set up. All of the variables I mention here will give you a different result in the end and that’s why I find it futile to follow some ones else’s exact recipe and expect the same results visually and taste wise as the author. I do believe it’s possible to follow a well described process on the other hand if it also gives you guidance on how and why, with some options depending on what the senses picks up.
So, on this section I will give you the general process of how I bake my current country style sourdough bread (mainly lower extraction wheat based loaves with a 0-50% whole meal flour in relation to total flour weight). This main process can then be varied in eternity when it comes to flavors, additions and texture. Get the main process down and you’ll open a world of opportunities. I will never post a specific recipe, instead I will update the process versions when exploring new methods and gaining more knowledge.
I would also like to remind you (as stated in the purpose of this site/blog) that this is no scientific and evidental approach to baking. It’s purely empirical and describes what is working for me.
Welcome to my Country Style Sourdough Bread Version 1.0! Let’s begin.
About the Baker’s Percent %
Recipes for bread are often described in relative ratios rather than exact measurements. This is done so that you can scale it depending on how much bread you want to make! The total amount of flour in the dough is set to 100%. All other ingredients now relates to this. Let’s say we have 1000g of flour in the dough and we add 700g of water. This makes 70% water. If we have 600g of flour and want the dough to feel the same we add 70% out of 600g flour (600×0,7) = 420g water.
When describing my measurements I will not take the leaven into account when calculating the baker’s percent, to make things easier. The relations will be very alike even with the leaven. If you need even more info about this lovely baker’s percent, just google it.
Stage 1: Preparations
1a – Planning the choices
This very first stage of the sourdough bread baking process begins at the thought of it. The idea, inspiration and lust to create something. I can spend a lot of time at this stage or very little depending on my aspirations and mood for the day. One thing is certain, I will have to set up a goal and plan the bake in some form. Either I’m keep it in my mind and go forth by feeling and in-the-moment calculations or I sit down with (or make) a formula to guide me through the days ahead. The more I prepare my choices, the more probable I am to evolve and learn new things.
Let’s proceed with the first choice: The leavening source.
1b – Building a leaven
SHORT: Let’s prepare a leaven (either the regular starter or by building a pre-dough with the starter) 3-12 hours before making the dough. Time depends on how much starter I’ve kept in relation to the added flour, water and temperature. I let mine rest 6-10 hours in room temp (8-12 in the winter) after mixing 15g starter with 50g room temped water, 65g organic low extraction wheat (All-purpose) and 5g whole meal wheat.
Now it’s time to choose the type of leaven to bake with. The “Leaven” is the product you’re using to make a dough ferment and rise. You can use the starter in its true mother form as your leaven or you can build a specific pre-dough (containing your starter). This process will at this point of time not describe how to build and maintain this starter, you’ll find good info about this here.
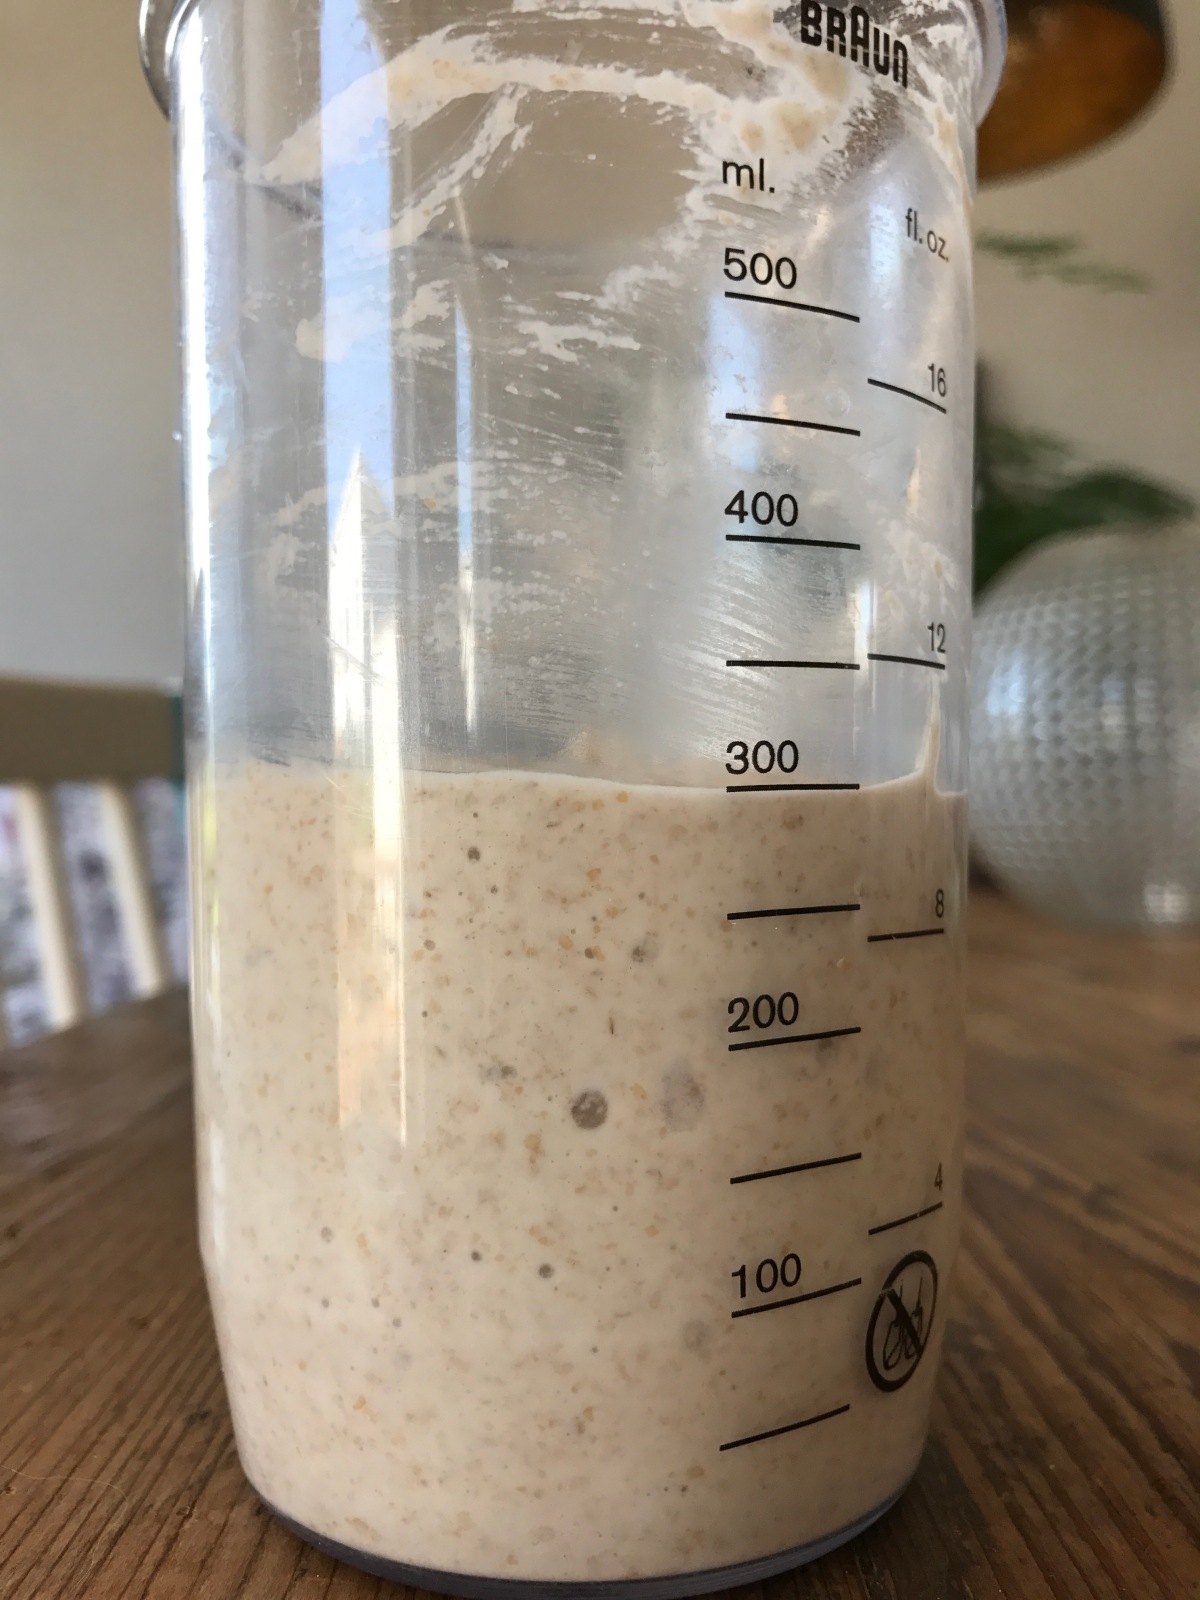
I use my slightly stiffer low extraction wheat starter as my leaven generally. I let it ripen over night or during work (6-12 hours) before using it in the final dough (80-130g). A stiffer starter/leaven will mature slower and this is why it suits my current life logistics.

A starters development over 8 hours. It’s bake ready as a “Young” leaven straight from the upper right stage (about 3 hours in).
On the weekends I’m currently experimenting with building higher and higher activity in the leaven before using it in the dough, trying different methods. One thing I’m trying is using a high extraction whole meal starter at 100% hydration (80% whole meal, often fresh milled) , keeping it warmer (maximum 30C or 86F), and feeding it often with a smaller seed, 2-5g (seed being the amount kept after the discard). When it’s time for a bake I use a higher amount of seed for the leaven (50-100g) that’s 1 part starter, 1 part water and 1 part flour (1/1/1) and use it in the final dough after 2-4 hours, kept warm. In these trials I’m using mainly roller milled organic All-purpose flour (11% protein) for the leaven.
There are so many ways of doing this and I’d say as long as the starter rises (doubles in size after fed) and are being kept clean and fresh it will make the dough rise. If feeding the leaven at a 1/1/1 ratio before baking you should at least let it sit for 2-4 hours (depending on temp) so the yeast activity gets a chance of multiplying before adding to the final dough. A leaven that’s been sitting a shorter time is often called “young” and should supposedly contain a higher ratio of yeasts, resulting in more gas production and less acids (milder taste). Keeping a low seed in the leaven/starter should also result in the same output.
“Young” leaven at 1/1/1 ratio.
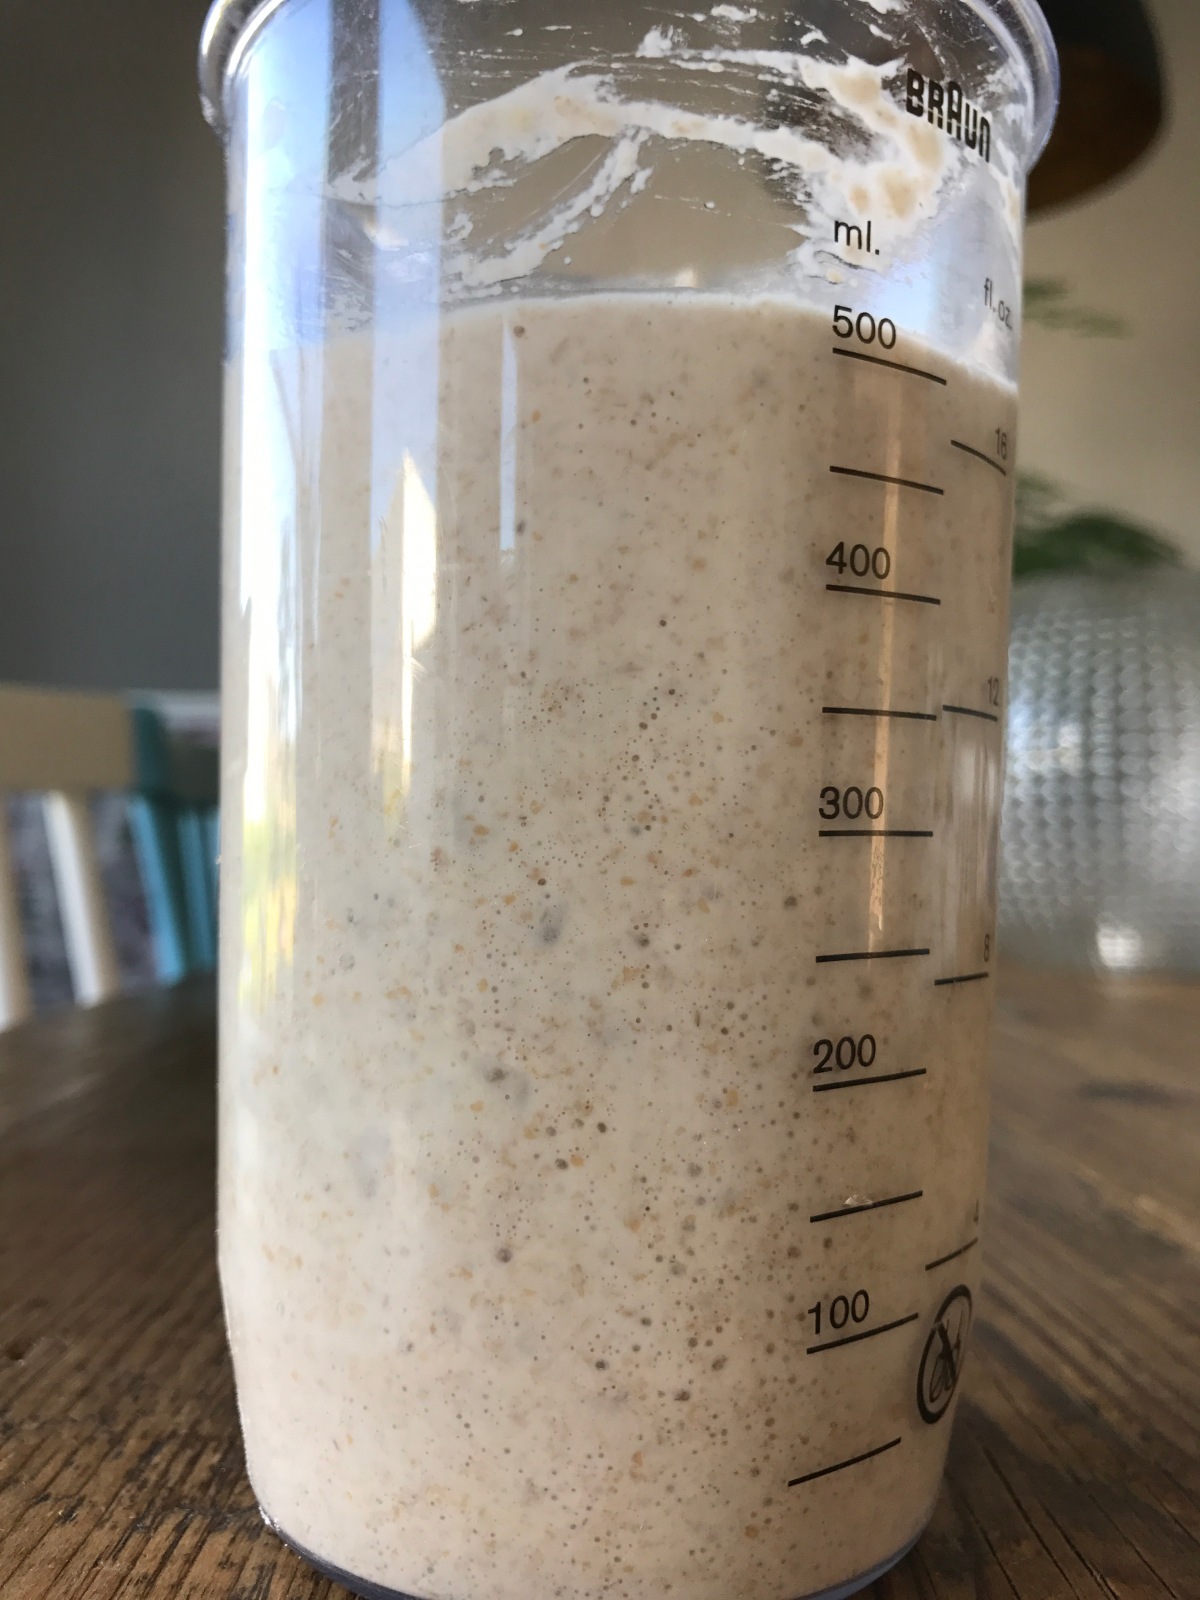
3 hours later! Ready to bake.
You can generally say that the wild yeast will have a good presence as long as there are fresh food to nibble upon! If your goal is to create more gas in a dough (and get those air bubbles and bunny shape) then you should leaven it with something that has a lot of yeast present.
Finally, you need to experiment to find a maturing cycle that fits your logistics. As with the final dough the starter (or pre-dough) moves with the pace of temperature, hydration levels, type of flour and seasons.
Stage 2: Mixing
2a – The flour
SHORT: For two 825g loaves you mix 85-425g (10-50%) whole meal flour with 700-450 (90-50%) All-purpose flour, depending on how much whole meal you want. Stir the dry flour together with a spatula or spoon that’s gentle to your container.
Your bread will never be as good as the flour you’re using. This choice will have a very large impact on the outcome of your bake. Use good quality flour and you’ll potentially yield a high quality bread in the end. There are so many different types of flour today and depending on how much you use they will give you different styles of bread. I will give you an in depth insight in the chemistry and types of heirloom flour out there in an article this year.
This particular process is for the “country” style loaf, with a high amount of whiter flour (often roller milled and sifted) and some whole meal (also called whole grain) flour. The goal of this process is to produce a lighter loaf of bread with lots of gas (giving those nice evenly distributed air bubbles in the crumb), and a mild taste that fits every meal. For this you need low extraction (from the original grain a lower amount is left from the milling process) white flour with relatively high ratio of proteins and good quality of the same. There should be at least 11-12g of protein per 100g of flour. Flour with 10-11% protein are most often called “All-purpose flour” in the English speaking countries of the world and higher protein flours are called “Bread flour”. I try to keep the total ratio of flour between 11-12%. If you use flours with higher protein the crumb tends to get drier and more chewy (gummier) and often even more dense. Balance is key!
I use an all organic All-purpose flour with 11% protein cultivated and roller milled in my region. To me it packs some soul and feels pure. Great taste and very versatile (I use it for pizza and pastries as well). To this I add the amount and type of whole meal flour (100% extraction) to match my goal for the bake. I love working with organic heirloom wheats such as Emmer (Farro), Spelt, Einkorn and Barley. They give a lot of taste and the quality of the protein are often very good (even if the amount of protein can be lower since it’s the whole grain is used as opposed to the low extraction roller milled where the high protein core is separated).
I see the higher extraction/whole meal flour as the spice to this meal. This will give you the exquisite aromas and experiences to your palette you are looking for in a sourdough bread. I try to use less than half of the total flour weight in the dough when working with whole meal flour. If you use more this will become a different bread and you probably won’t achieve your goal with this style.
Normally I go for 15-30% whole meal in my country loaves. I find it to be a good balance between taste, form and texture.
I own a KoMo Fidibus XL electric stone bench mill and nowadays I mill all of the whole meal flour myself. It’s tastier, more nutritious and I can track its very origin which brings a lot of soul to the bread. The process won’t differ that much with freshly milled flour. I have noticed the activity of the exponential fermentation rate goes up, so I tend to cut the time it ferments in bulk by 30-90 minutes.
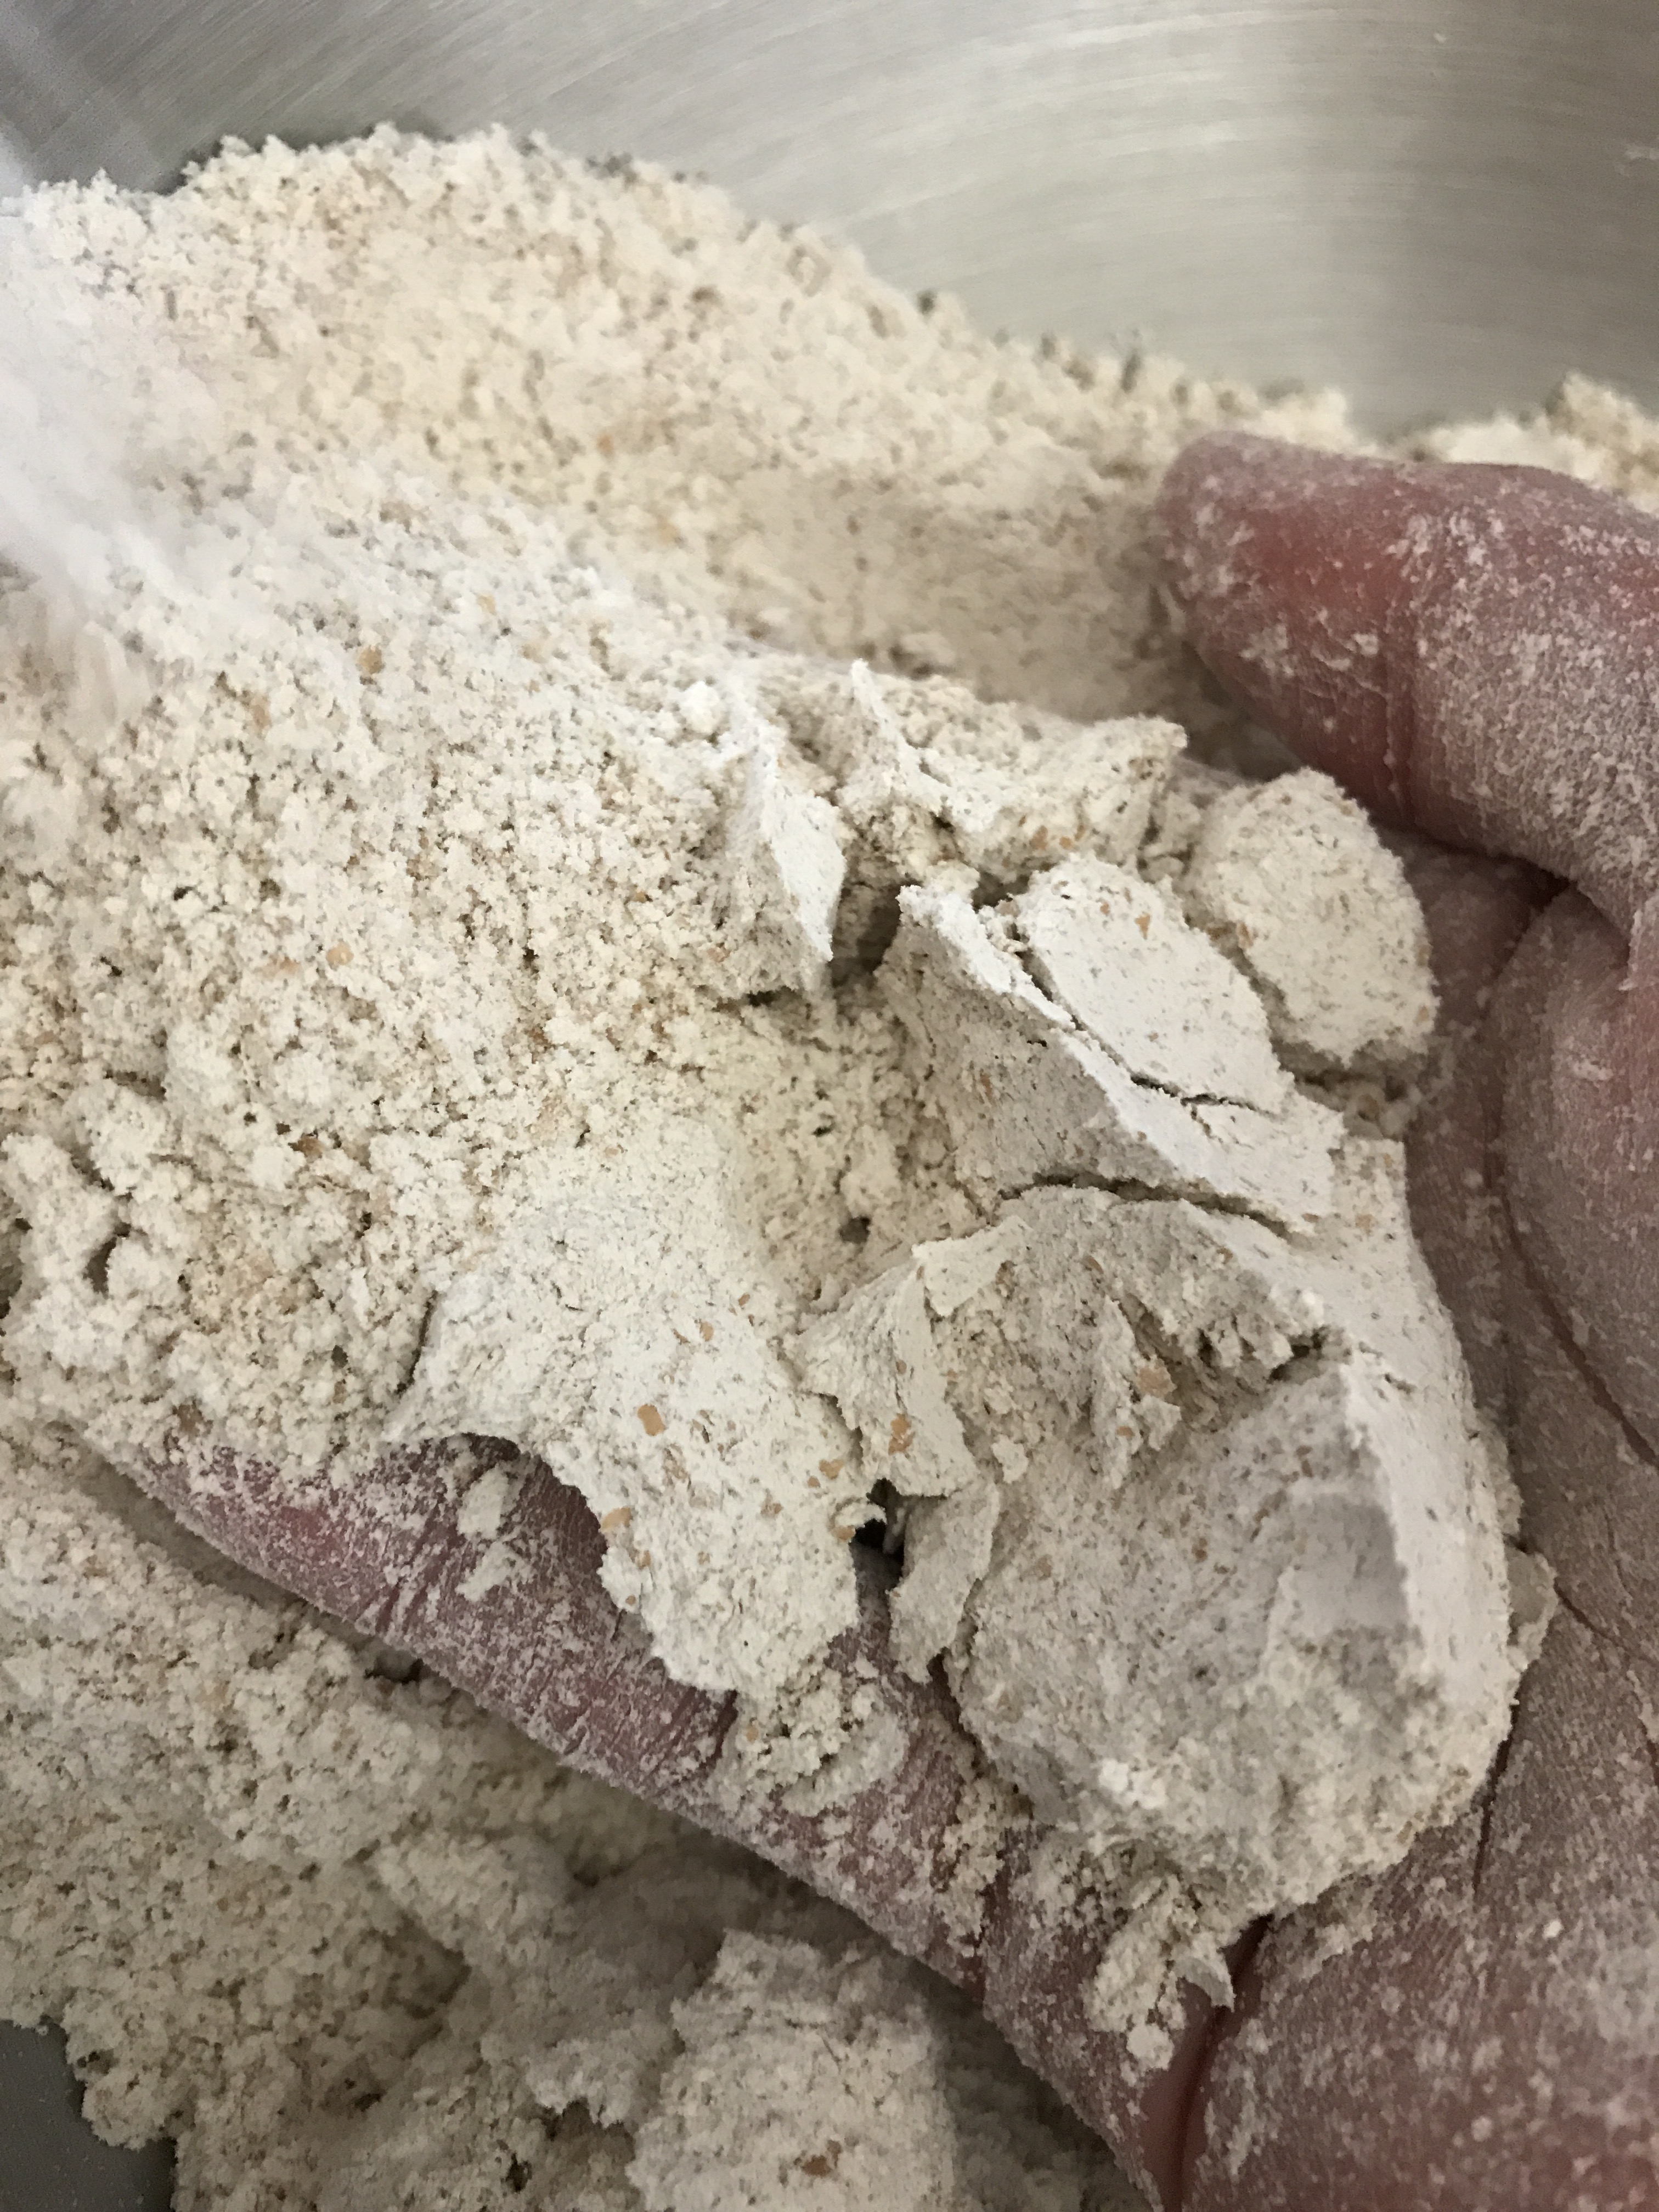
Freshly home milled spelt flour.
Also please note that flour in Sweden generally has a lower amount and quality of protein in comparison to North American and Australian flour and will act a bit differently when mixed with the same amount of water and physical force.
2b – The water (or other liquid)
SHORT: For two 825g loaves a total of 650g of water is needed. This calculates a total hydration of 76,4%. Adjust the amount of water depending on your goal, method and flour. Mix flour and water only (and swiftly) until it comes together (no dry spots). Let it sit for 30-120 minutes.
Now it’s time to choose what kind of texture you want to aim for. Add a lot of water and you’ll get a softer, slacker dough that probably will give you a more evenly open crumb. Add less water and you’ll get a stiffer, stronger dough that gives the bread a potent shape and denser crumb. So what is a lot and less? Shouldn’t you be able to get all of the above characteristics in a bread? Yes you can! You see; every flour has its optimal absorption of liquids. In my experience each flour bag can differ too when it comes to this.
The grain itself contains water. When milling the millers add a bit of water to ease the process. When stored in a dry place the flour will release this water and become drier with age thus absorbing more added water. Fresh flour will absorb less.
Flour with high ratio of proteins will bind more water. Flour with high quality in the proteins will also bind more water. At a humid weather a little less water needs to be added, at dry weather more a little more is needed.
There are methods that will help bind water better in the dough. Most commonly it comes down to mechanical force by hand or machine. My process will not use these methods. I’ve learned that using a lot of force will affect the taste of the final product and hurt the ground on which you want to build a strong house (this analogy will recur). Be gentle to the dough and it will reward you. And it’s very convenient to skip that big mixer in the kitchen right?
With this said you need to make a decision based on how well you know your flour and how you are going to mix it all together. You can take 65g of a flour type and 50g of water and just mix it together until all water is absorbed (the ratio 1,3/1). Feel it with your hands and compare this with another mix of the same ratio. You will most probably notice some difference with different flour types! I’ve learned what counts as “a lot” and “less”, “stiff” and “wet” by getting my hands in the dough and bake a lot. To give you some pointers I’d say that a stiffer dough with less hydration holds its shape longer and will stick less to your hand and the bowl. A wetter dough with a lot of hydration will bloat faster and feel soupy!
With the flour and method I’m using right now anything below 76% water will be a stiffer dough. Anything above 80% will be a wet dough. I find my best results between 76-80% hydration so that’s what I’m aiming for as the final hydration in relation to total flour weight. In my opinion my dough is balanced here. If I hydrate more I limit my options when it comes to scoring as well. The dough will be too soft to score with flair.
OPTIONS: You are also welcome to hydrate with something completely other than water as well! Use coconut water, beer or whey or whatever you want to try! It could affect the outcome of bake, making the bread something else, but hey that’s ok. I’ll stick with water for this process.
2c – Adding the leaven
SHORT: Adding the leaven next by squeezing and folding it in (until all visual signs of it are gone). By dissolving the leaven in the water, and then adding the enriched water to the flour this “autolyze” can be skipped entirely.
A “true” autolyze is when you let the water and flour react with each other alone. Organic magic starts to happen as soon as flour comes in contact with liquid, no need for wild yeasts or salt yet. If you want the flour to absorb the liquid better and if you’re looking to create more extensibility in a dough then you can experiment with the true autolyze for 30-120 minutes. You can compare it with boiling dry pasta. It’ll get softer the longer you’re boiling it. The same goes for exposing pure flour to water – It will make the dough more extensible and relaxed.
Now I actually rarely go for the true autolyze. I usually add the leaven to the water, and then add this to the flour. I’ve experimented a lot with shorter and longer true autolyzes to see how it affects the dough and final crumb and in my experience it won’t matter much with the kind of flour I’m using! If I had that super strong and high quality flour I’d absolutely go for the autolyze. I get real good extensibility with the exposure it gets during the “pseudo”-autolyze (with leaven added). 30 minutes doesn’t hurt though and when you feel you have the time and logistics to do so, then go for it. In the mixing videos below I add the leaven after a true autolyze to show you how it can be done.
2d – The salt
SHORT: Now we wait at least 20 minutes before adding (at least) 20g salt per 1000g total flour to the dough. For two loafs weighing 825g at 76% hydration we need 17g salt.
The magic continues with the salts effect to the dough composition. Besides to boosting the flavors in the finished product the salt also provides structure to the gluten network that’s has begun forming when the flour meets water. The bindings become stronger now and helps the dough support its own weight in the end, when gas starts to fill the cavities. You need 20g per 1000g flour. You can add more if you wish – It will give you a dough with stronger bindings but its effect on taste and health might not be worth it for a bread. Pizza dough generally contains a lot more salt (27g per 100g flour (2,7%)) to help it tolerate the forming or a large round flat shape, without breaking. I generally use 2-2,2% salt.
Now I’ve experimented with different kinds of salt and methods of adding it to the dough and I can’t say it makes any bigger difference. It’s the chemistry of the salt (NaCl) reacting with the flour that matters, not if its sea salt, rock salt, coarse or fine. I like to get a salt representing good sustainability, preferably with good a story and soul attached to it.
So why add the salt after the leaven? The salt also has a calming effect to the yeasts working the dough, slowing down the fermentation. Let the fermentation get going before adding the salt and you’ve given it a good start. You can absolutely add the salt with the water and leaven as well, no problem. Just be aware that this will slow down the activity at the start. I want as much activity as possible at this stage!
2e – Mixing methods & temperature
SHORT: When mixing flour with water, adding the leaven and finally the salt you can either do it by hand or by mixer, using more or less mechanical force (kneading). The choice is yours and it will affect the final product. Aim to keep the dough temperature between 28 to 29 degrees Celsius (82-84F) when the leaven is added (warmer when cooler weather and cooler if warmer weather).
I’ve mentioned only a little about the mixing methods so far in this process. It’s an important step so I’m rewarding it with a section of its own.
I always mix by hand. When I started my baking journey I thought sticky hands to be a real nuisance which now has transformed to pure joy. I love getting my hands in there, feeling the dough transform in my hands. By touching and squeezing the dough you’ll also get a sense of its state. By doing it every bake you can compare and slowly rely more and more on your intuition. After the autolyze (with or without the leaven) you can decide how much more water you need to add with the salt.
In my experience mechanical force (kneading by hand or mixing) can help the water bind to the flour faster and develop the gluten. Time will do this for you as well, but with varied results (depending on the environment how well the water/leaven/salt was distributed in the dough). Using a mixer will help with consistent results but in my opinion it could also affect the tastes and texture at a longer exposure to force. If you’re making large quantities of dough a mixer is a given convenience. When the mix is done you transfer the dough to a bulk container (oiled up or with 1-2% water in the bottom) of your choice. I prefer a large thick walled bowl. Any plastic food-approved box will do just fine too.
Temperatures has a vital impact on the fermentation process. By controlling the temperatures you will easier be able to reproduce a consistent result. In my experience you will have the best activity in the dough when the final temperature (temp after mixing) is 28-29C (82-84F). If you’re in a warmer environment you could keep the temperatures down to 80-81C instead. If it’s really peaking in temperatures and in periods where food generally matures really fast you can keep the temps even lower (just keep it above 22C (72F)).
A nifty way to calculate what temperature you need in your water is: (Desired dough temp *3) – Room temperature – Flour temp – Mixing friction (when hand mixing this shuld be around maximum 2C (35F). This will get you in near the desired dough temp, but its no guarantee. Experiment to get the temps right for the very formula you are using.
Generally when making less dough I just measure the flour temp, and assume its about the same room temp. If the flour temp is 24-25C (75-77F) then I add 31-32C (88-89,5F).
2f – Adding texture and taste enhancements (optional)
Now here’s your chance to explore an endless world of baking. Only your imagination can set limits for the available variation. Add whatever you like and make it clear to the world that this is YOUR bread!
There’s only rule when it comes to adding stuff to your dough; adjust the timing to add it depending on its density and surface. A very soft or even liquid additions can be added earlier (during the mixing phase). Examples of this that could work really well are: Polenta, cocoa powder and softer cheese. Harder and sharper additions should are preferably folded in during the bulk fermentation stage (I prefer at the second fold). See the next stage for more information about this. Harder and sharper mediums could damage the gluten structure of your dough, and you don’t want that! Examples of really nice solid additions are: Nuts, fruits, cocoa nibs, seeds, fresh spices and hard cheese cubes. Soft = Earlier. Hard = Later.
I generally do my experimenting with the flour and water composition and put the good stuff on top of a slice instead. It’s really fun doing additions, just keep in mind that it will become a totally different product than the Country Style Sourdough Bread this process is describing. The additions will affect the chemical composition of the dough and you must adjust accordingly. In example seeds and nuts are softer and will release so much more taste if first roasted and then soaked in water for at least a couple of hours. If so they will release oils and absorb water making the dough wetter. Adding olives can make the dough saltier, rinsing and soaking them might give you different results. As stated before, variations are infinite and so are the source of knowledge.
Stage 3: Bulk fermentation
3a – Dough development
SHORT: Perform three sets of stretching and folding with 30 minute intervals. Then another set each hour of the remaining bulk fermentation (depending on the dough development). Wet your hands before each stretch and fold session.
The “bulk” fermentation begins the moment you mix the leaven with flour and water. It’s the second of three fermentation phases in this baking process (the word ‘bulk’ comes from the fact that it’s one big unit during this phase). The first phase being the leaven fermenting and the third is the final rise (after shaping).
The dough now starts to leaven and evolve over time. I’ll try to simplify this complex wonder of nature; Yeasts in the sourdough produces gas (carbon dioxide) that will make the dough rise and the lactic acid bacteria produces lactic acid which contributes to flavor. The symbiotic relation between these two parts will keep on evolving the product until it’s baked in the oven. In this process description I won’t go deeper than this (there’s a lot of information on the Internet available via google searches if you want to examine this more).
Now depending on how much water, flour type and mixing method you used you’ll have a strong, wet or well-balanced dough at this stage. I’m going to keep assuming it’s well balanced after a lighter hand mix when adding the salt. You now want to develop the gluten network in the dough to its strongest possible state, without breaking it. The goal is to have a dough that can hold its own weight when baked. Mixing, adding salt and time will naturally strengthen these bindings and by stretching and folding the dough you’re also helping it expand its possible limits (before it breaks). After expanding the net will pull back and tighten. Balance is of the essence here. You don’t want to tear the network apart now, you want to develop its potential.
I generally stretch and fold the dough three times in 30 minute intervals (plenty of time to relax after being tightened). Then every hour of the remaining bulk fermentation. With a wetter dough I might fold up to 4 times the first hour to help it on the way.
You will feel the dough develop between folds, also you will probably see signs of gas building up and leavening the dough at this early stage as well.
You should vary your techniques between the stretching and folding depending on what you see and feel. If the dough feels stronger (pulls back and holds its form) you should do gentle pulls, folding the dough over itself, no need to force it. If the dough feels slack and wet you should push it more, creating inner tension with more fold overs. The videos below will describe the difference in techniques. I often start with the “wetter” technique and finish the last folds with the “stronger” technique.
Wetter dough, in a bowl:
Stronger dough, in a bowl:
Wetter (yet well devoped dough), in a box:
You want to keep the dough from tearing, thus keeping it from sticking to the bowl and your hands. You can ease the friction between the mediums by oiling the bulk container (using a neutral organic oil) or by adding some % of the total water in the bottom. I do the latter when the dough feels too dry after the mixing session. I always wet my hands before and during the folding.
The stretching and folding also serves the purpose of slowing down the fermentation process. You will disturb the party just a little, also evening out temperatures in the dough. I measure the temperature in the dough before each fold, trying to keep it at 28-29C (82-84F) after the mix, and around 77-79C at the end of the bulk.
3b – Signs of finished bulk
SHORT: When the dough looks airy, alive, feels light and “pillowy” plus have risen 25-50% it should be done.
Now it’s time to determine when this second stage of fermentation is finished. The rate of which the dough is fermenting (the exponential growth of yeasts and lactic acid) depends on the temperature, the amount and state of the leaven, the flour type, season and amount of water.
Higher temperatures in the dough and environment will make the process go faster. A more mature leaven will contain more acids that shortens the balance span. Using fresh milled whole meal flour will increase the activity, so will adding a bit of rye. Many stone ground and high extraction flours also contributes to the fermentation rate. A wetter dough will develop faster than a stiffer dough. Do you see now how it’s futile to only go by the clock to decide it’s finished? The clock can only really be a tool if all other variables are the exact same, which rarely happens.
First off you need to learn the signs of a finished bulk. Here’s what I go by:
Visual signs:
- The amount of gas produced is one way to see how much activity has been going on inside that dough. More gas means more volume which can help you decide when it’s done, when doing very similar dough from one bake to another. Change to many variables and this becomes an uncertain tell. I’ve used rain meters and added balls of dough inside to measure the rise exactly between each stages and it has helped me get the timings right (when all else is the same). I let it rise at least 25% more than it’s original volume and 50% at most.
- An increase in bubbles on the top, sides and under (of you’re using a transparent container) the dough is also a good sign of activity when doing this type of dough.
- Domed (convex) edges where the dough meets the container shows you the dough has become stronger and to me it tells me i’m getting closer to the bulk sweet spot.
- The dough should look alive and billowy when tugging the container.
- If you’re using a lower hydration dough (less then 70%) you can use a sharp knife and cut into it, and you should see many bubbles in its “flesh”.
Other sensory signs:
- Touch the dough to feel it’s state. Spread a light layer of flour on top or wet your hand and grab it. Tug it and sense the reaction. If a freshly newly mixed dough feels like a heavy carpet, the bulk finished should feel more like your lighter pillow. A handful should feel lighter in your hand by the time it’s getting more mature. Use the folds at the later stages to learn how it reacts over time.
- Taste and smell the dough during the bulk fermentation. This is if course (as much else) a learning-by-experience method as you need to compare with something. The more it smells and tastes the more mature it gets.
If you really want to learn the signs you really should change as little as possible between your bakes. You will get a clearer and better understanding of what to do and when with the type of flour you are using, the amount of water, the maturity of your starter/leaven, temperatures and so on.
Stage 4: Shaping
4a – Dividing and pre shaping
SHORT: Pour the dough on a table, divide into two similar pieces and shape them into rounds by using tension pulls. Let them rest at least 20 minutes before proceeding with the final shaping.
After you’ve decided the bulk fermentation is done you need to shape it into the loaves you’re aiming to bake. I always shape the loaves twice to ensure the presence of tension in the out most layer or dough, helping me to reach my goals; dough that can hold its own weight when baked.
The pre shaping (first shaping), does not only give the dough another opportunity to gain strength, it also leaves you with a symmetrical piece of dough, ready to become a symmetrical loaf in the final shaping. I would probably skip this stage totally if working with stiffer dough (below 70% hydration). since its probably already strong enough.
At this stage I have a bulked dough intended for several loaves and need to divide it into suitable pieces. To divide it it needs to leave its container. I simply turn the container upside down on the baking table and wait for the dough to slide down. If I feel the dough being particularly sticky during the bulk, I might give it one final round of very gentle folds to help it release from the sides of the container and then transfer it slowly to the table by hand (or gravity).
I then use a bench knife to cut the dough up. By spreading a thin layer of flour on top of the dough, the friction will lessen and the cut will be cleaner. I also flour my hands and bench knife just a little to prevent the dough from sticking to them. Now I use my hand and knife to push and pull the piece of dough into a round shape, stretching the outer layer of dough and leaving it more tense. I recommend having a lot of bench space when doing this (in the video its tight and I’m risking the symmetry).
I will not scale the pieces since I deal with such low quantities and bake one loaf at a time in the end (at bakeries you might want to have exact sizes to fill the demand and bake many loaves evenly hence scaling when dividing).
Overdoing these tension pulls will tighten the innards or even tear the gluten network. Moderation and efficiency is key here, adjust to how the dough reacts. If the dough is very slack I can create more tension, if it’s strong I ease up on the pulls.
If the dough feels sticky I use slightly more flour. Its more about speed and determination than flour on the bench at this stage. Adding too much flour that hasn’t fermented this late in the process can create inconsistency in the texture of the crumb (like large holes, tunnels or lines of flour).
Now depending on the state of the dough (slack or strong) I let the dough rest on the table, uncovered, for 20-60 minutes (shorter time for slacker dough). When pre shaping the gluten network tightens. Now it’s time to rest and relax again before adding even more tension in the final shaping. A slacker dough relaxes much faster. I leave it uncovered to let the surface dry out just slightly. This will slightly prevent the dough from sticking during the final shaping. If its a drier dough I might cover it for the first half of the rest to keep it from drying too much.
4b – Final shaping
SHORT: Shape the dough into a boule (round) or a batard (oval) and place them inside linen lined proofing baskets.
The principles for this final shaping is them same as the first pre shaping. The goal is to create an even structure of tension in the dough, without tearing it. Gentle, firm and efficient. Do not touch the dough without a clear purpose of the move. Every contact and friction will effect the structure and you want it to effect only in a tension building (and maintaining) way, not a gas deflating way.
There are so many ways to shape a loaf of bread. They’re all good as long as if fulfills the above described goal. I generally use two different was to shape round loaves and two different way of shaping ovals. One method for the slacker dough (the stitching) and one for the stronger (the tuck and roll). They are described in the videos below. The “stitching” aims to create tensions inside the dough as well as outside. The “tuck and roll”aims to create even tension at the outer layer mainly. The principles are the same for both methods regardless of final shape (round or oval).
Tuck and roll, boule (round):
Tuck and roll, batard (oval):
Stitching, boule (round):
Stitching, batard (oval):
Regardless of method used the start is always the same: Dust the surface of the pre shaped and rested dough, dust the table, flour your hands and bench knife and scoop up the dough, flipping it upside down again. After the rest the dough will have a dry side and a sticky side. You will want to have as little contact as possible with the sticky side, using its stickiness as a glue to the tension you want to create. A drier and flour covered surface will not glue so well to another drier and flour covered surface. It fits better with that sticky wet media. Keeping this in mind the logic of using as little flour as possible still reigns here. You want the dough to glue up, without using to much force, a very hard balance that will take thousands of loaves to master. Do your best to keep the symmetry and stick with a method you are comfortable with, it will be the most efficient in the end. Also make sure you have enough space. You will see later in this process (the bake) that one of the shaped loaves had a bit of a wonky shape due to the tight space when shaping.
After the shaping is done I sprinkle some flour on its top to create a dry and protective layer. I could also let the dough sit seem side down for a minute or two just to make the seem close naturally before transferring it to a linen lined proofing basket. I use the bench knife to scoop it up in my hands, turning it upside down so the seem faces upwards before placing it for its final rise. I place it upside down since I want to score the smoother side when baking. More on that in stage 6!
Stage 5: Proofing
SHORT: Cover the proofing baskets with linen cloth and/or food safe plastic bags and let it rest for 0-90 minutes in room temperature before placing them in the fridge for 10-48 hours.
It’s time to let our loaves get their final rise and rest. During this “proof” (or “prove”) the fermentation and development keeps on going until all the food are eaten and no gas longer will produce, and the pH-levels will get dip down and start breaking down the structure.
I always prefer to do a cold proof (also called “retard”) over a room temped. I like the taste and texture it brings to the crust and crumb, and I need the dough to develop a nice “skin” for the artistic scoring (more on that on stage 6).
It seems the attributes of the flour has a great effect on how long you can retard your dough in the fridge. Some flour brings dough that just seems to die in the fridge, no development at all! Some flour keeps on fermenting at a higher rate in the fridge.
The temperature effects of course as well. I keep my fridge thermostat at 5C(41F) putting the dough in the lower parts of the fridge where the cold is less likely to fluctuate if the fridge keeps getting opened.
When using higher amounts of fresh milled flour (25%+) I can’t seem to retard the dough longer then 16 hours (roughly), where a roller milled can yield the same type of result after 48 hours.
At some point I have to go by the guts when trying out new flour and methods. The “poke-test” seems more reliable when dealing with room temped proofing, rather then the cold retard. All dough get “slow” when cold enough. Also, it’s easy to get fooled by the volume of the cold proofing dough, since cold gas shrinks.
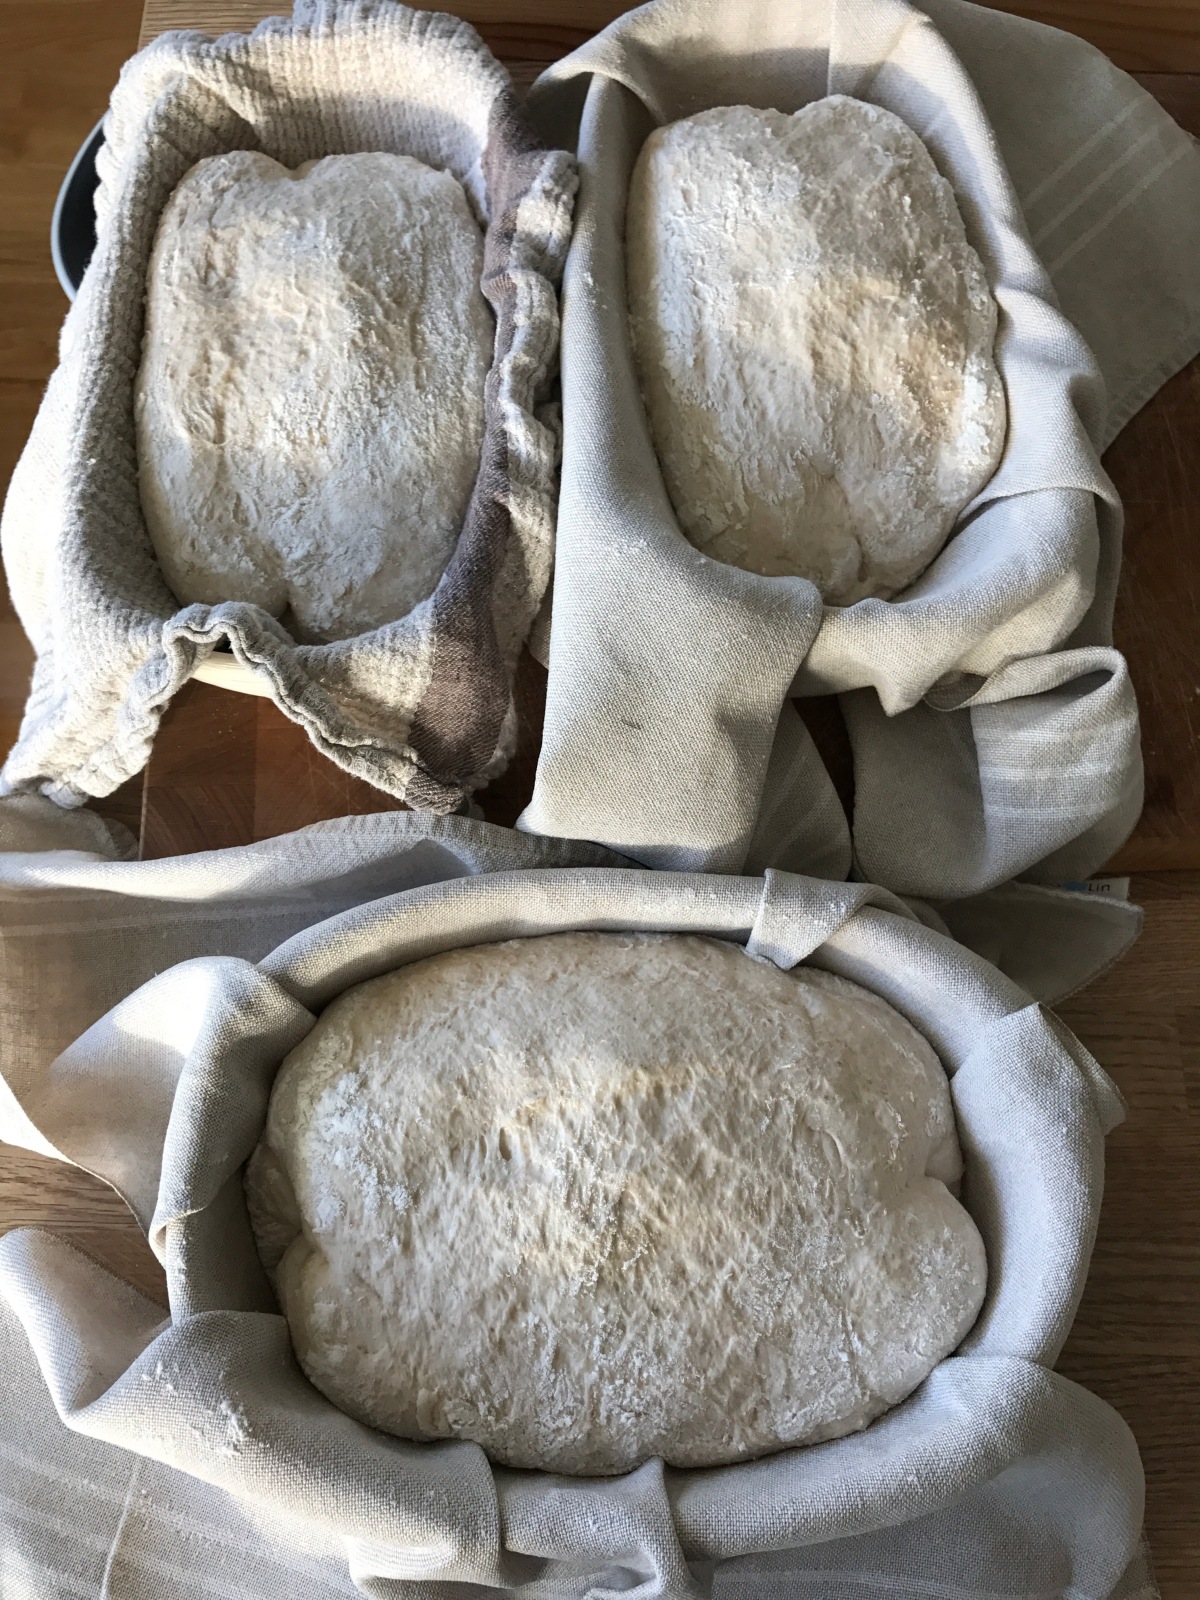
Three oval loaves ready for a cold long retard, resting in linen cloths.
With some types of flour I let the dough proof in room temp until its on the brink to finished before letting it sleep, and some I put straight into the fridge. Stiffer dough that evolves more slowly are always left in room temp before hitting the cold (otherwise it could be in there forever). Wetter dough I tend to cool down earlier and so on.
The dough contains a lot of water. Water always wants to balance out between mediums (from a damper medium to a drier medium) leaving your dough “sweating” during the retard. If you retard it in a dense container, or on a dense cloth, condense will form leaving the surface wet. A wet surface will be hard to score, because its softer. So you want to hit a sweet spot where its damp enough to be able to expand proper but still dries the surface enough for those sharp lines when blooming in the oven. Some flour releases more water over time in the fridge, and others do not.
By adjusting the access to circulating air around the dough you can control the dampness. I do this by using linen cloth which lets the dough breathe better then cotton. Also by putting the proofing basket (made from rattan) inside a plastic food approved bag to keep it drying too much (some flour I’m using releases so much water that I most often just retard it only covered by cloth).
Stage 6: Scoring and baking
SHORT: Flip the proofed dough from its basket onto parchment paper or a well floured peel. Score it and bake in a pre heated oven at atleast 250C (480F), with steam added during the rise, and 200-230C (400-450F) for the remaining bake time.
I’ve written an extensive guide on this stage (which will also be updated regularly). You find the first part of two right here.
Unleashing the full potential of your loaves through scoring patterns, oven springs and crusts is mainly about the process before hand and very little about the methods used during the baking moment. You might find there are some repetition in these articles because of this, only from another angle.
Resulting bake from above video. You can see here that there are still a lot of sugars left in the crust, from the shifting colors.
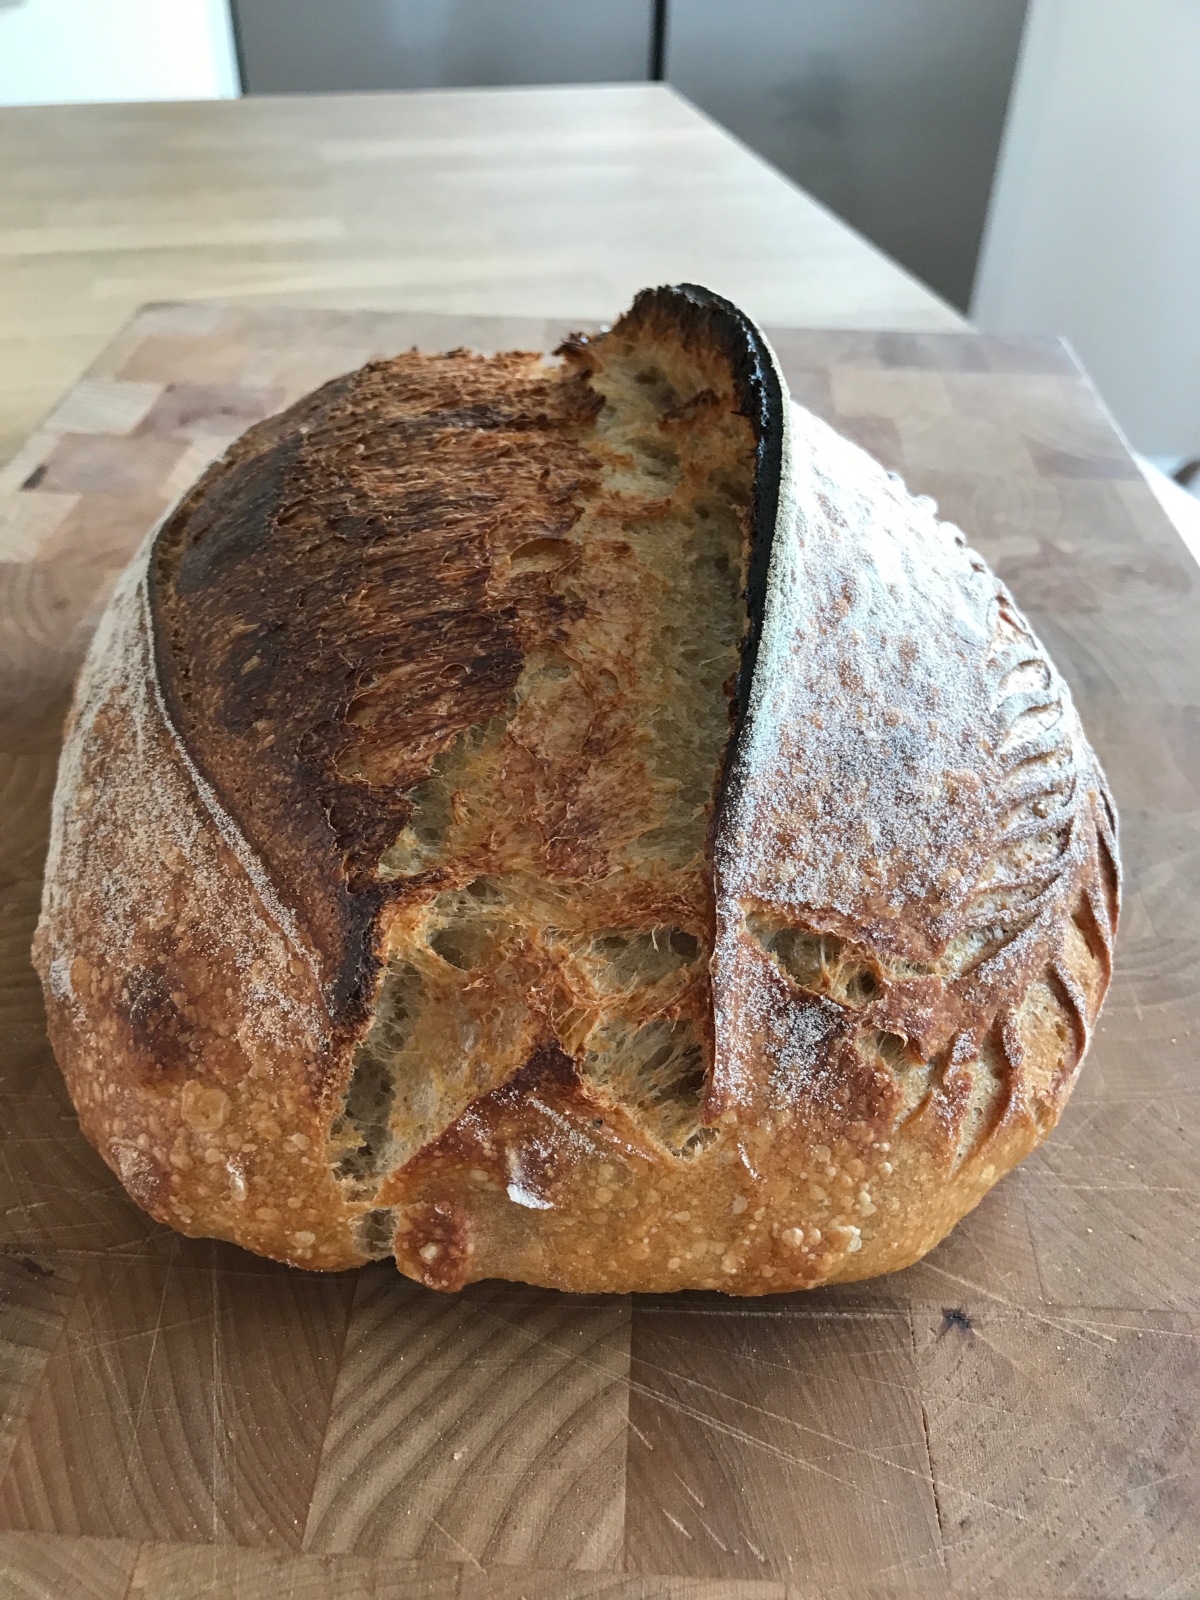
Same bread, another angle, demonstrating a mighty “ear”.
Epilogue: Analyze
The process of making a naturally leavened bread is finished with the bake, no stages left to interact with the product (asides from enjoying it of course!).
With this final section I will give you some insight in to how I analyze my work in order to move forward and improve. If your ambitions are alike then you should treat this phase as the most important one.
The best way to evolve is changing as little as possible between each bake. Try to change ONE thing only and you, take notes, and you will gain wisdom. It’s really hard to change only one variable. At least try to change as few as possible and you will go forward.
With the help of some pictures of crumb taken from several loaves I’ll try to explain some things I’m looking for when analyzing the bake.
Now first let’s be clear on what the goals are for this process. My goals with each bake is a juicy soft crumb with lots of evenly distibuted glossy air bubbles and crispy caramelized crust in an artistic bloom. This describes balace to me. Balance between strength and weakness in the dough, dampness and dryness inside and out. The harder this balance is to achieve the more attractive it becomes to me.
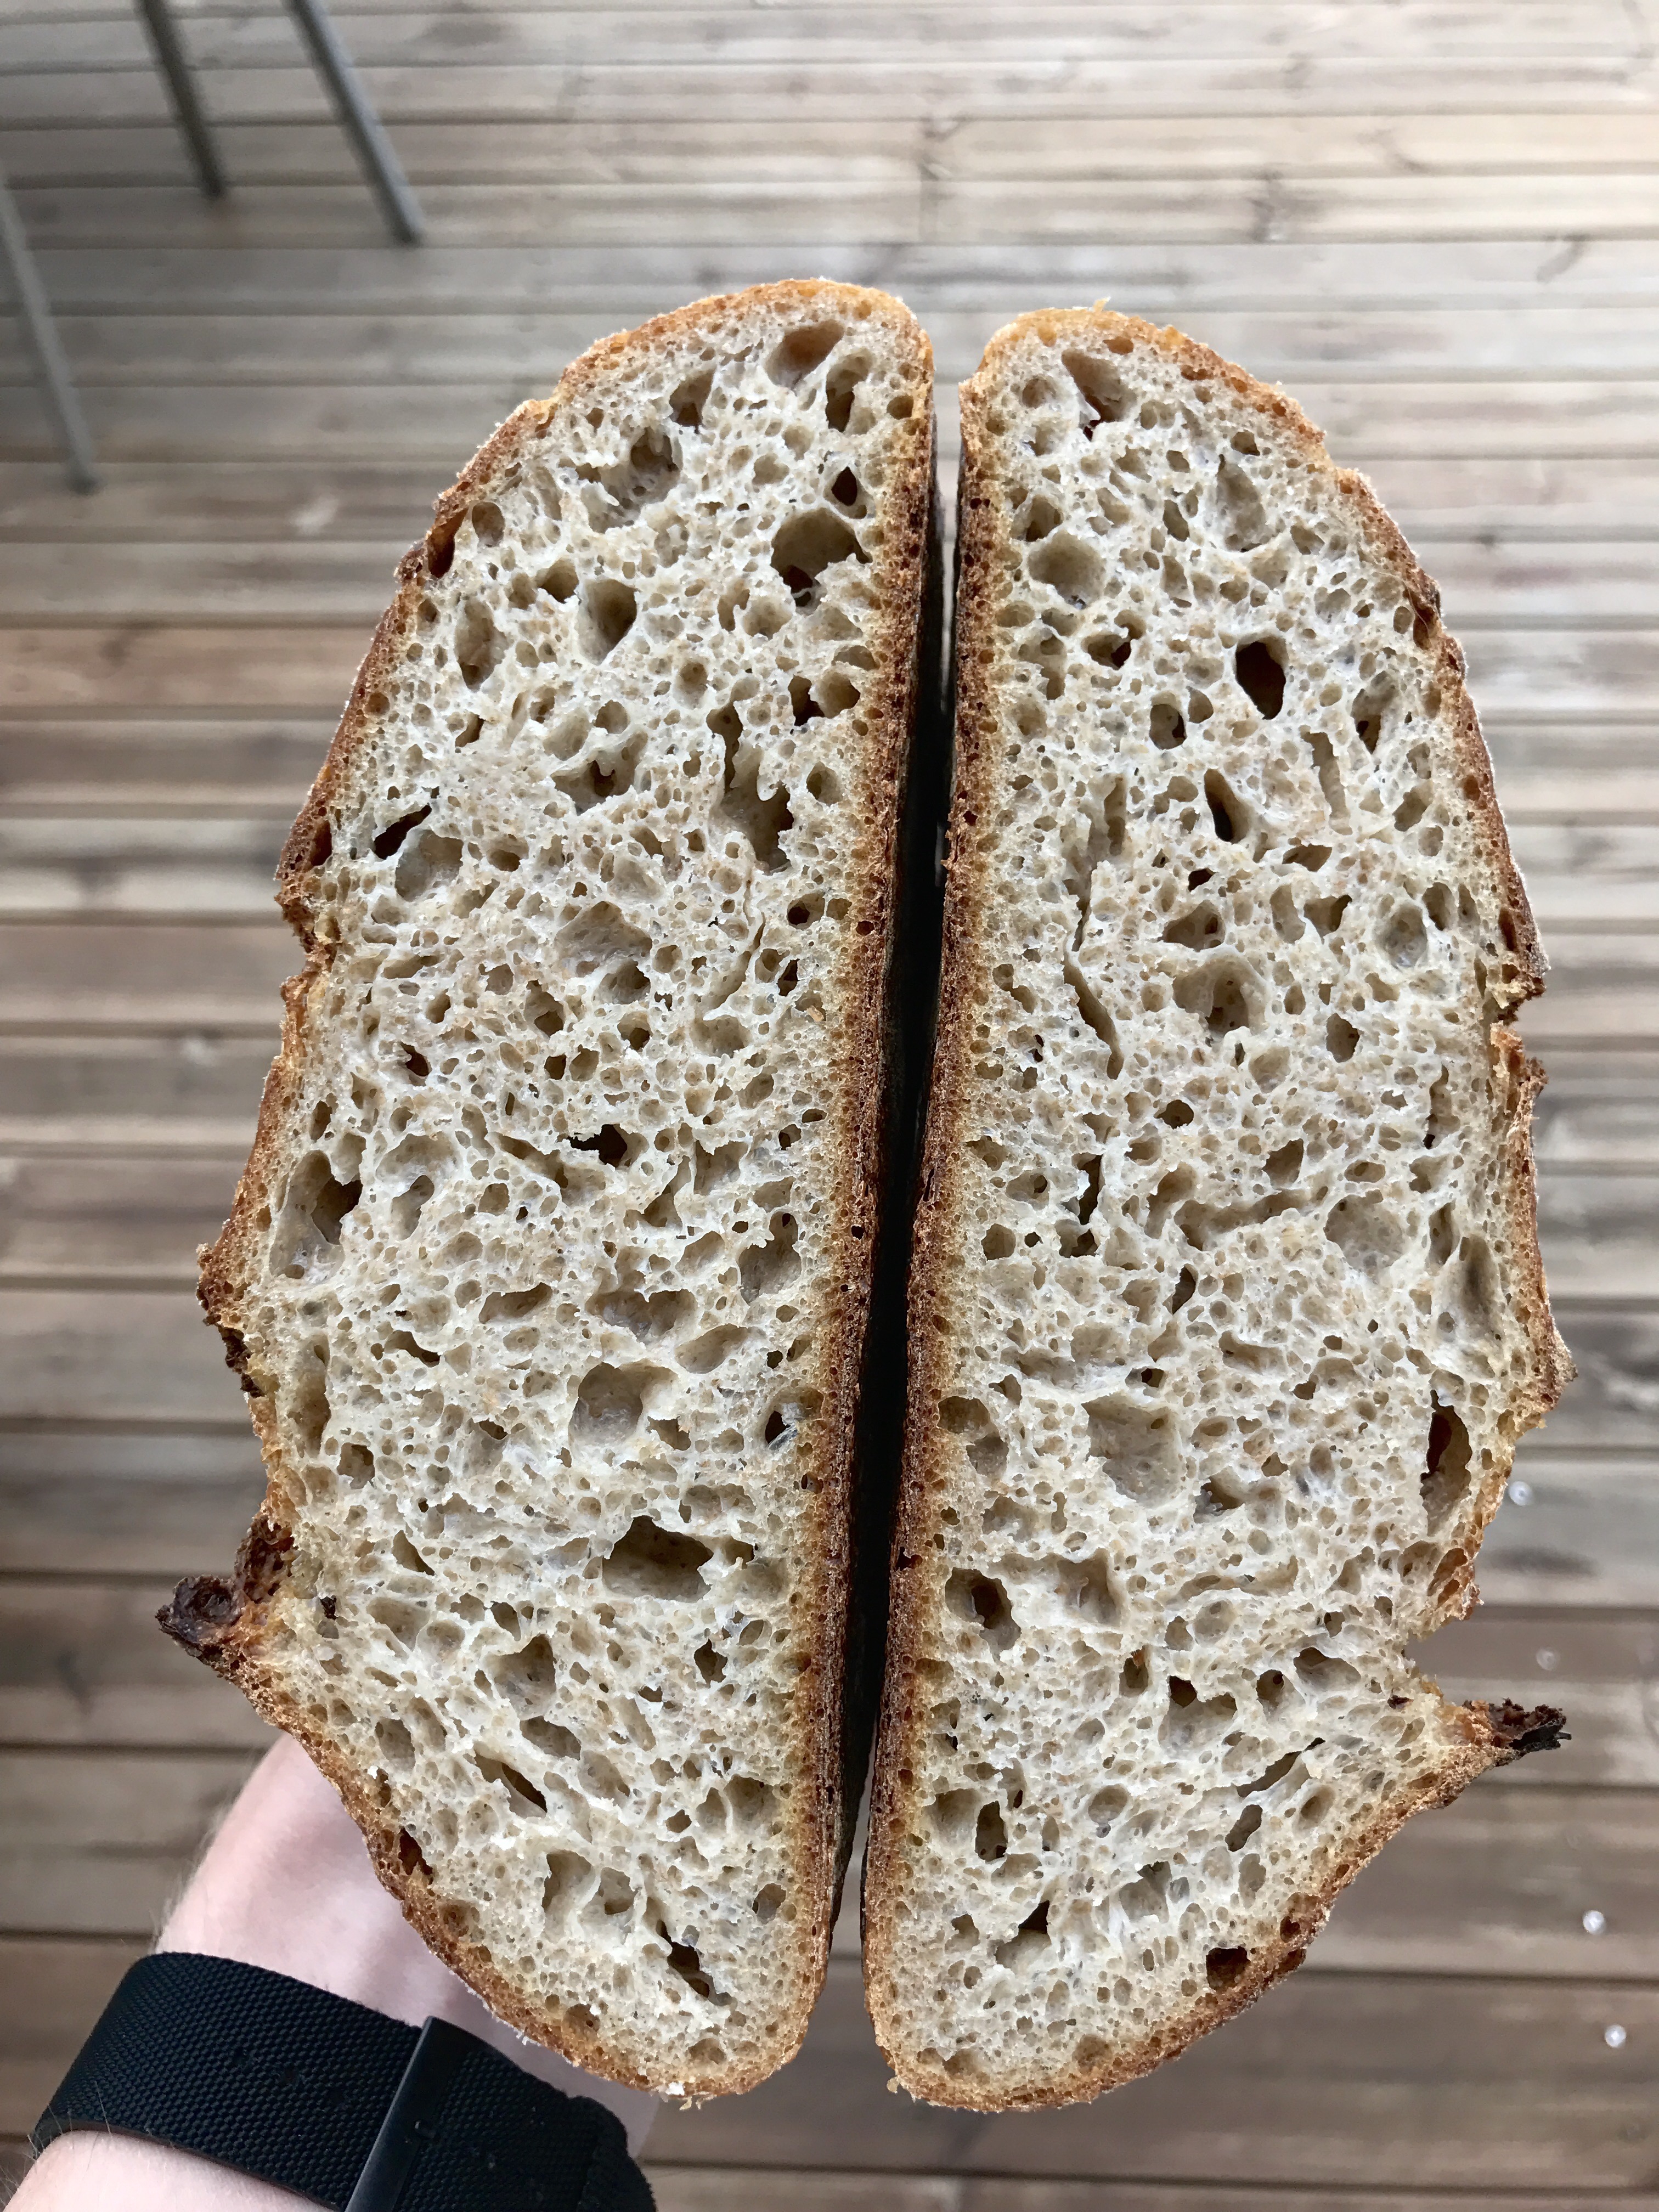
First off I want to show you a high hydration crumb. This has the softness and juiciness I’m looking for, with a distincly even distibution of those air bubbles. A crackly well caramelized crust and a good rise! I can only really score this loaf one way though, since the surface is too damp and soft. Trying an artistic approach will leave the slashes dragging and also ruin the tensions and rise.
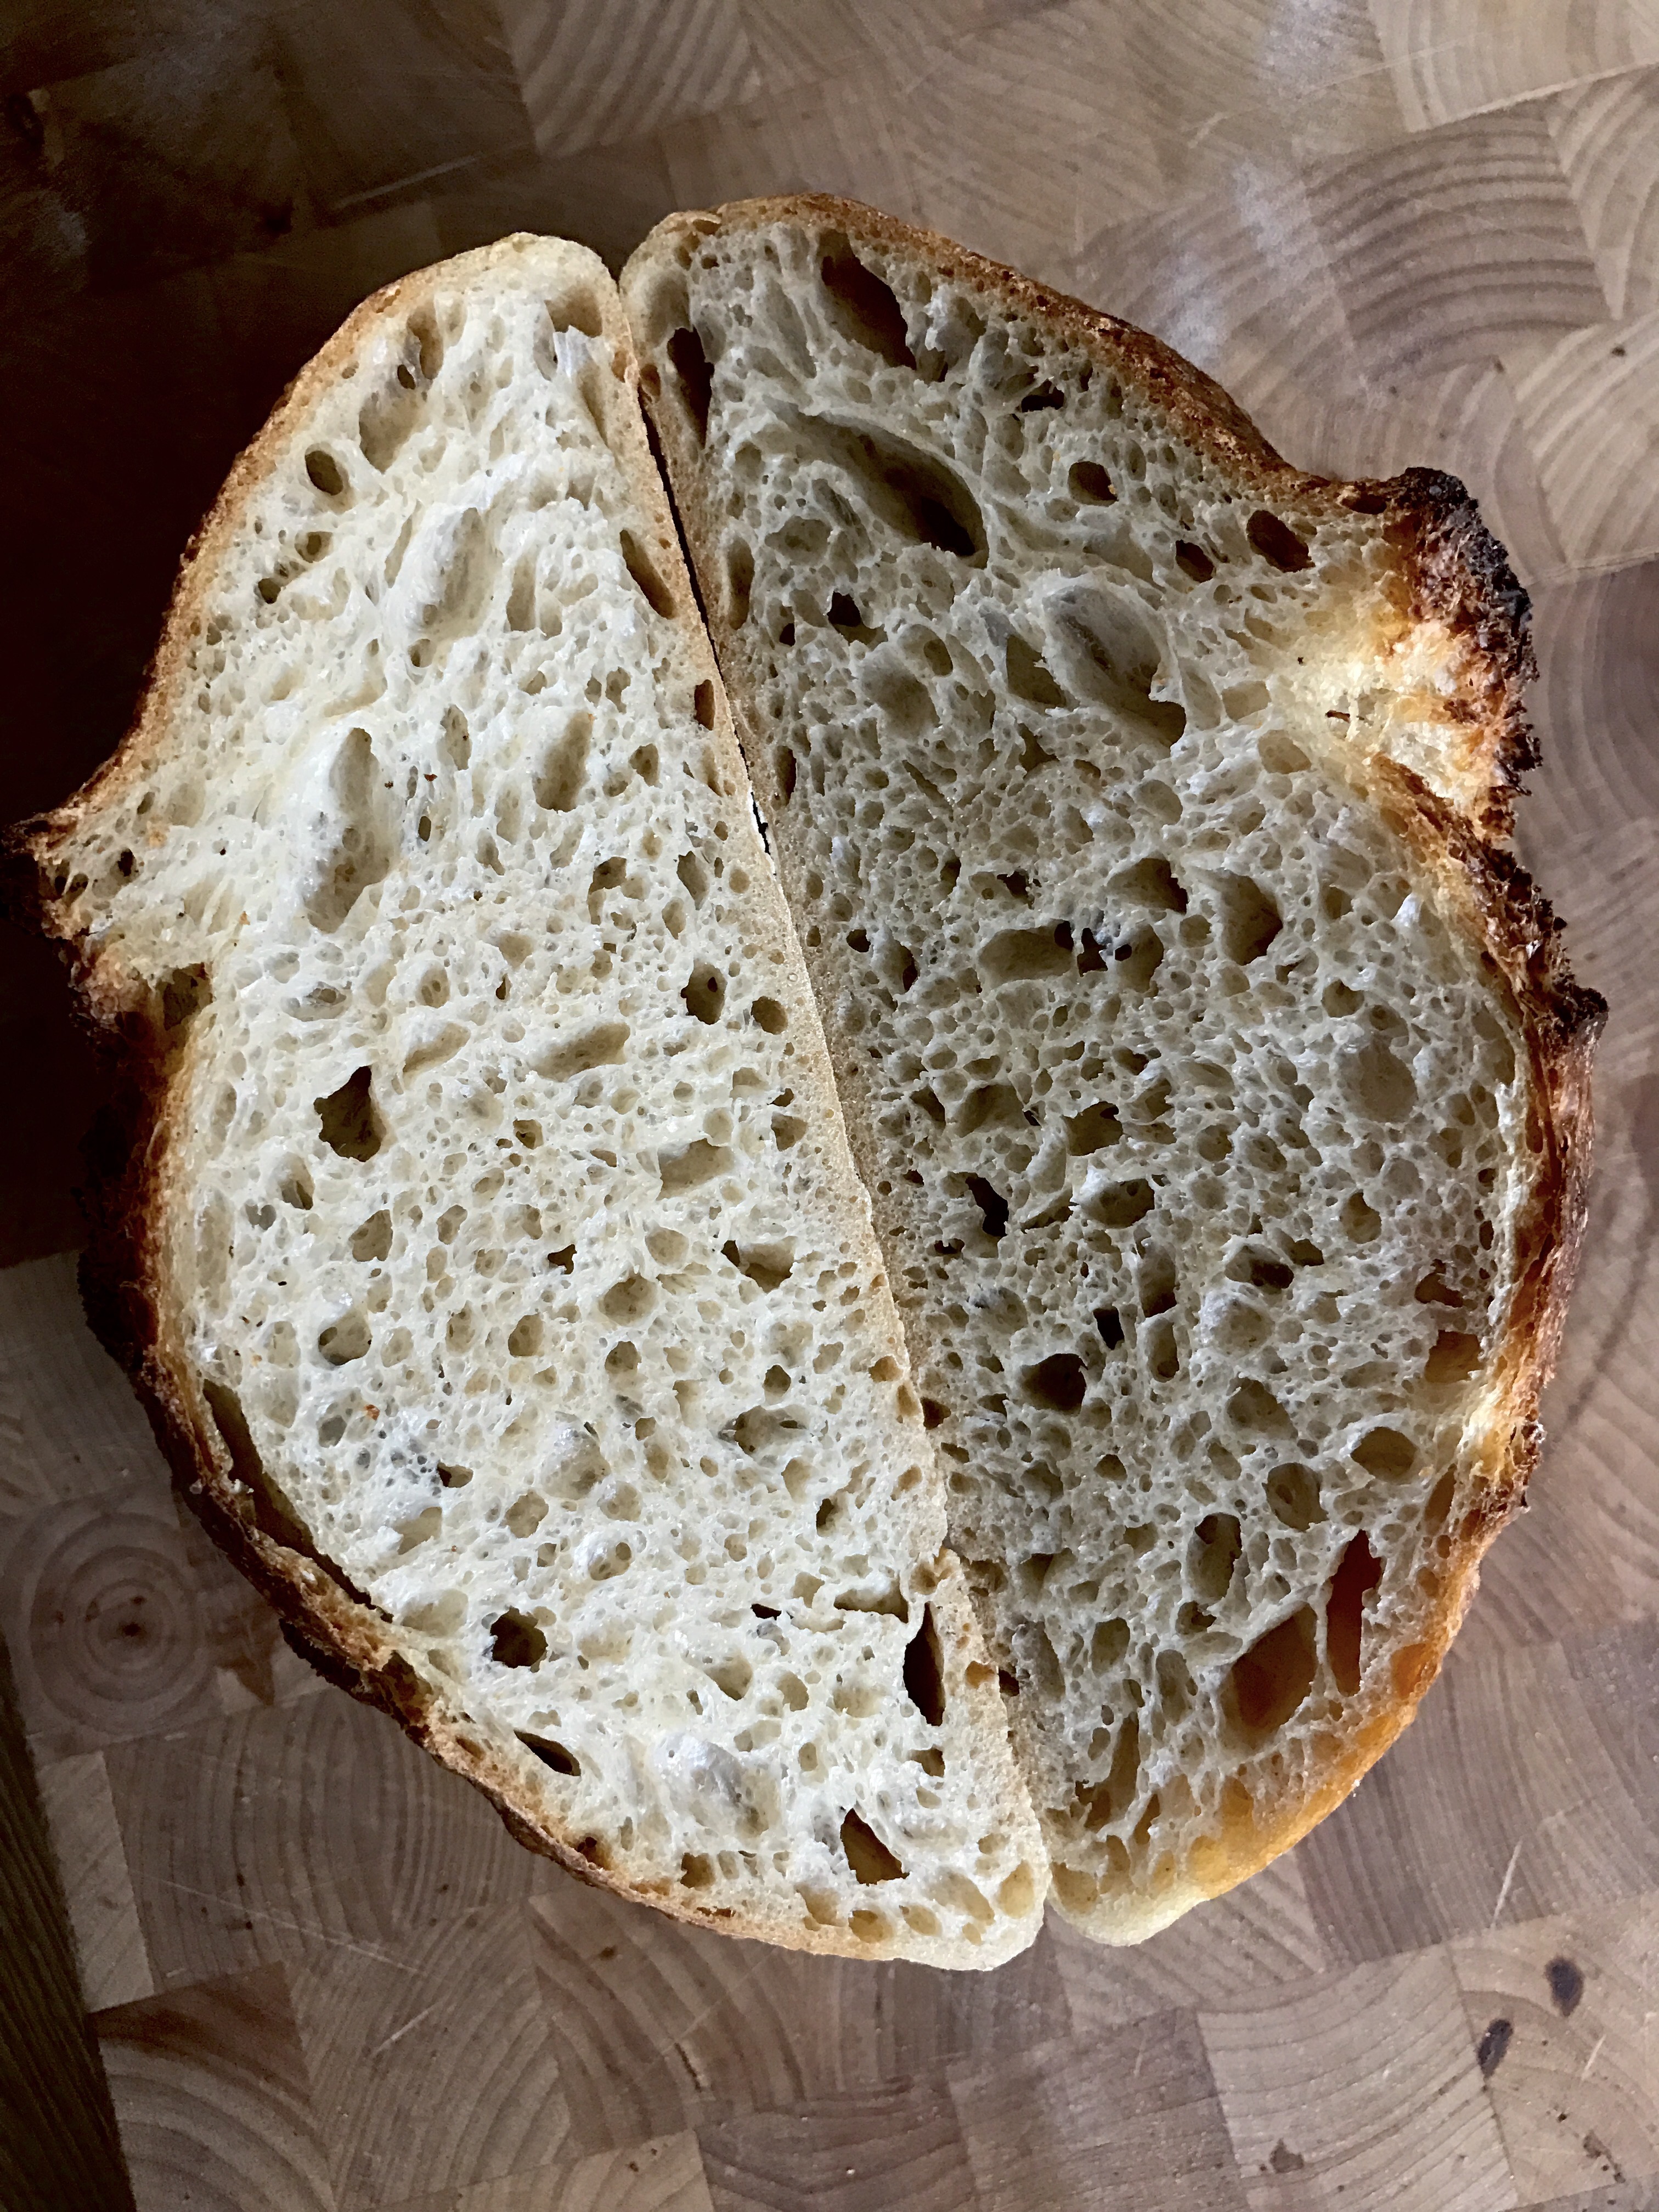
High hydration loaf, could’ve gone just a little bit shorter in the fridge.
The example below shows two loaves from the same batch, One had a much longer colder retard then the other and can be considered over proofed, the acids took over, leaving the bindings weaker, unable to hold the shape and any larger gas pockets. They both had the same score (single straight line) and same shaping technique. The latter also had a more sour and tangy taste to it (but still very rich and tasty) then the first.
Another sign of over proofed loaves is the flatter profile and the monotone coloring of the crust.
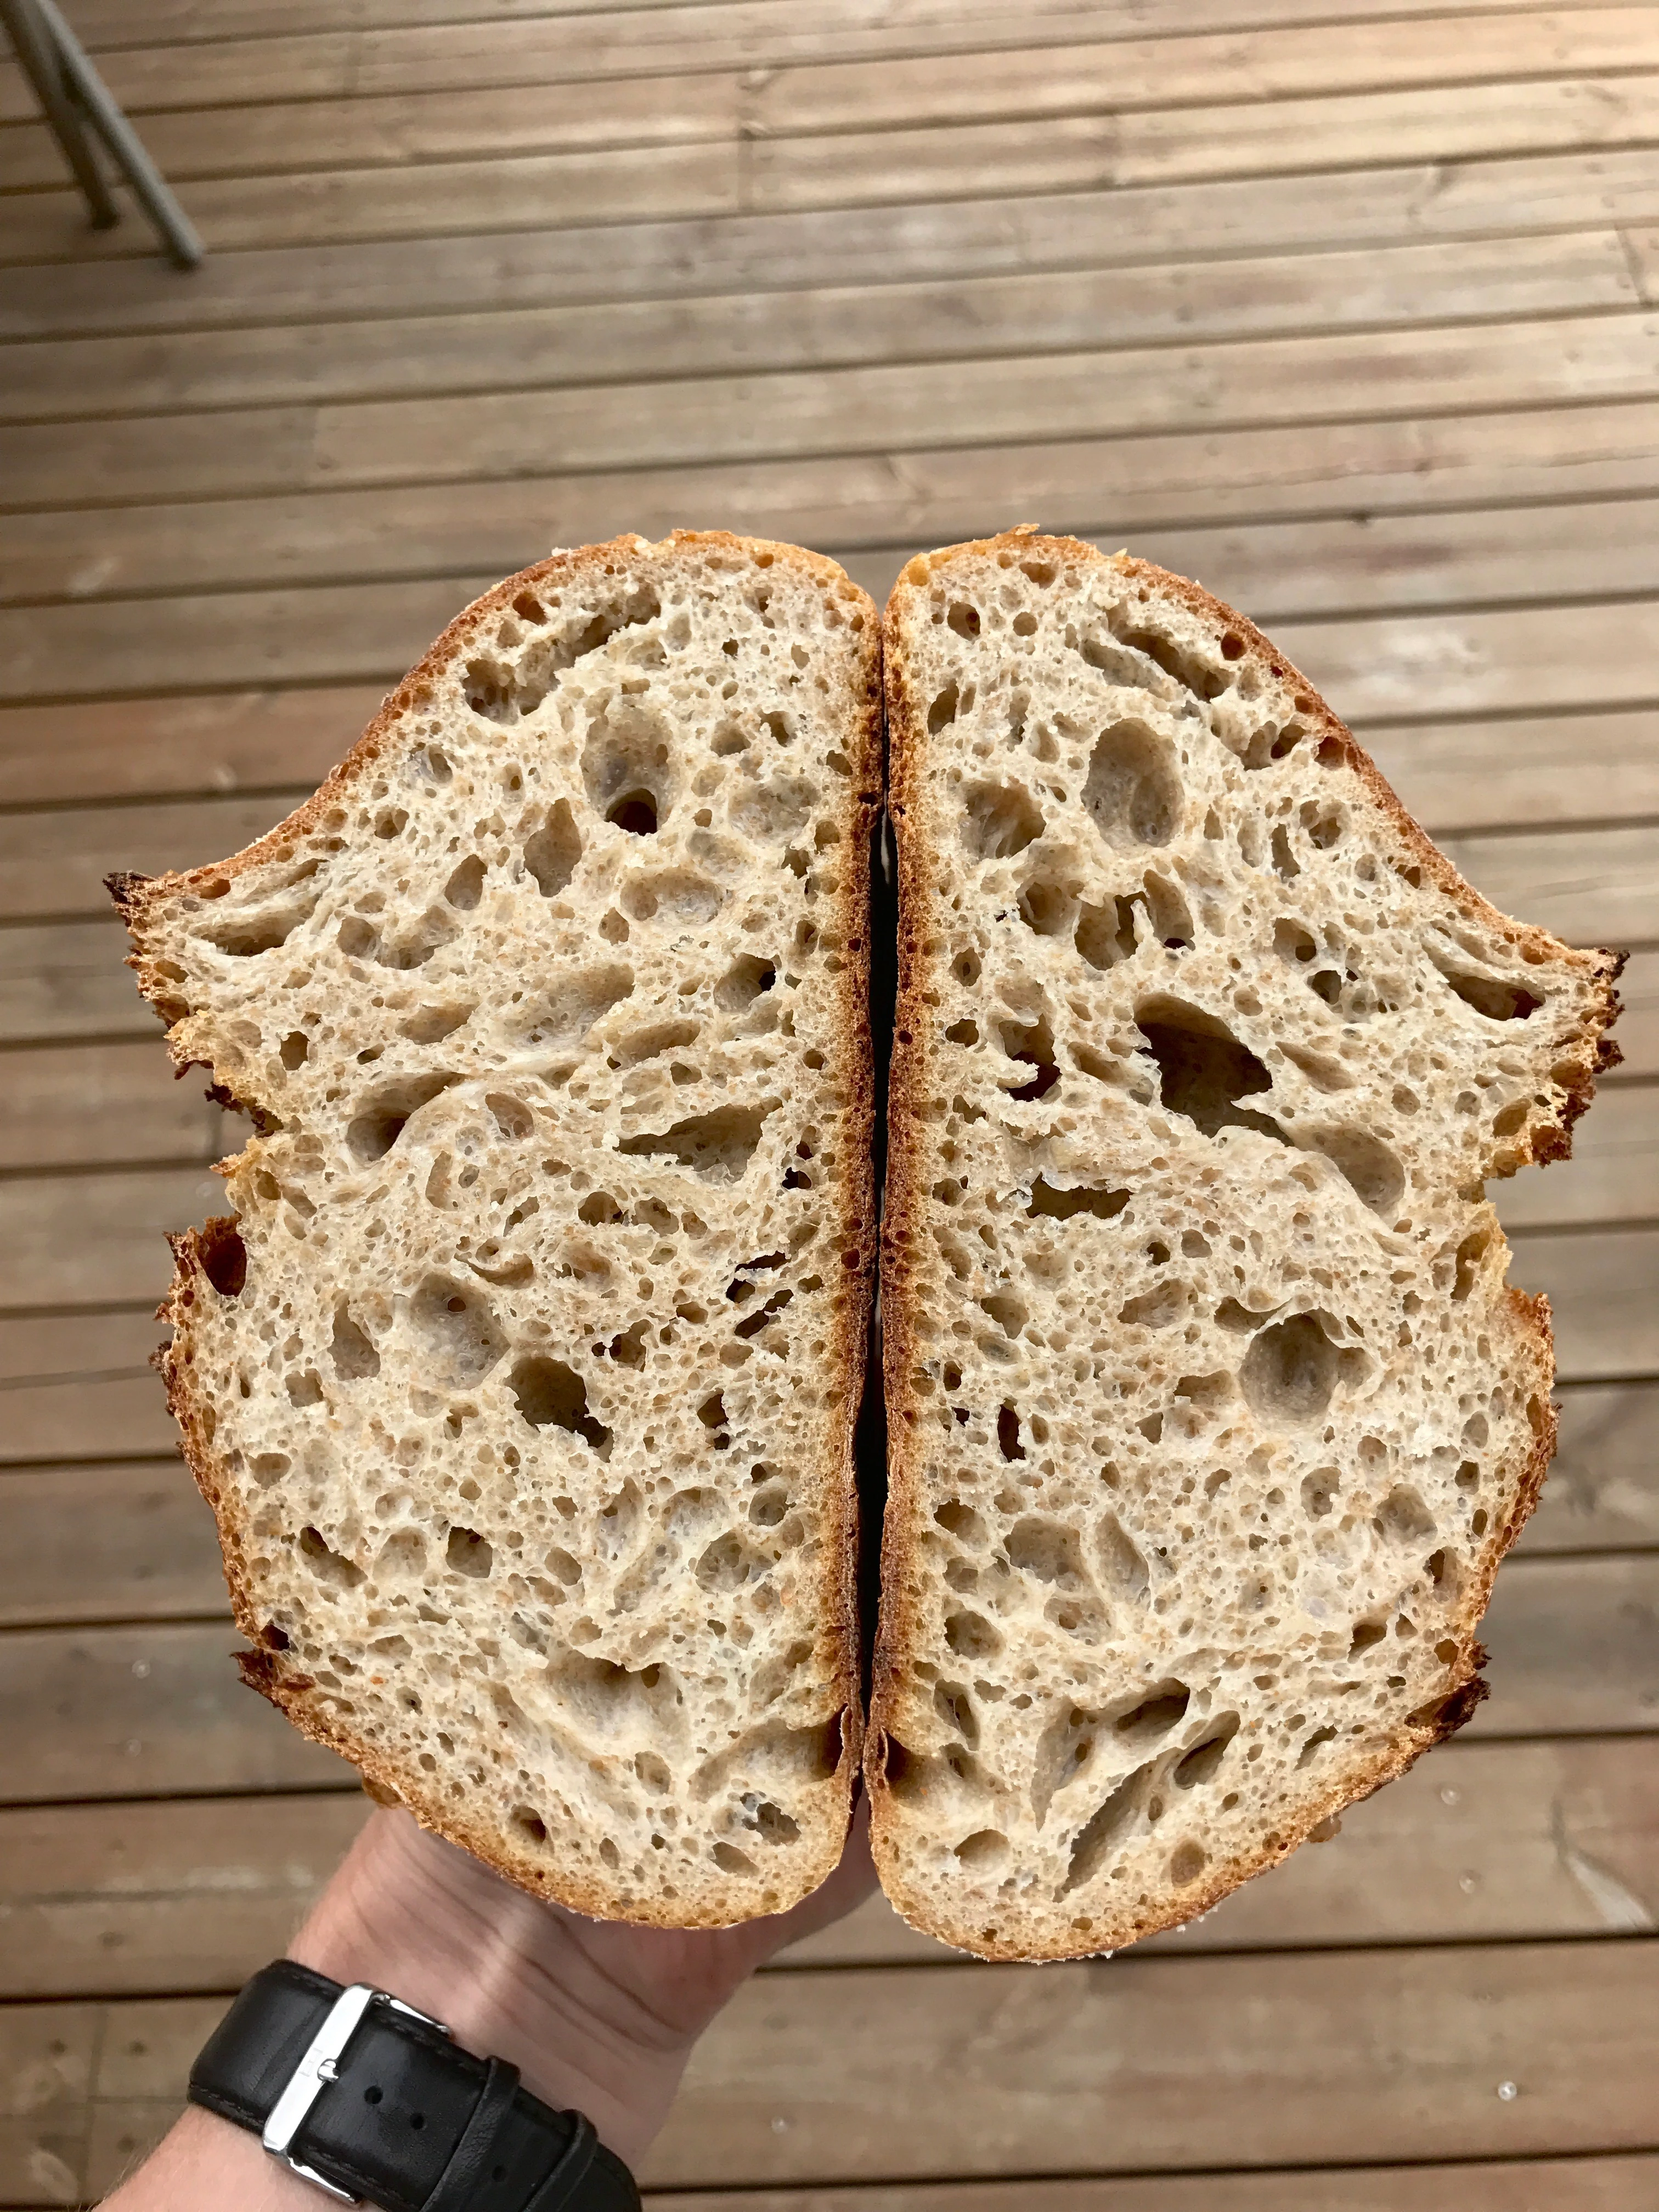
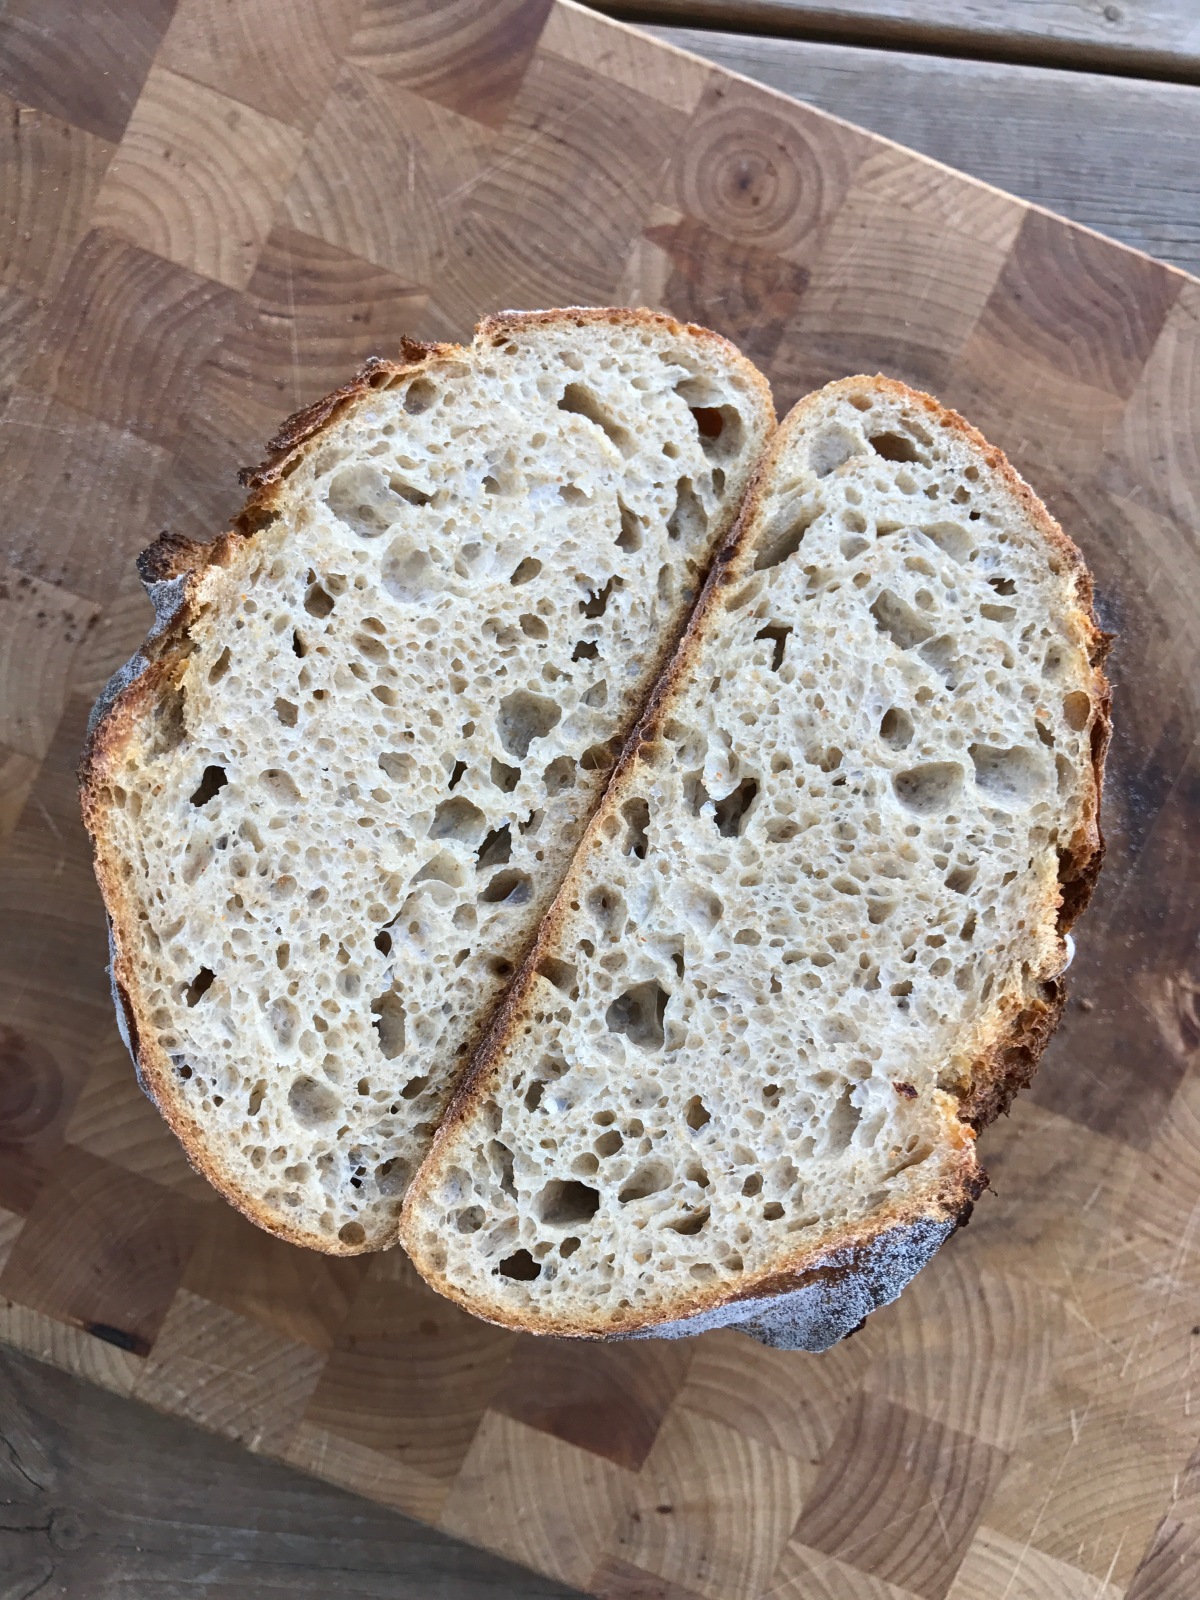
16 hours cold proof – Proofed a tad too short, leaving it with some large air pockets and some denser parts. This could also be due to rough handling during the bulk and during shaping.
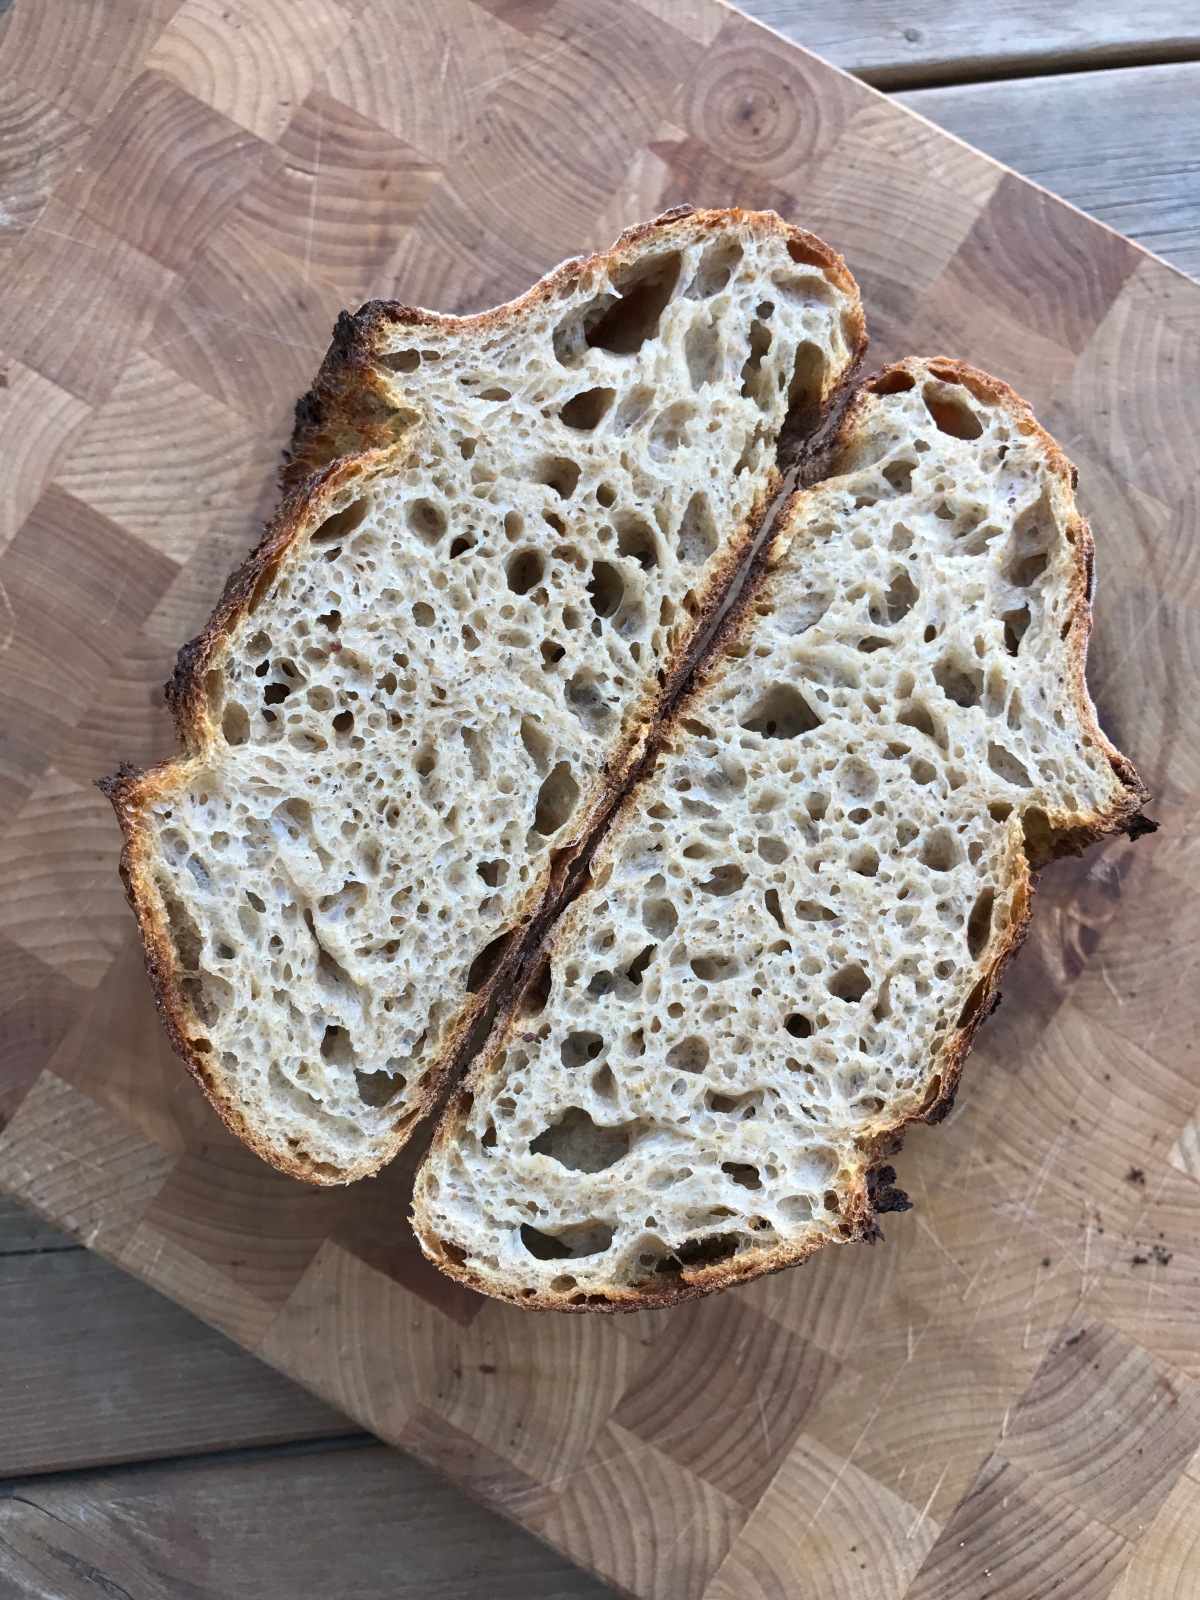
40 hours cold proof. This one has proofed for too ling, leaving a flatter profile and tighter crumb (yet with evenly distributed gas pockets). Taste could be too acid or just heavenly at this point (in this case the latter).
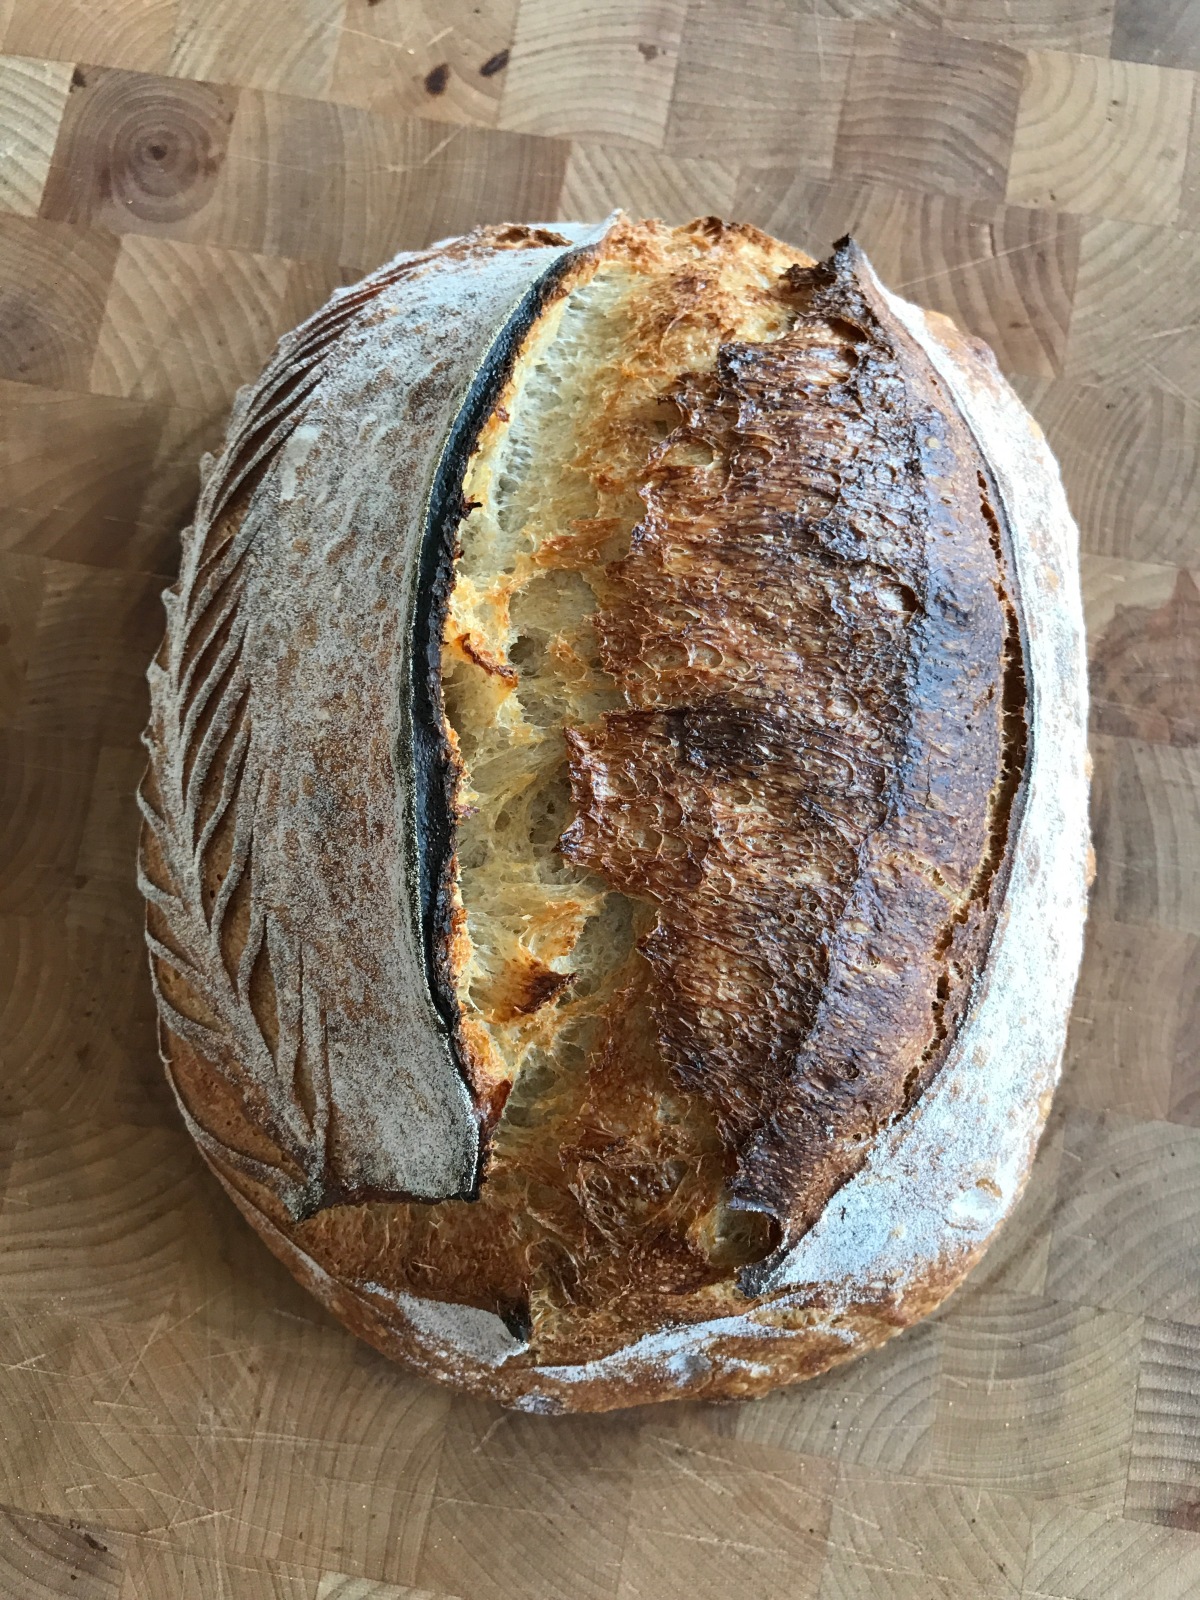
Two more loaves from the same batch. Everything is the same but the scores are and proofing times are different. The first one being scored in random patterns, leaving it blooming more evenly, the other with a single slash (and some minor stalks). The latter had 5 more hours in the fridge as well.
This one had a random pattern leaving the bloom much tighter. In order for the crumb to reach its full potential you should score a loaf accoringly (check out part 6 for more info on this).
Creamy, even, glossy with a rich bloom and possibility to score artisticaly as well. This is my ideal crumb (from the same batch as the above picture). Scored with a single slash and a decorative stalk on the side.
One day I will write a trouble shooting article and add to this process. Until then, decide what your goals are, bake a lot and change as little as possible between each one.
Glad you’ve stuck with me so far in this version of the Country Style Sourdough Bread, I hope your loaves tastes as good as these!
