Skip to content
  • Home
  • About
  • Contact
  • How I bake
  • Order
  • Studio
  • Workshop
    • International Workshops
    • Workshops på svenska

Enter your email address to follow this blog and receive notifications of new posts by email.

Recent Posts

  • Building THE baking studio – part 4
  • Mehanics of mixing: The best choice for quality
  • Building THE baking studio – part 3
  • Building THE baking studio – part 2
  • Building THE baking studio – part 1

Archives

  • December 2019
  • July 2019
  • June 2019
  • May 2019
  • August 2017
  • March 2017

@danlarn Instagram

No Instagram images were found.

Categories

  • GUIDES
  • How I bake
  • MUSINGS
  • Okategoriserade
  • The Baking Studio
  • GUIDES
  • How I bake
  • Okategoriserade
  • MUSINGS
  • The Baking Studio

Bread by @danlarn

Sustainable & Educational Bread

  • Home
  • About
  • Contact
  • How I bake
  • Order
  • Studio
  • Workshop
    • International Workshops
    • Workshops på svenska
  • GUIDES

10 tips in 10 days: 4 – scoring bread

Daniel Larsson 15 May, 2019

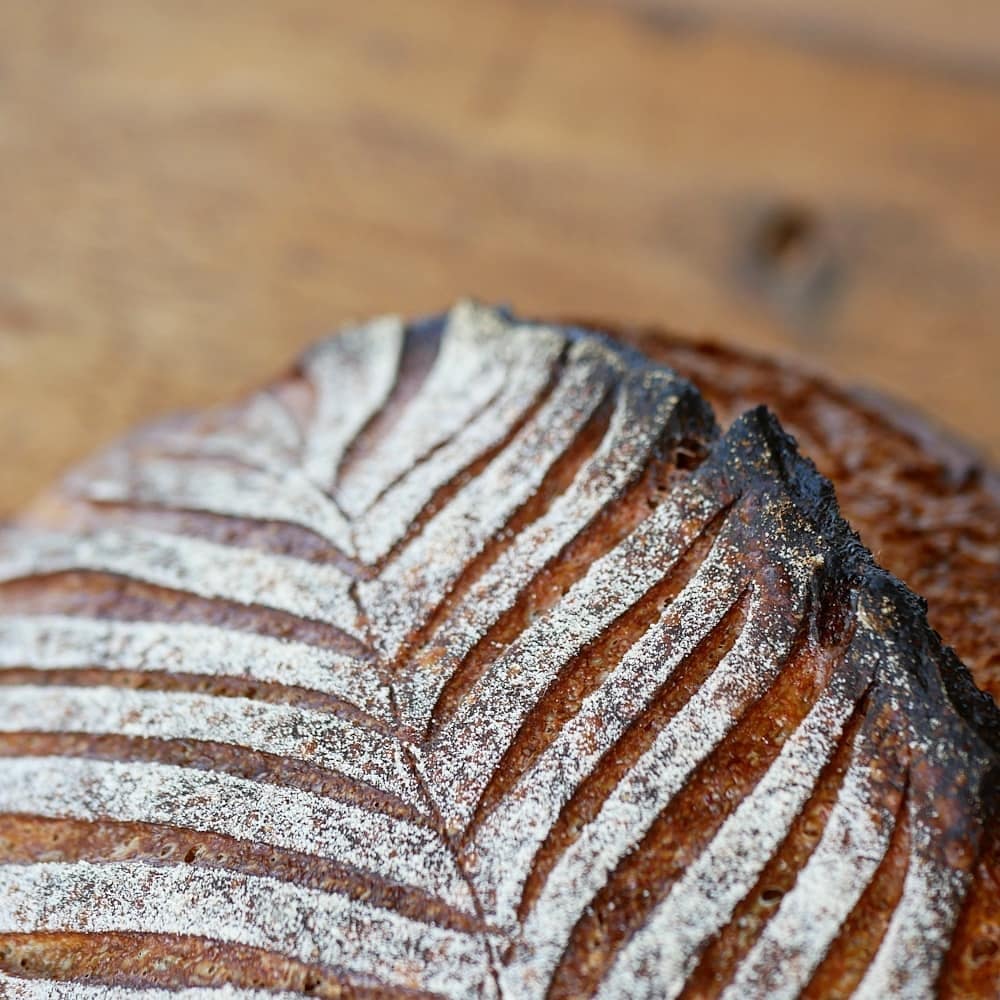
Make distinct patterns possible by storing the shaped dough cold and open to air.

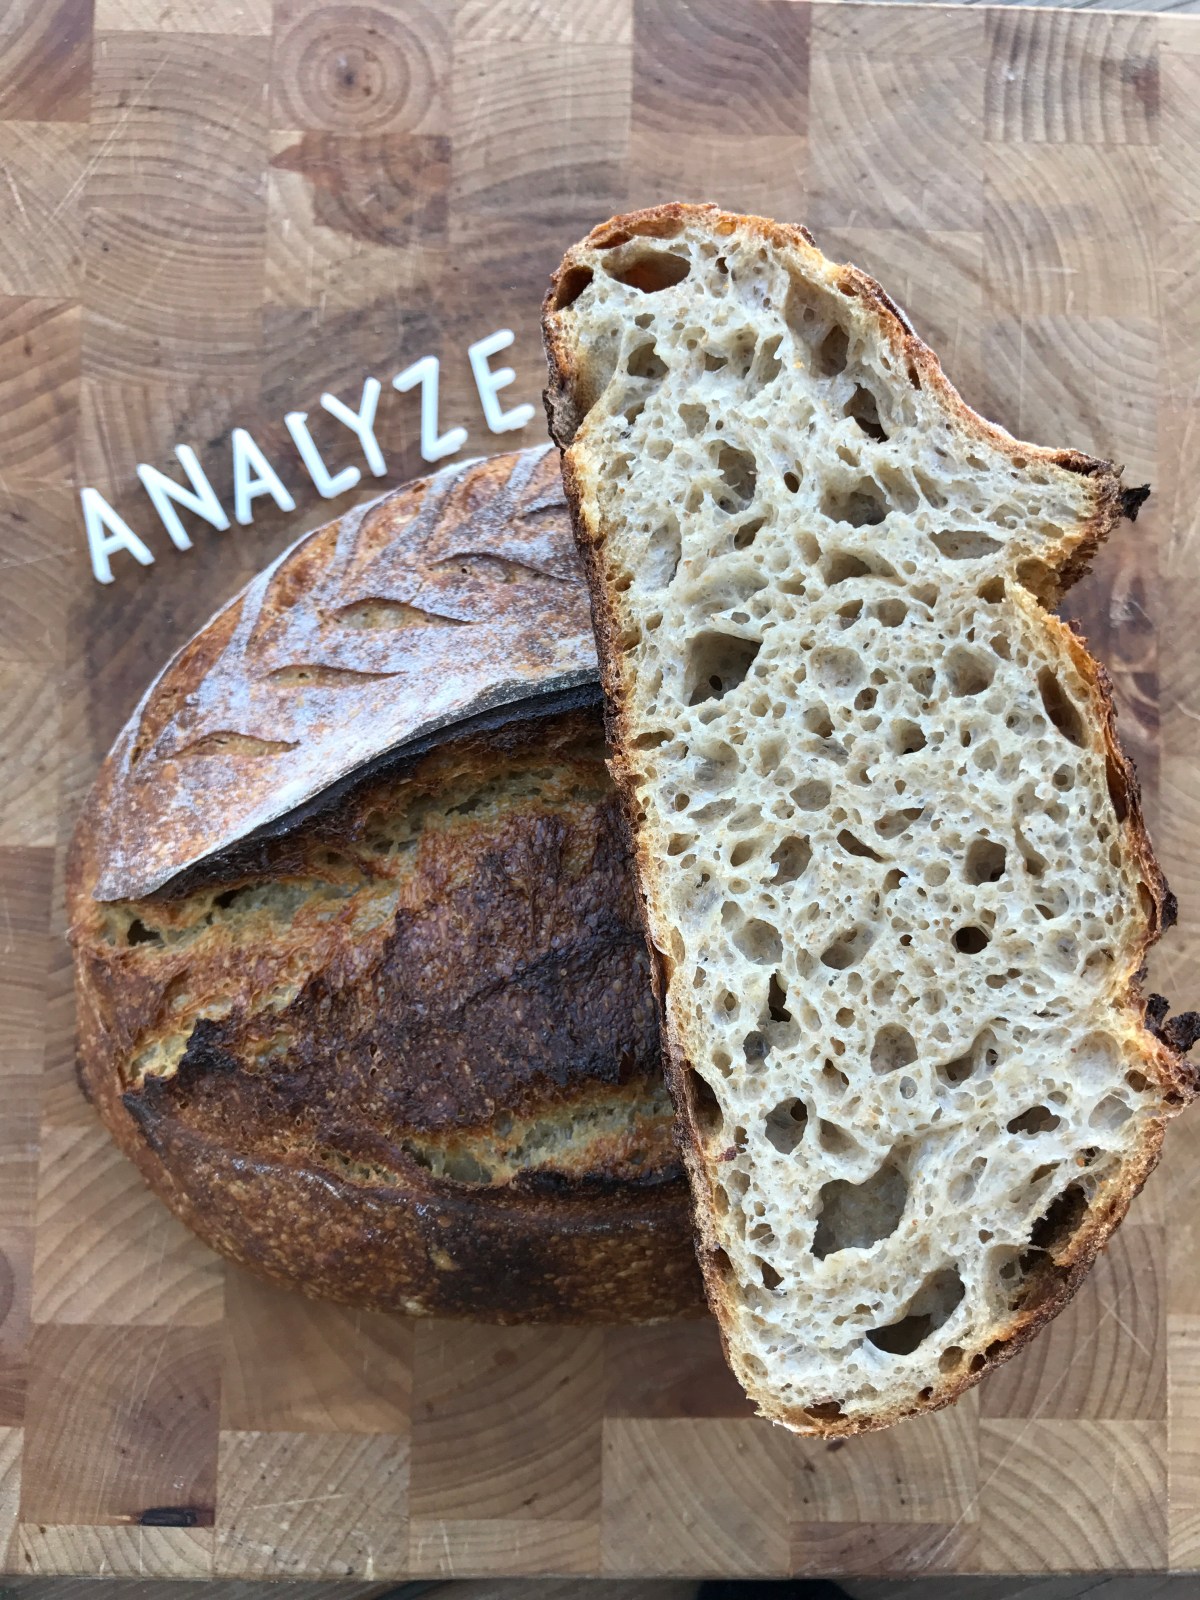
How the dough will bloom when put into a hot steamy oven is a sum of all things that have happened so far in the process. It’s not all about how the blade cuts the surface of what’s to become the crust.

With all thing being equal up to the point of the loaf being shaped and ready for the second rise, there are some details that (to me) makes a huge difference. This is what this tip is all about. Storing the shaped loaf in a way that it can be exposed to a moderate amount of circulating air, for an extended period of time. This gives you a surface that holds a little less water. A sharp blade will have an easier time getting distinct cuts.

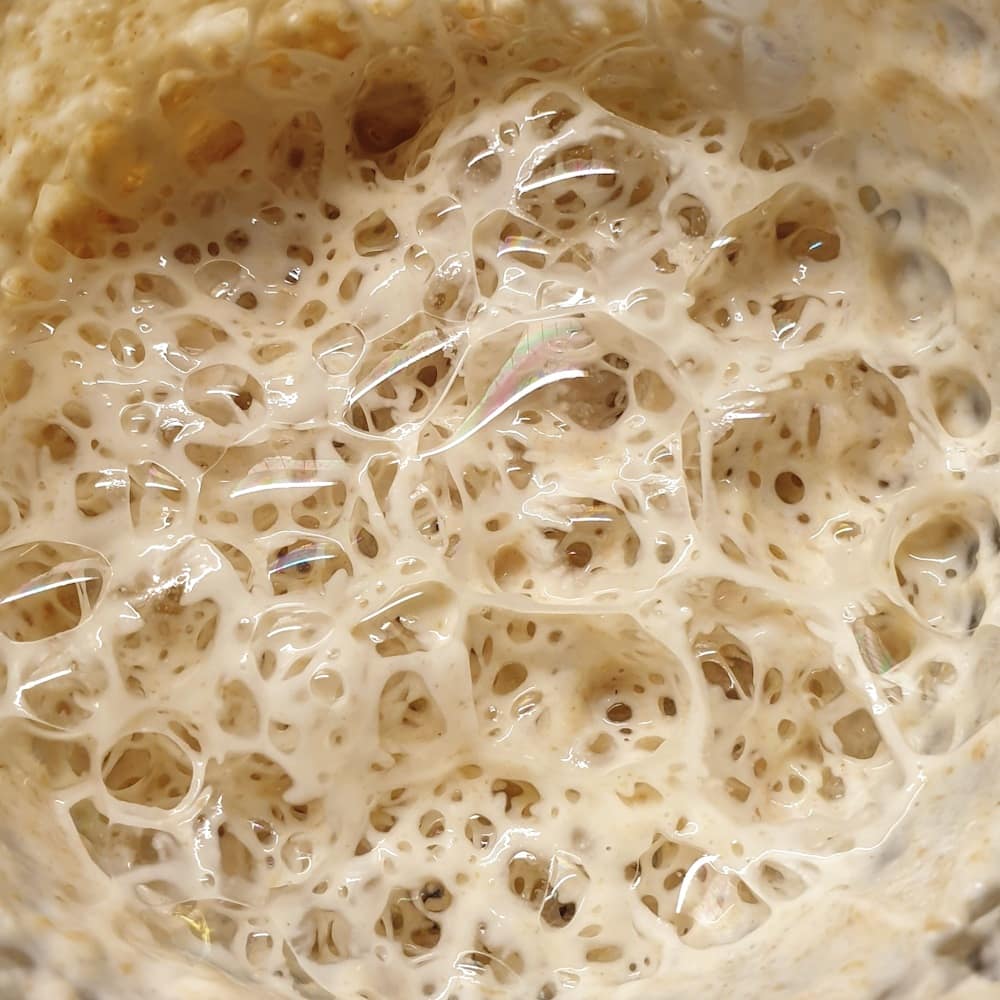
I’ve experimented with a lot of different materials and timings here and I find cane baskets a good alternative for letting air come in contact with the dough. Using a cloth of cotton or linen (or a mix) with a light weaving also helps (too tight and thick and the moist will stay at the surface). By storing it cold in the fridge the dough will be exposed longer and the surface will dry more.

Please note that how the dough then rises in the oven after the scoring could be dramatically affected by other variables then the cuts on the surface, such as fermentation, structure, tension, heat, steam and more (on danlarn.com I have an extensive 2-part scoring guide if you want to learn more).

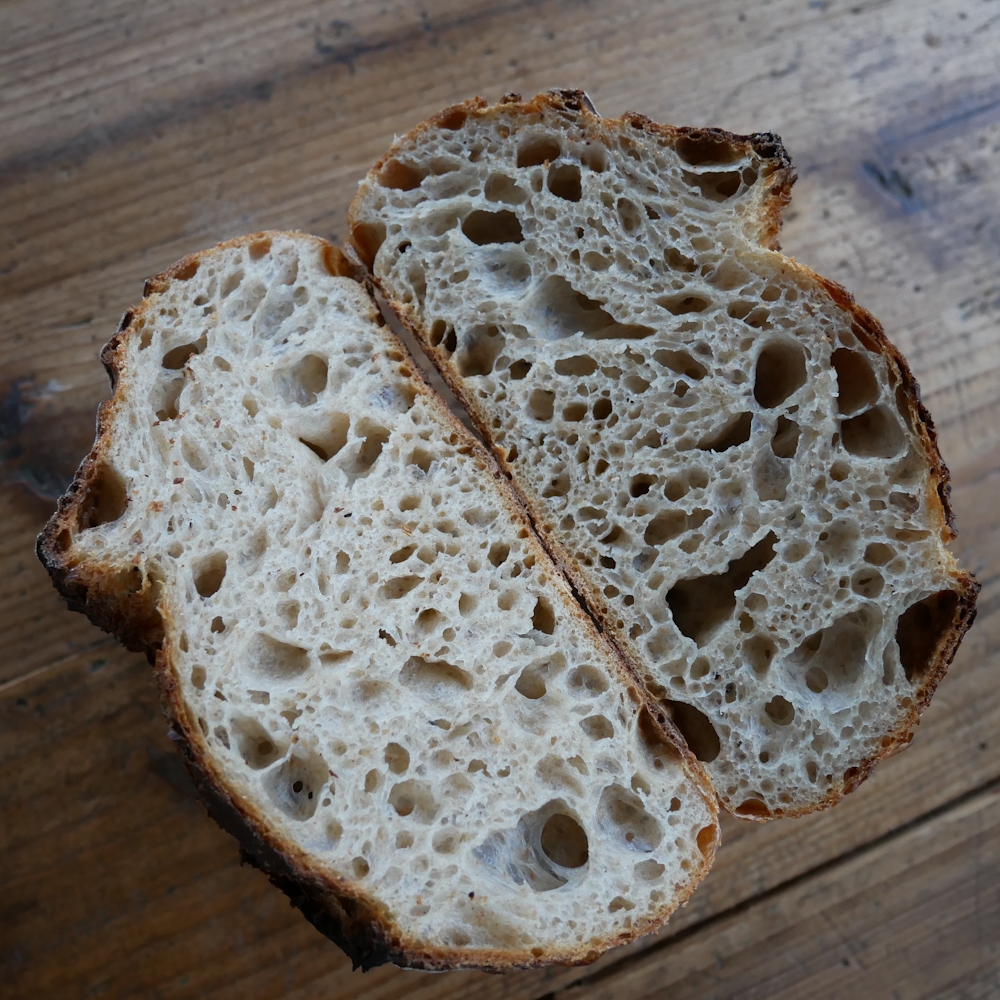
Let’s talk a little bit about the loaf featured in this video too. I would say that the surface could have been a bit drier, and that it would be better to score less if the goal was a higher rise. The jagged fallen leaf still turned out very nice if you ask me! Had this dough been stored in a sealed bag, it might have been too difficult to score cleanly.

I’ve basically been having a dough rising every day during the last years. Most often in a bowl or a box, and if not; in my thoughts.
Along with the coming week’s posts I will share 10 of the most valuable insights I’ve had that’s lead to more consistent result in baking high quality, beautiful goods from home (in no particular order).
Would love it if you comment or DM with questions, I always do my best to answer!

  • GUIDES

10 tips in 10 days: 3 – Pizza dough easy shaping

Daniel Larsson 14 May, 2019

Get that round shaped pizza with fluffy Cornicione (edges) easily by using an individual container for each dough ball.

By putting the shaped pizza dough ball in a round and very slightly oiled container, with lid, you will make the whole pizza process a delight! In my experience, this method will help you keep shape and gas. Something easily lost when lifting and separating proofed dough balls.

  • Just turn it upside down and let gravity do its thing (shake it lightly to help if you’re impatient). Oh, and in the video I’ve cut ahead to the release to spare you the shaking.
  • Let it land upon a pile of flour and put some more on top.
  • Pat it gently to open it up a little at a time to preserve its original round shape.
  • Lift it away from the pillow of white dust and dust it off lightly to lose some of the most excess flour, then put it on a cleaner surface. I like using a cutting board to reduce the cleaning time.

How you proceed from here Is up to you to make the pizza open up as evenly as possible. I’m currently practicing at the method in the video. Just feels good (once again working with gravity as my tool).

Also, the longer you’ve proofed the ball, and the more water and weaker flour you’re using, the easier will the ball open up into a pizza ball.

Today’s dough was made from 80% Caputo Tip 00 (Blue bag) and 20% strong wheat flour (Kvalitetsvete Berte). It usually turns out very slack, so I tend to put it in the fridge for some time before the shaping phase, to gain a little more control.

No matter what, the trick with the round container will make it easier and that’s what’s at focus here. 0,5-liter containers fit very well for dough balls up to 250g. I prefer around 220g (such as in this video) to make it bake faster.

The pictures shows two pizzas baked in a home electrical oven (on a steel). The first one after a 24-hour rise, the second after another 16 in the fridge.

I’ve basically been having a dough rising every day during the last years. Most often in a bowl or a box, and if not; in my thoughts.
Along with the coming week’s posts I will share 10 of the most valuable insights I’ve had that’s lead to more consistent result in baking high quality, beautiful goods from home (in no particular order).
Would love it if you comment or DM with questions, I always do my best to answer!

  • GUIDES

10 tips in 10 days: 2 – Consistent result from a consistent starter

Daniel Larsson 14 May, 2019

The Sourdough Starter! Expect consistency in result by treating your starter with consistency

Feed your starter at the same timings each day, with the same type of flour, at the same ratios and keep it at the same temperatures!

Your aim should be to have a starter that doubles in size over the same period of time. Adapting the variables above slightly over time to reach this when you notice the change in timings.

I myself am a living thing. I like food and I like to have regularity in the intake of energy. Breakfast, lunch and dinner at about the same time each day makes me happy. And some snacks in between of course. I enjoy eating food I’m used to and like. I like being moderately warm and I really don’t like being cold! All this is of course very natural to you and me as human beings.
And my greatest tip to keeping an active healthy starter is to give these things also to your millions of living yeast bacteria.
Do not cut corners over a long time. Of course, I could starve for a couple of days too, In a cooler. I’d survive that and function, yet I wouldn’t be very happy or productive. Your starter will probably function to leaven a dough too, with inconsistency in the feeding, yet the full potential wouldn’t be reached!

The 1st picture shows the crumb of yesterday’s sourdough loaf. 25% fresh milled organic Ölands wheat and the rest organic bread flour from my region (Limabacka kvarn). 74% hydration and a long healthy fermentation, starting with an active and happy starter!

The 2nd picture shows my starter in regress on a warm day, after peaking and having a high acidic load.

The 3rd picture shows my starters rise in progress from today (a couple of hours in).

I’ve basically been having a dough rising every day during the last years. Most often in a bowl or a box, and if not; in my thoughts.
Along with the coming week’s posts I will share 10 of the most valuable insights I’ve had that’s lead to more consistent result in baking high quality, beautiful goods from home (in no particular order).
Would love it if you comment or DM with questions, I always do my best to answer!

  • How I bake

Closing the process of the Sourdough Country loaf with some Analyzing

Daniel Larsson 13 August, 2017

Hey!

I’m wrapping the first version of my Country Style Sourdough Bread up with the Epilogue: Analyze.

Check it out here!

img_0225

  • How I bake

The Score & Bake (Stage 6) now added for the Country Sourdough process

Daniel Larsson 12 August, 2017

Hello there!

My favorite part of the baking process has now been added to the “How I Bake” section.
It’s the scoring and baking. The infusing of soul and unleashing of potential.

This stage points to a previous guide I’ve made on this subject (which is also regularly updated). It’s almost as extensive as the entire process itself so far so please don’t hesitate to give it a read!

Enjoy.

img_0035

  • How I bake

Stage 5 – Proofing the Country Sourdough

Daniel Larsson 11 August, 2017

Hello!

The time has come to let time do its work. A whole new stage now available under the “How I Bake” section.

Enjoy!

img_0033

  • How I bake

Shaping the Country Style Sourdough – Stage 4 now available!

Daniel Larsson 10 August, 2017

It’s time to get this dough divided and shaped into it’s final shape. Under the “How I Bake” section you will now find the fourth stage of this wonderful process (with videos of techniques included).

Enjoy!

img_0018

  • How I bake

Stage 3 – Bulk fermenting the Country Style Surdough

Daniel Larsson 9 August, 2017

Hey!

This stage is now live and it’s all about letting and helping the dough evolve. The full description and process so far is found right here. Happy reading!

img_0007


  • How I bake

Mixing! Stage 2 of the Country Style Sourdough Bread process

Daniel Larsson 8 August, 2017

It’s time to get messy!

The second stage is now added to the “How I Bake” section of this site and blog. In this text I’ll explore the use and characteristics of flour, water and salt. How these are mixed with each other and the leavening source, plus the use of additions to taste and texture.

This is the largest section with the most information with a lot of text and video to show you how I hand mix, so just click here and dig in!

img_9980


  • How I bake

Preparations (stage 1) of making the Country Style Sourdough Bread

Daniel Larsson 7 August, 2017

Hey!

It’s august 7th and it’s on!

The very first step of creating comes from the thought of it. The process for making this style of bread at home is now updated with it’s first stage – The preparations – where I’ll explore the importance of planning and the very first choice; The leavening source.

The following stages will be published over the coming week, so stay tuned.

Click here to find the process in its current shape, happy reading!

img_9962

Posts navigation

Previous 1 2 3 Next
Create a website or blog at WordPress.com
Bread by @danlarn
Create a website or blog at WordPress.com
  • Follow Following
    • Bread by @danlarn
    • Join 326 other followers
    • Already have a WordPress.com account? Log in now.
    • Bread by @danlarn
    • Customize
    • Follow Following
    • Sign up
    • Log in
    • Report this content
    • View site in Reader
    • Manage subscriptions
    • Collapse this bar
 

Loading Comments...